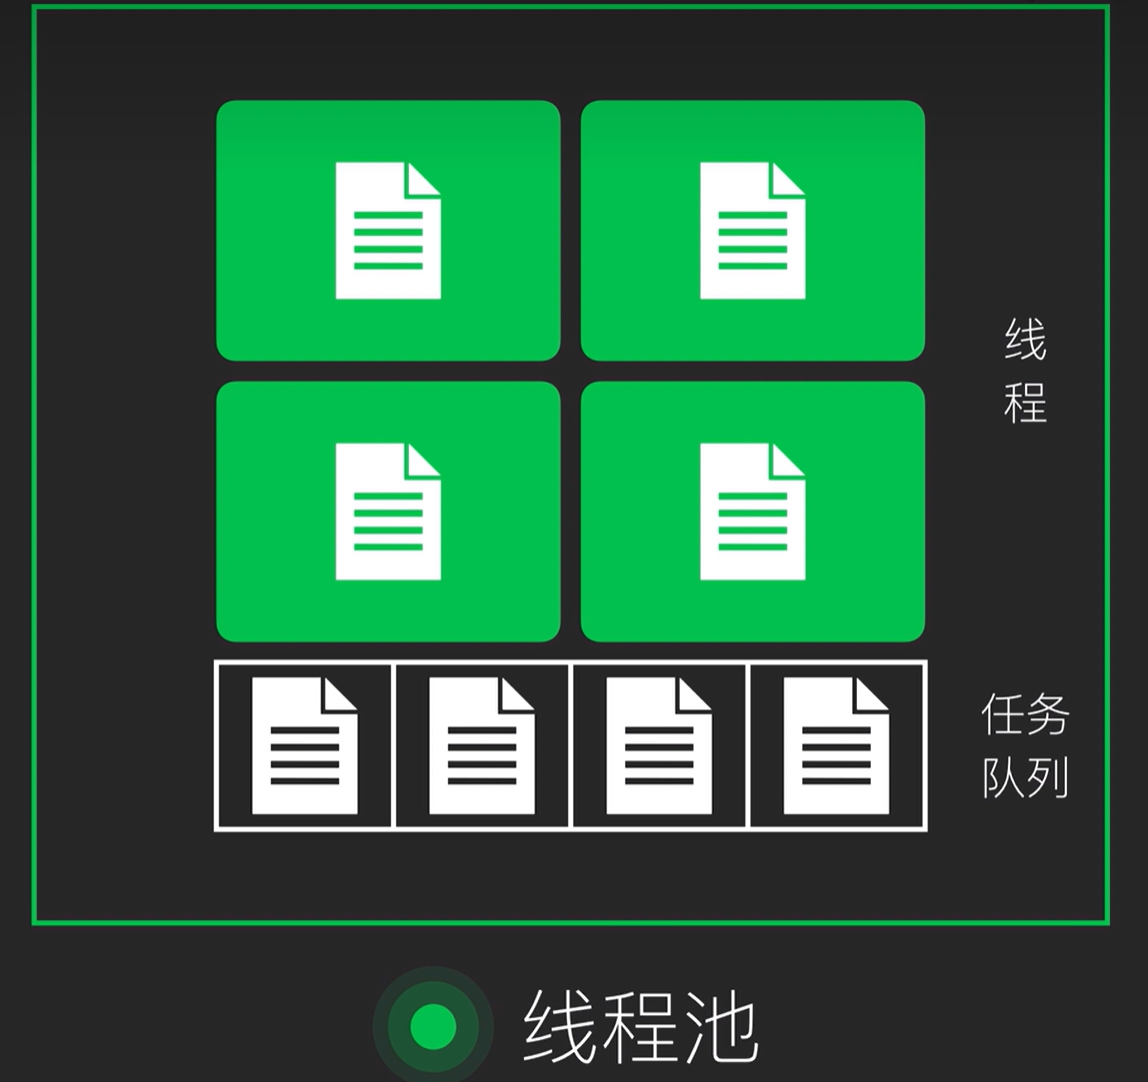
Java线程池从使用到原理 1.线程池的介绍 线程池是一种基于池化思想管理线程的工具,如果每次新任务到达都使用new Thread的方式创建新线程,那么频繁的创建和销毁线程资源是一笔昂贵的支出,并且我们也很难对所有线程统一进行管控,因此线程池便应运而生!线程池带来了三个方面的好处:
降低资源消耗:通过重复利用已创建的线程降低线程创建和销毁造成的消耗。提高响应速度:当有任务时,任务可以不需要等到线程创建就能立即执行。提高线程的可管理性:线程池可以统一的分配、调优和监控。
池化,顾名思义,是为了最大化收益并最小化风险,而将资源统一在一起管理的一种思想。在计算机领域中的表现为:统一管理IT资源,包括服务器、存储、和网络资源等等。通过共享资源,使用户在低投入中获益。除去线程池,还有其他比较典型的几种使用策略包括:
内存池(Memory Pooling):预先申请内存,提升申请内存速度,减少内存碎片。连接池(Connection Pooling):预先申请数据库连接,提升申请连接的速度,降低系统的开销。实例池(Object Pooling):循环使用对象,减少资源在初始化和释放时的昂贵损耗。
实际开发中,线程池用的非常多,一定要掌握!
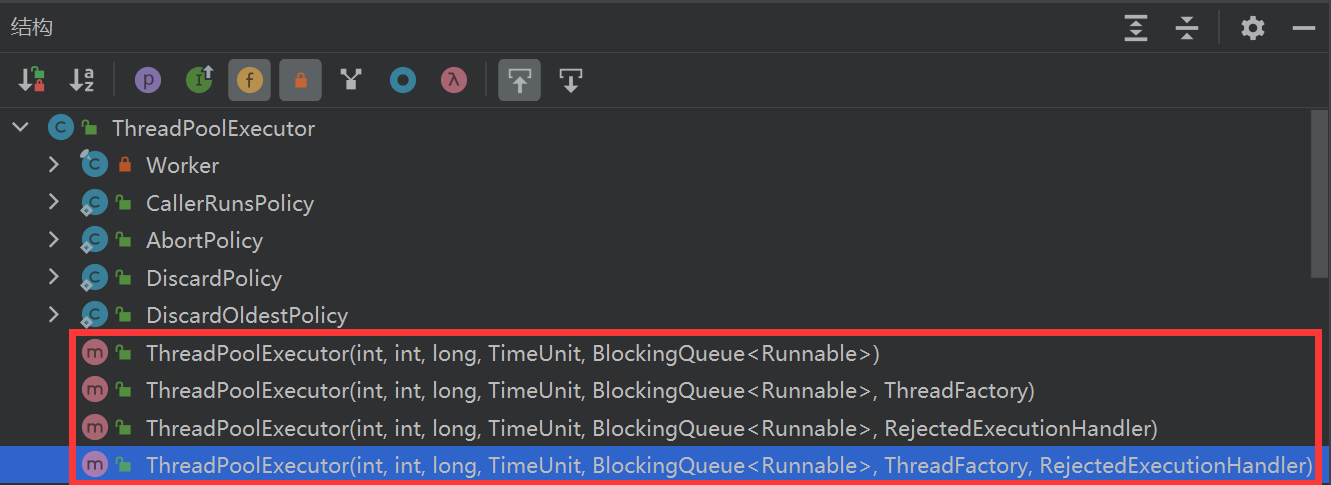
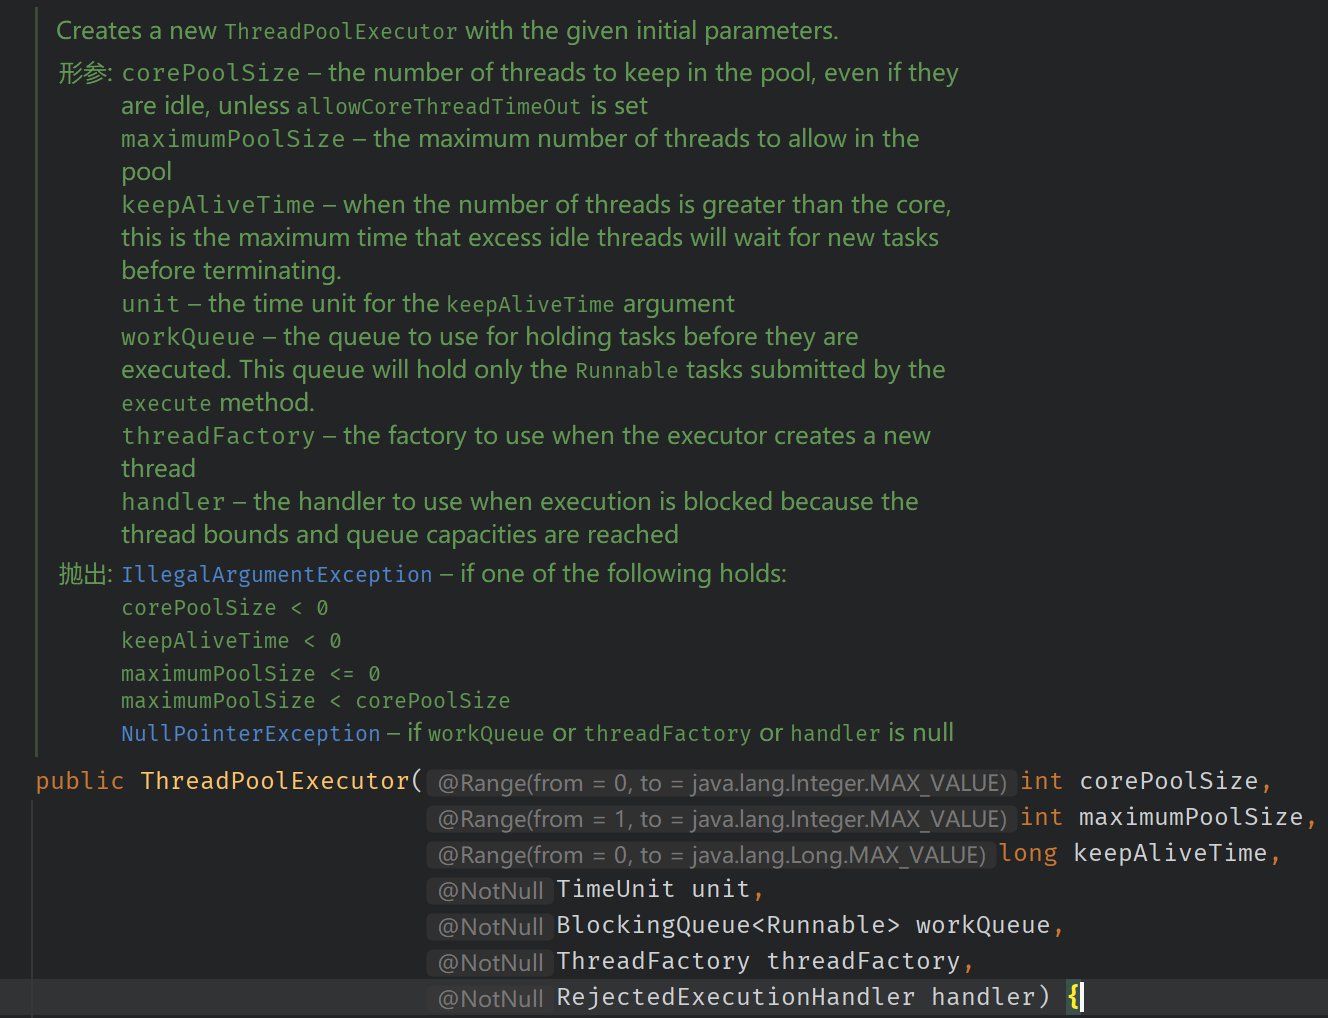
2.线程池的创建
我们使用原生的ThreadPoolExecutor的方式自定义创建线程池,这也是推荐的一种方式,首先定义线程工厂类,给线程池命名,有利于问题的定位:
1
2
3
4
5
6
7
8
9
10
11
public class CustomThreadFactory implements ThreadFactory { private AtomicLong threadNumber = new AtomicLong (1 ); @Override public Thread newThread (Runnable r) { Thread thread = new Thread (r); thread.setName("线程" + threadNumber.getAndIncrement() + "号" ); return thread; } }
接着,我们创建线程池并提交任务,其中每个task任务都是在内部打印了执行线程的名称:
1 2 3 4 5 6 7 8 9 10 11 12 Task task1 = new Task ();Task task2 = new Task ();Task task3 = new Task ();ThreadPoolExecutor threadPool = new ThreadPoolExecutor (10 ,25 ,0 ,TimeUnit.SECONDS,new LinkedBlockingQueue <>(),new CustomThreadFactory (),new ThreadPoolExecutor .AbortPolicy());threadPool.execute(task1); threadPool.execute(task2); threadPool.execute(task3); threadPool.shutdown();
线程池不允许使用Executors去创建,而是通过ThreadPoolExecutor的方式,这样的处理方式让写的同学更加明确线程池的运行规则,规避资源耗尽的风险。
1 2 3 4 5 6 7 8 9 10 11 12 13 14 15 16 17 18 19 20 21 22 23 24 public static ExecutorService newFixedThreadPool (int nThreads) { return new ThreadPoolExecutor (nThreads, nThreads, 0L , TimeUnit.MILLISECONDS, new LinkedBlockingQueue <Runnable>()); } public static ExecutorService newSingleThreadExecutor () { return new FinalizableDelegatedExecutorService (new ThreadPoolExecutor (1 , 1 , 0L , TimeUnit.MILLISECONDS, new LinkedBlockingQueue <Runnable>())); } public static ExecutorService newCachedThreadPool () { return new ThreadPoolExecutor (0 , Integer.MAX_VALUE, 60L , TimeUnit.SECONDS, new SynchronousQueue <Runnable>()); }
3.任务的提交方式
execute任务提交的方式前面已经提到过了,下面分别演示三种submit的任务提交方式:
1 2 3 4 5 6 7 8 9 10 11 12 13 14 15 16 17 Task task = new Task ();ExecutorService threadPool = Executors.newSingleThreadExecutor();Future<?> future = threadPool.submit(task); try { Object result = future.get(); System.out.println(result); } catch (InterruptedException | ExecutionException e) { e.printStackTrace(); } finally { threadPool.shutdown(); }
1 2 3 4 5 6 7 8 9 10 11 12 13 14 15 16 17 Task task = new Task ();ExecutorService threadPool = Executors.newSingleThreadExecutor();Future<String> future = threadPool.submit(task, "任务结果" ); try { String result = future.get(); System.out.println(result); } catch (InterruptedException | ExecutionException e) { e.printStackTrace(); } finally { threadPool.shutdown(); }
1
2
3
4
5
6
7
8
9
10
11
12
13
14
15
16
17
18
19
20
21
22
23
24
25
26
27
28
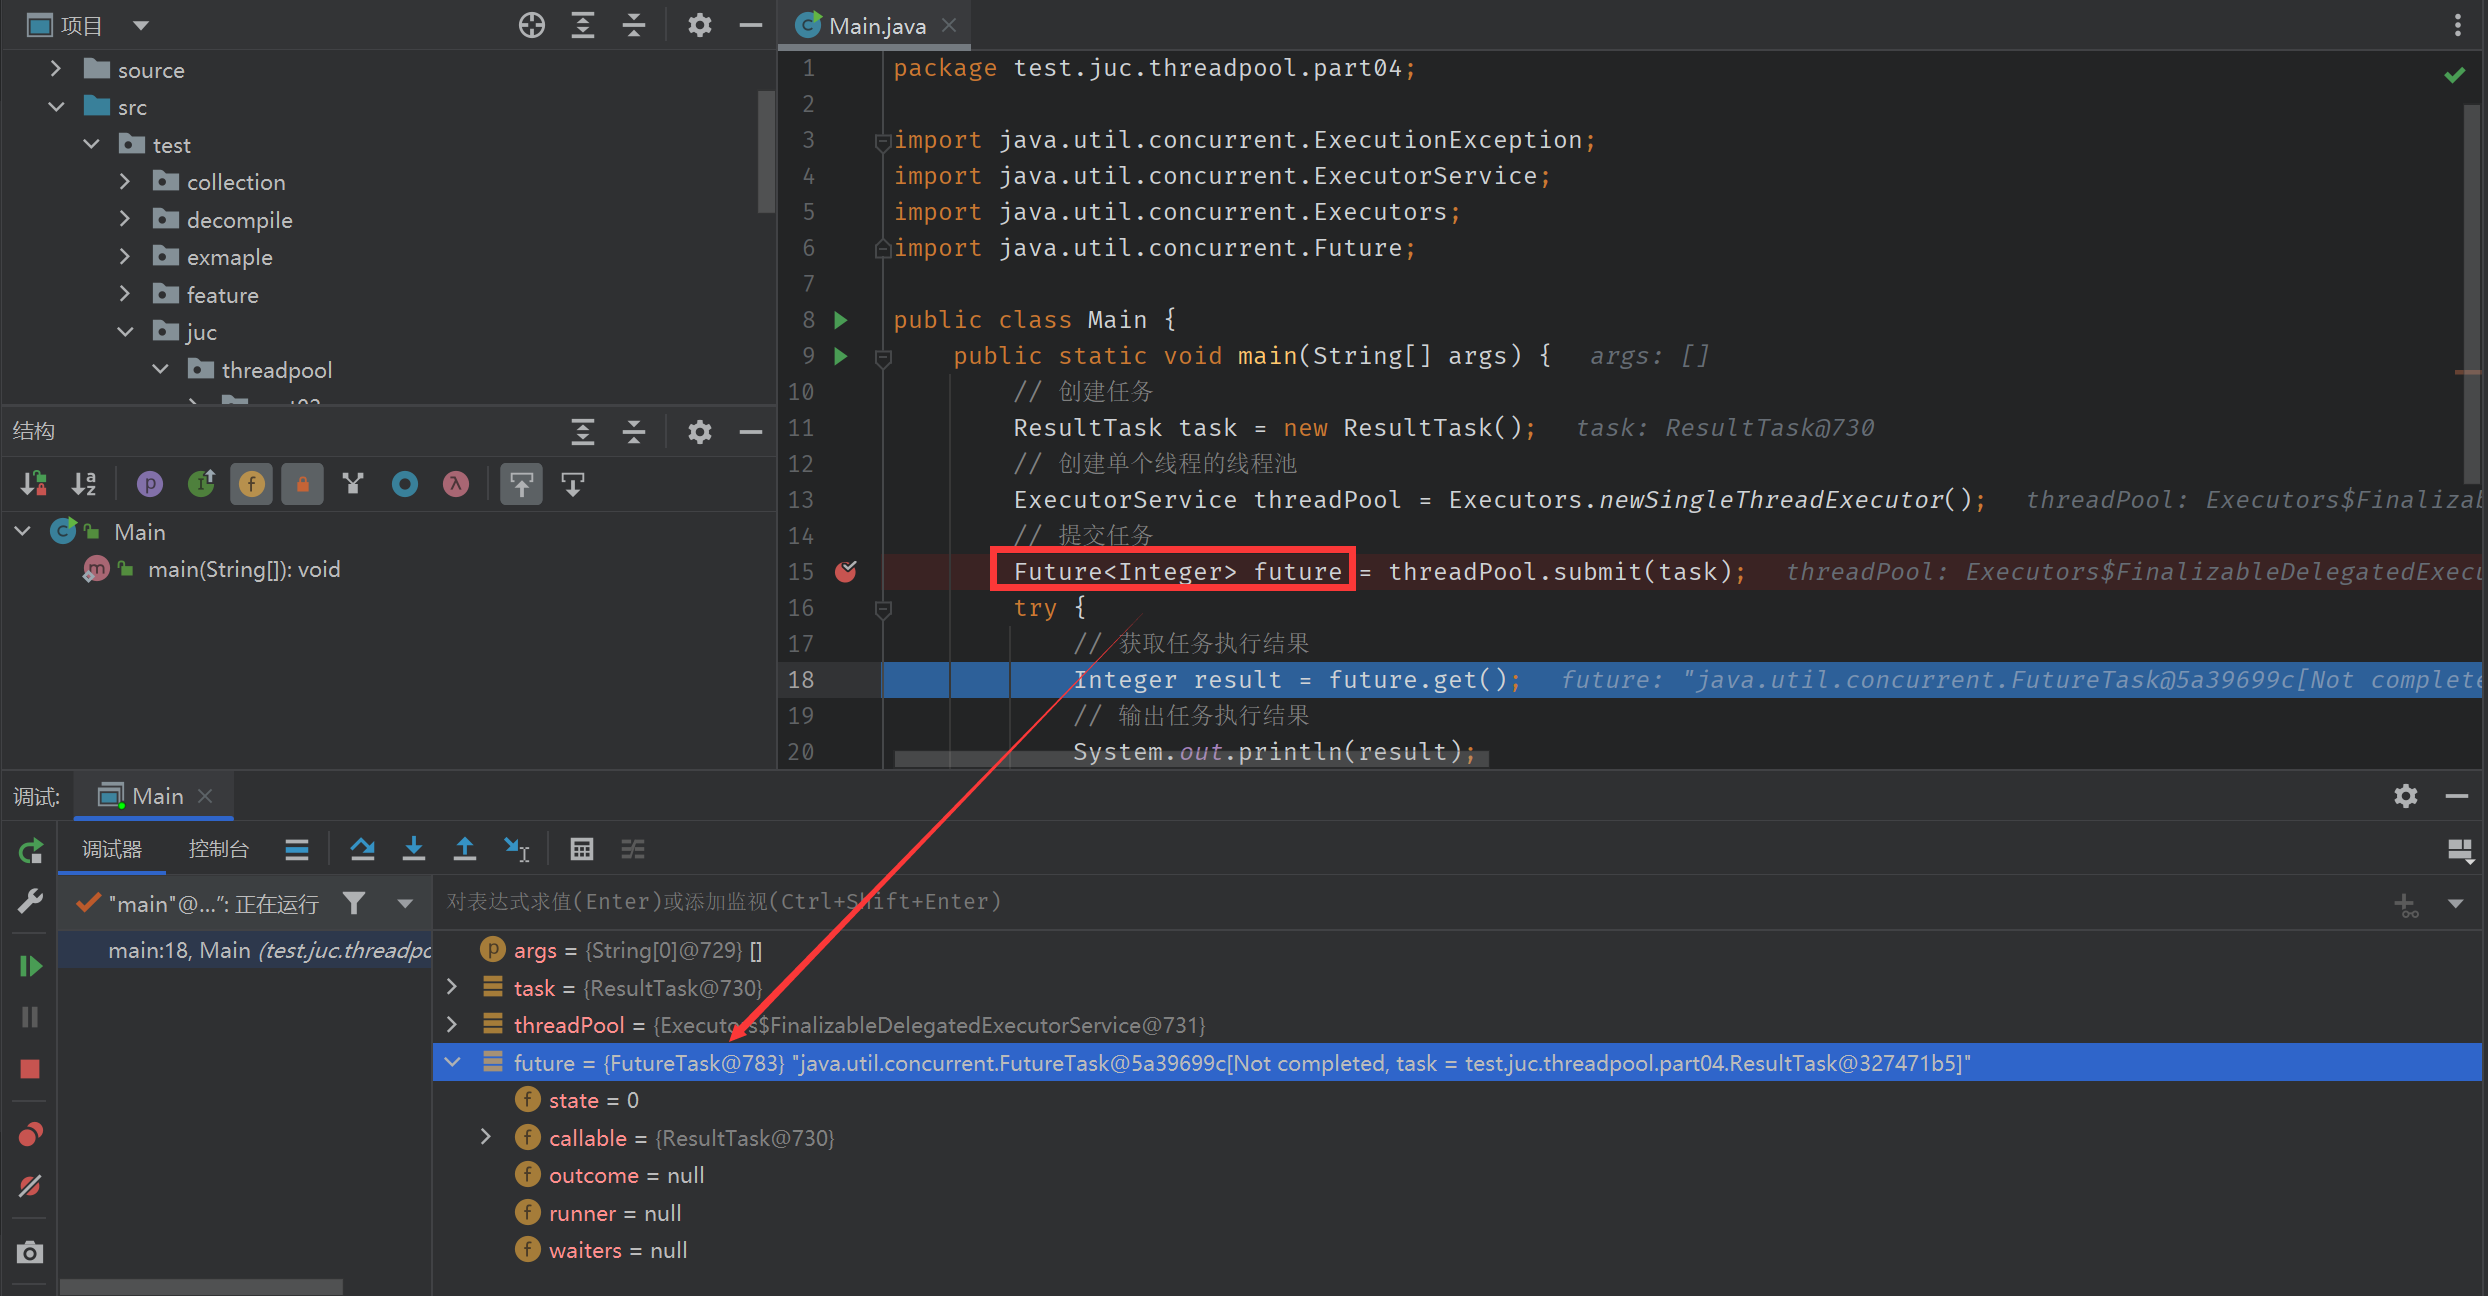
public class ResultTask implements Callable <Integer> { @Override public Integer call () throws Exception { return 1 + 1 ; } } public class Main { public static void main (String[] args) { ResultTask task = new ResultTask (); ExecutorService threadPool = Executors.newSingleThreadExecutor(); Future<Integer> future = threadPool.submit(task); try { Integer result = future.get(); System.out.println(result); } catch (InterruptedException | ExecutionException e) { e.printStackTrace(); } finally { threadPool.shutdown(); } } }
其实,准确的说sumbit方法返回的Future对象是FutureTask类型的,至少在我的OpenJDK 11的环境中是如此。
4.任务结果的获取
下面演示的是超时的情况,指定时间内获取不到结果会抛出TimeOutException:
1
2
3
4
5
6
7
8
9
10
11
12
13
14
15
16
17
18
19
20
21
22
23
24
25
26
27
28
29
30
31
public class ResultTask implements Callable <Integer> { @Override public Integer call () throws Exception { TimeUnit.SECONDS.sleep(3 ); return 1 + 1 ; } } public class Main { public static void main (String[] args) { ResultTask task = new ResultTask (); ExecutorService threadPool = Executors.newSingleThreadExecutor(); Future<Integer> future = threadPool.submit(task); try { Integer result = future.get(1 , TimeUnit.SECONDS); System.out.println(result); } catch (InterruptedException | ExecutionException | TimeoutException e) { e.printStackTrace(); } finally { threadPool.shutdown(); } } }
下面演示future的cancel方法的使用,注意体会cancel(true)和cancel(false)的区别:
1
2
3
4
5
6
7
8
9
10
11
12
13
14
15
16
17
18
19
20
21
22
23
24
25
26
27
28
29
30
31
32
33
34
35
36
public class LoopTask implements Callable <String> { @Override public String call () throws Exception { while (!Thread.interrupted()) { System.out.println("call" ); } System.out.println("执行结束" ); return "执行结束" ; } } public class Main { public static void main (String[] args) throws InterruptedException { LoopTask task = new LoopTask (); ExecutorService threadPool = Executors.newSingleThreadExecutor(); Future<String> future = threadPool.submit(task); TimeUnit.SECONDS.sleep(1 ); future.cancel(true ); System.out.println(future.isCancelled()); try { String result = future.get(1 , TimeUnit.SECONDS); System.out.println(result); } catch (InterruptedException | ExecutionException | TimeoutException e) { e.printStackTrace(); } finally { threadPool.shutdown(); } } }
future.cancel(true)底层会中断任务的执行线程,如果任务是响应中断的则会退出,否则将继续执行。
1
2
3
4
5
6
7
8
9
10
11
12
13
14
15
16
17
18
19
20
21
22
23
24
25
public class Main { public static void main (String[] args) throws InterruptedException { LoopTask task = new LoopTask (); ExecutorService threadPool = Executors.newSingleThreadExecutor(); Future<String> future = threadPool.submit(task); TimeUnit.SECONDS.sleep(1 ); future.cancel(false ); System.out.println(future.isCancelled()); try { String result = future.get(1 , TimeUnit.SECONDS); System.out.println(result); } catch (InterruptedException | ExecutionException | TimeoutException e) { e.printStackTrace(); } finally { threadPool.shutdown(); } } }
future.cancel(false)底层不会中断任务的执行线程,任务会继续执行。
5.任务拒绝策略
1
2
3
4
5
6
7
8
9
10
11
12
13
14
15
16
17
18
19
20
21
22
23
24
25
26
27
28
29
30
31
32
33
34
35
36
37
38
39
40
41
42
43
44
45
46
public static class DiscardPolicy implements RejectedExecutionHandler { public DiscardPolicy () { } public void rejectedExecution (Runnable r, ThreadPoolExecutor e) { } } public class Task implements Runnable { private final int index; public Task (int index) { this .index = index; } @Override public void run () { System.out.println(Thread.currentThread().getName() + ":" + index); } } public class Main { public static void main (String[] args) { ThreadPoolExecutor threadPool = new ThreadPoolExecutor (1 , 1 , 0L , TimeUnit.SECONDS, new LinkedBlockingQueue <>(1 ), new ThreadPoolExecutor .DiscardPolicy()); try { threadPool.execute(new Task (1 )); threadPool.execute(new Task (2 )); threadPool.execute(new Task (3 )); threadPool.execute(new Task (4 )); } catch (RejectedExecutionException e) { e.printStackTrace(); } finally { threadPool.shutdown(); } } }
当线程池中的线程数达到最大线程数且阻塞队列已满时,DiscardPolicy任务拒绝策略会直接丢弃到来的新任务。
1
2
3
4
5
6
7
8
9
10
11
12
13
14
15
16
17
18
19
20
21
22
23
24
25
26
27
28
29
30
31
32
33
34
35
36
37
public static class CallerRunsPolicy implements RejectedExecutionHandler { public CallerRunsPolicy () { } public void rejectedExecution (Runnable r, ThreadPoolExecutor e) { if (!e.isShutdown()) { r.run(); } } } public class Main { public static void main (String[] args) { ThreadPoolExecutor threadPool = new ThreadPoolExecutor (1 , 1 , 0L , TimeUnit.SECONDS, new LinkedBlockingQueue <>(1 ), new ThreadPoolExecutor .CallerRunsPolicy()); try { threadPool.execute(new Task (1 )); threadPool.execute(new Task (2 )); threadPool.execute(new Task (3 )); threadPool.execute(new Task (4 )); } catch (RejectedExecutionException e) { e.printStackTrace(); } finally { threadPool.shutdown(); } } }
当线程池中的线程数达到最大线程数且阻塞队列已满时,CallerRunsPolicy任务拒绝策略会在调用方线程中直接执行任务。
1
2
3
4
5
6
7
8
9
10
11
12
13
14
15
16
17
18
19
20
21
22
23
24
25
26
27
28
29
30
31
32
33
34
35
36
37
public static class DiscardOldestPolicy implements RejectedExecutionHandler { public DiscardOldestPolicy () { } public void rejectedExecution (Runnable r, ThreadPoolExecutor e) { if (!e.isShutdown()) { e.getQueue().poll(); e.execute(r); } } } public class Main { public static void main (String[] args) { ThreadPoolExecutor threadPool = new ThreadPoolExecutor (1 , 1 , 0L , TimeUnit.SECONDS, new LinkedBlockingQueue <>(1 ), new ThreadPoolExecutor .DiscardOldestPolicy()); try { threadPool.execute(new Task (1 )); threadPool.execute(new Task (2 )); threadPool.execute(new Task (3 )); threadPool.execute(new Task (4 )); } catch (RejectedExecutionException e) { e.printStackTrace(); } finally { threadPool.shutdown(); } } }
当线程池中的线程数达到最大线程数且阻塞队列已满时,DiscardOldestPolicy任务拒绝策略会丢弃最旧的任务,优先考虑新任务。
1
2
3
4
5
6
7
8
9
10
11
12
13
14
15
16
17
18
19
20
21
22
23
24
25
26
27
28
29
30
31
32
33
34
35
36
37
public static class AbortPolicy implements RejectedExecutionHandler { public AbortPolicy () { } public void rejectedExecution (Runnable r, ThreadPoolExecutor e) { throw new RejectedExecutionException ("Task " + r.toString() + " rejected from " + e.toString()); } } public class Main { public static void main (String[] args) { ThreadPoolExecutor threadPool = new ThreadPoolExecutor (1 , 1 , 0L , TimeUnit.SECONDS, new LinkedBlockingQueue <>(1 ), new ThreadPoolExecutor .AbortPolicy()); try { threadPool.execute(new Task (1 )); threadPool.execute(new Task (2 )); threadPool.execute(new Task (3 )); threadPool.execute(new Task (4 )); } catch (RejectedExecutionException e) { e.printStackTrace(); } finally { threadPool.shutdown(); } } }
当线程池中的线程数达到最大线程数且阻塞队列已满时,AbortPolicy任务拒绝策略会直接抛出异常RejectedExecutionException。
6.线程池的关闭 6.1shutdown
1
2
3
4
5
6
7
8
9
10
11
12
13
14
15
16
17
18
19
public class Main { public static void main (String[] args) { ThreadPoolExecutor threadPool = new ThreadPoolExecutor (1 , 1 , 0L , TimeUnit.SECONDS, new LinkedBlockingQueue <>(1 ), new ThreadPoolExecutor .AbortPolicy()); try { threadPool.execute(new Task (1 )); threadPool.execute(new Task (2 )); } catch (RejectedExecutionException e) { e.printStackTrace(); } finally { threadPool.shutdown(); threadPool.execute(new Task (3 )); } } }
6.2shutdownNow
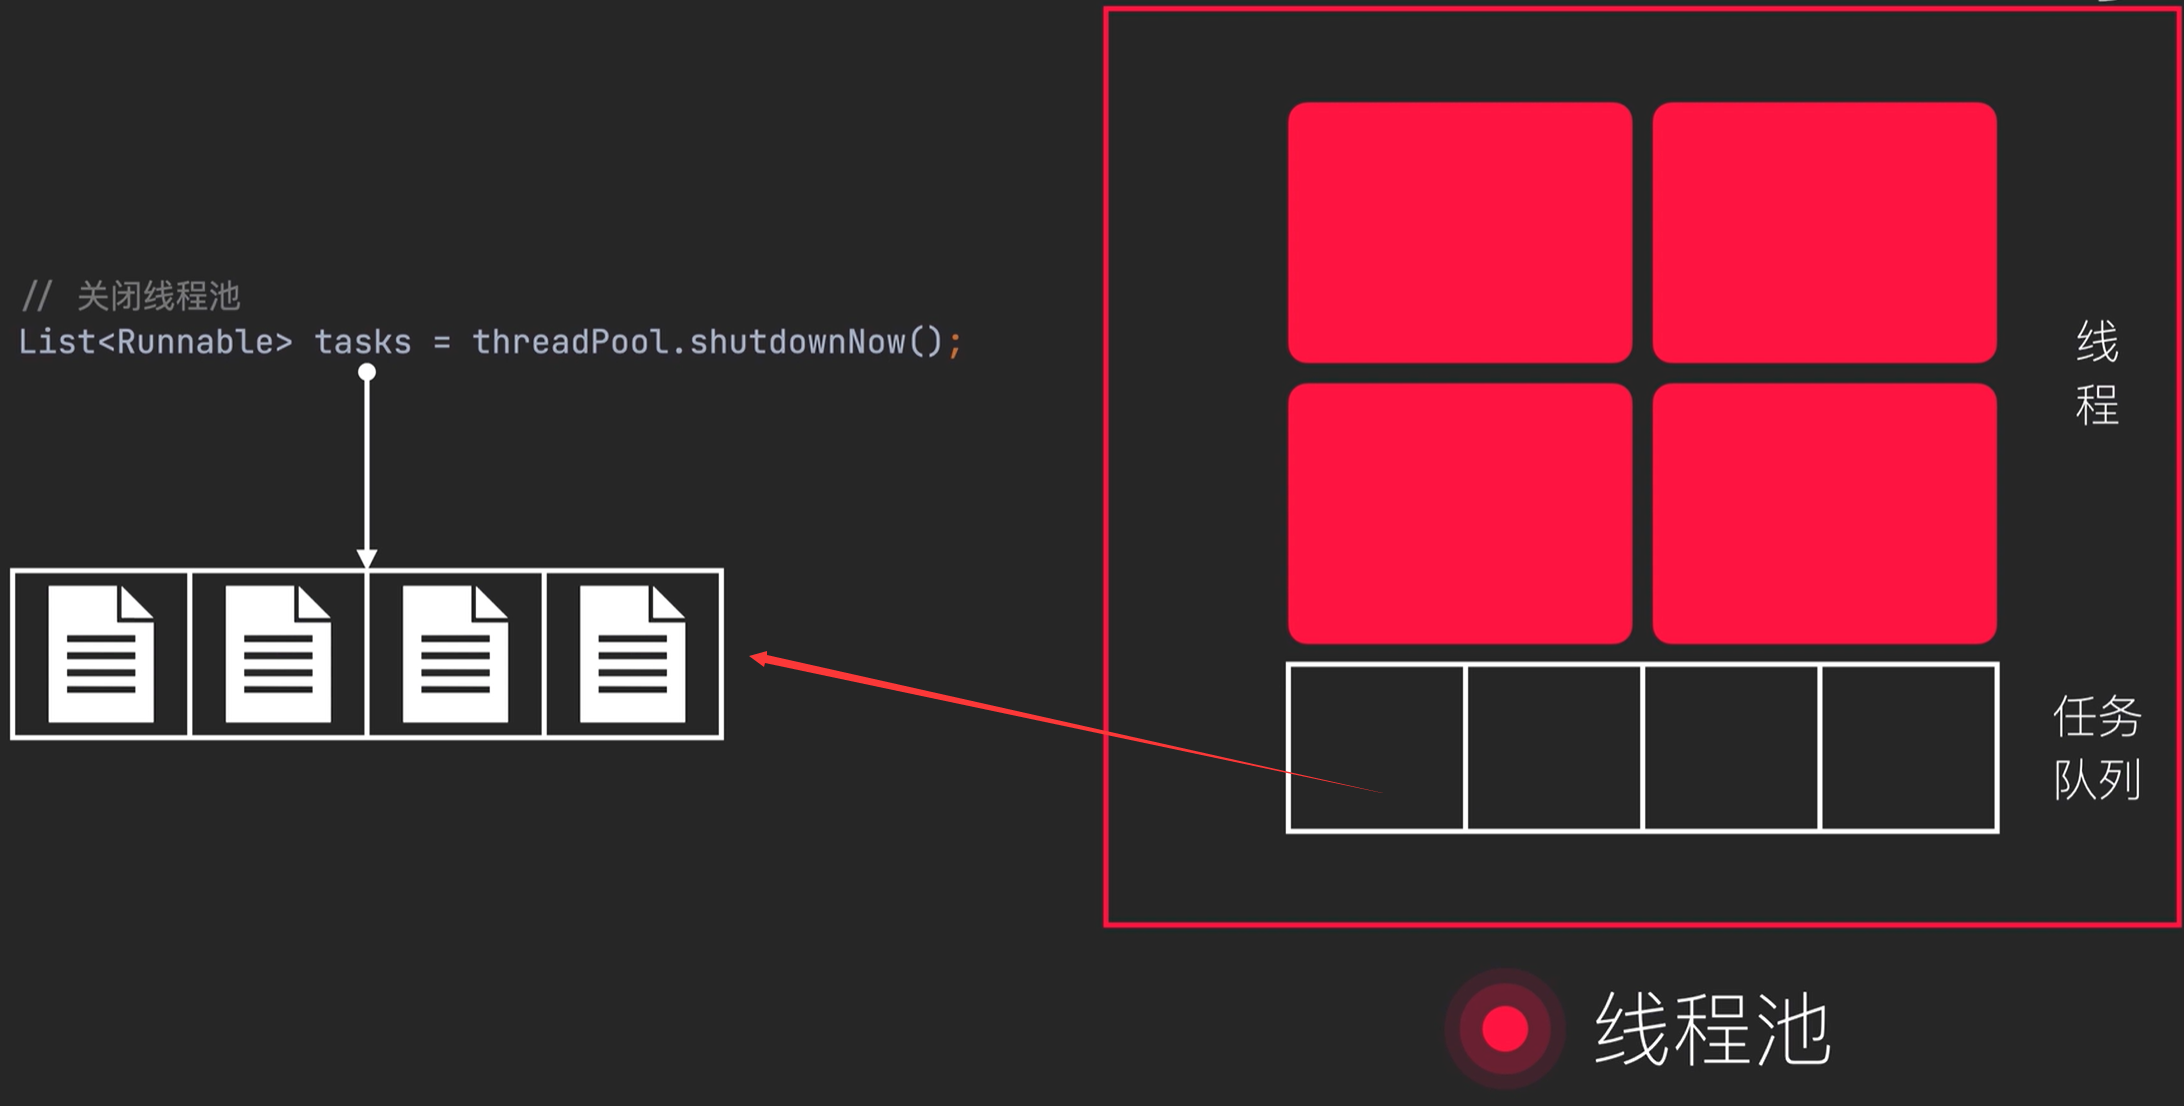
执行线程池的shutdownNow后的示意图:
此时新任务到达不再接受,线程池中的所有执行线程都会被中断,任务队列中的任务全部返回给调用方自行处理。
1
2
3
4
5
6
7
8
9
10
11
12
13
14
15
16
public class Main { public static void main (String[] args) { ExecutorService threadPool = Executors.newSingleThreadExecutor(); threadPool.execute(new Task (1 )); threadPool.execute(new Task (2 )); threadPool.execute(new Task (3 )); List<Runnable> tasks = threadPool.shutdownNow(); for (Runnable task : tasks) { task.run(); } } }
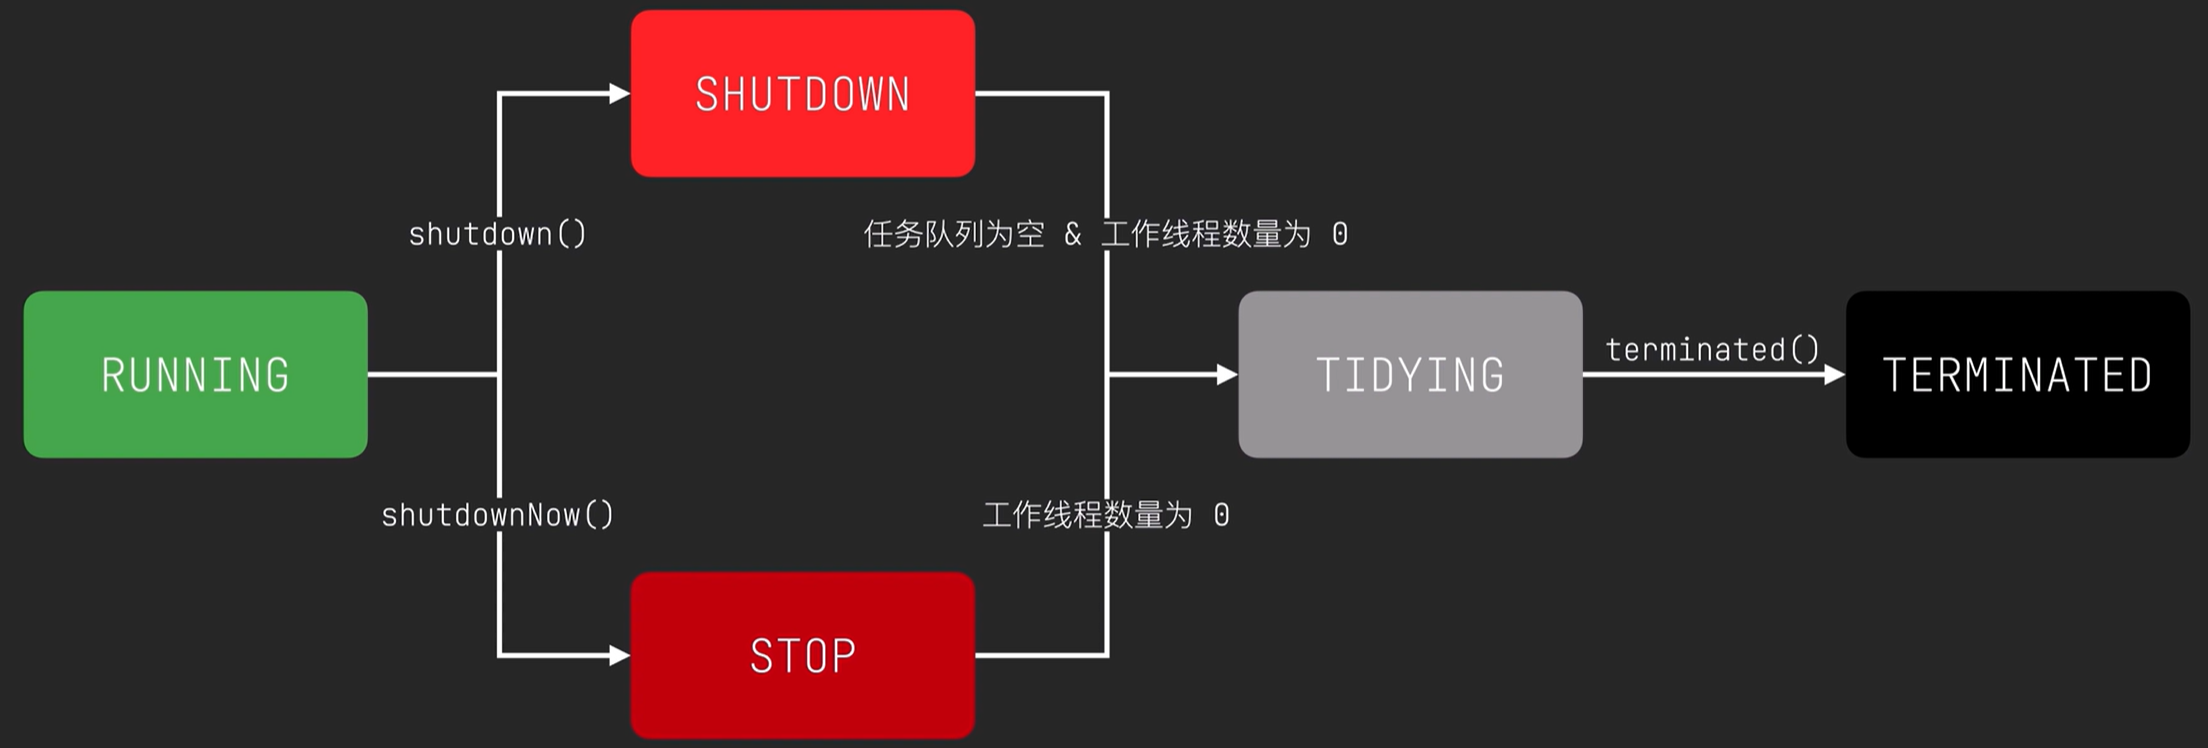
7.线程池状态及生命周期
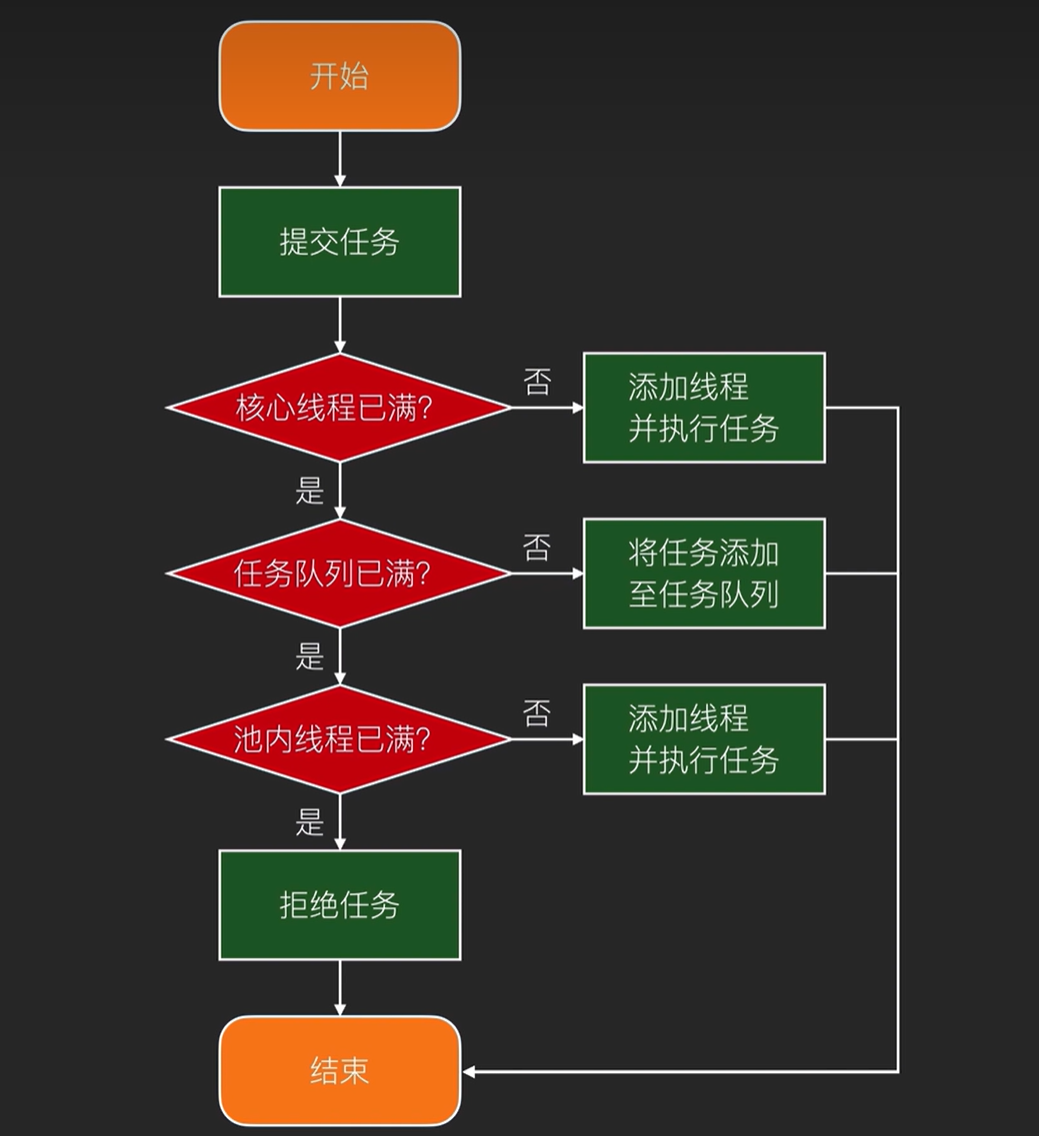
8.线程池任务执行流程 1 2 3 4 5 6 7 8 9 10 11 12 13 14 15 16 17 18 19 20 public Future<?> submit(Runnable task) { if (task == null ) throw new NullPointerException (); RunnableFuture<Void> ftask = newTaskFor(task, null ); execute(ftask); return ftask; } public <T> Future<T> submit (Runnable task, T result) { if (task == null ) throw new NullPointerException (); RunnableFuture<T> ftask = newTaskFor(task, result); execute(ftask); return ftask; } public <T> Future<T> submit (Callable<T> task) { if (task == null ) throw new NullPointerException (); RunnableFuture<T> ftask = newTaskFor(task); execute(ftask); return ftask; }
任务的submit提交方式其实最终还是交给了ThreadPoolExecutor的execute方法,因此我们关注最重要的execute方法:
1
2
3
4
5
6
7
8
9
10
11
12
13
14
15
16
17
18
19
20
public void execute (Runnable command) { if (command == null ) throw new NullPointerException (); int c = ctl.get(); if (workerCountOf(c) < corePoolSize) { if (addWorker(command, true )) return ; c = ctl.get(); } if (isRunning(c) && workQueue.offer(command)) { int recheck = ctl.get(); if (!isRunning(recheck) && remove(command)) reject(command); else if (workerCountOf(recheck) == 0 ) addWorker(null , false ); } else if (!addWorker(command, false )) reject(command); }
9.线程池的监控
1 2 3 4 5 6 7 8 9 10 11 12 13 14 15 16 17 18 19 20 21 22 23 24 25 26 27 28 29 30 31 32 33 34 35 36 37 38 39 40 41 42 43 44 45 46 47 48 49 50 51 52 53 54 55 56 57 58 59 60 61 62 63 64 65 66 67 68 69 70 71 72 73 74 75 76 77 78 79 80 81 82 83 84 85 86 87 88 89 90 public class Task implements Runnable { private int timeout; public Task (int timeout) { this .timeout = timeout; } @Override public void run () { try { Thread.sleep(timeout * 1000L ); } catch (InterruptedException e) { e.printStackTrace(); } } } public class MonitorThreadPool extends ThreadPoolExecutor { public MonitorThreadPool (int corePoolSize, int maximumPoolSize, long keepAliveTime, TimeUnit unit, BlockingQueue<Runnable> workQueue) { super (corePoolSize, maximumPoolSize, keepAliveTime, unit, workQueue); } @Override protected void beforeExecute (Thread t, Runnable r) { monitor(); } @Override protected void afterExecute (Runnable r, Throwable t) { } @Override protected void terminated () { } public void monitor () { System.out.print("正在工作的线程数:" + getActiveCount() + "\t" ); System.out.print("当前存在的线程数:" + getPoolSize() + "\t" ); System.out.print("历史最大的线程数:" + getLargestPoolSize() + "\t" ); System.out.print("已提交的任务数:" + getTaskCount() + "\t" ); System.out.print("已完成的任务数:" + getCompletedTaskCount() + "\t" ); System.out.print("队列中的任务数:" + getQueue().size() + "\n" ); } } public class Main { public static void main (String[] args) { MonitorThreadPool threadPool = new MonitorThreadPool (1 , 3 , 0 , TimeUnit.SECONDS, new LinkedBlockingQueue <>(2 )); try { for (int i = 5 ; i > 0 ; i--) { Task task = new Task (i); threadPool.submit(task); Thread.sleep(50 ); } Thread.sleep(6000 ); threadPool.monitor(); } catch (InterruptedException e) { e.printStackTrace(); } finally { threadPool.shutdown(); } } }
测试结果显示,优先创建核心线程,其次加入阻塞队列,最后是创建非核心线程,最终超时时间一过,非核心线程就会销毁。
10.线程池参数配置
推荐why神的这篇文章:如何设置线程池参数?美团给出了一个让面试官虎躯一震的回答
对于线程池参数到底如何设置的问题美团的那篇文章提供了一个很好的思路和解决方案,展现的是一个大而全的东西。
但是,对于实施起来的细节就没有具体的展示了。
所以文本斗胆,站在巨人的肩膀上对细节处进行一些补充说明。
现有的解决方案的痛点。
动态更新的工作原理是什么?
动态设置的注意点有哪些?
如何动态指定队列长度?
这个过程中涉及到的面试题有哪些?
10.1现有的解决方案的痛点 我们再看一下美团的那篇文章调研的现有解决方案列表:
第一个就是我们上面说的,和实际业务场景有所偏离。
第二个设置为 2*CPU 核心数,有点像是把任务都当做 IO 密集型去处理了。而且一个项目里面一般来说不止一个自定义线程池吧?比如有专门处理数据上送的线程池,有专门处理查询请求的线程池,这样去做一个简单的线程隔离。但是如果都用这样的参数配置的话,显然是不合理的。
第三个不说了,理想状态。流量是不可能这么均衡的,就拿美团来说,下午3,4点的流量,能和 12 点左右午饭时的流量比吗?
基于上面的这些解决方案的痛点,美团给出了动态化配置的解决方案。
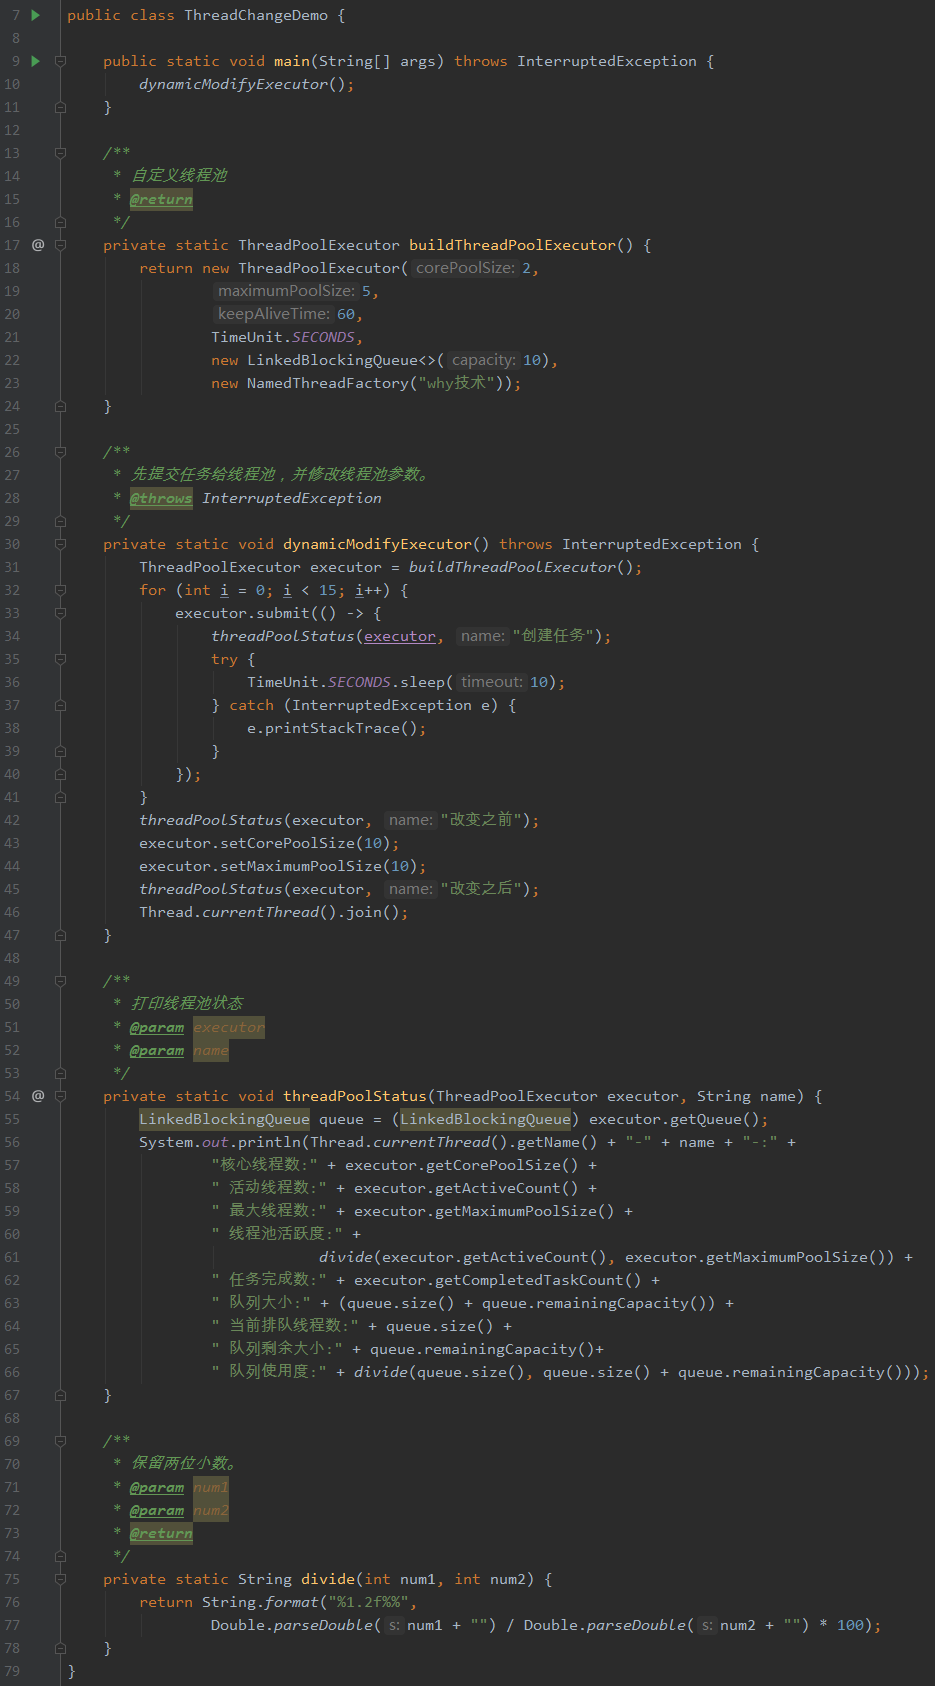
10.2动态更新的工作原理 先来一个动态更新的代码示例:
上面的程序就是自定义了一个核心线程数为 2,最大线程数为 5,队列长度为 10 的线程池。然后给它塞 15 个耗时 10 秒的任务,直接让它 5 个最大线程都在工作,队列长度 10 个都塞满。当前的情况下,队列里面的 10 个,前 5 个在 10 秒后会被执行,后 5 个在 20 秒后会被执行。再加上最大线程数正在执行的 5 个,15 个任务全部执行完全需要 3 个 10 秒即 30 秒的时间。
这个时候,如果我们把核心线程数和最大线程数都修改为 10。那么 10 个任务会直接被 10 个最大线程数接管,10 秒就会被处理完成。剩下的 5 个任务在队列里面,在 10 秒后被执行完成。所以,15 个任务执行完成需要 2 个 10 秒即 20 秒的时间处理完成了。
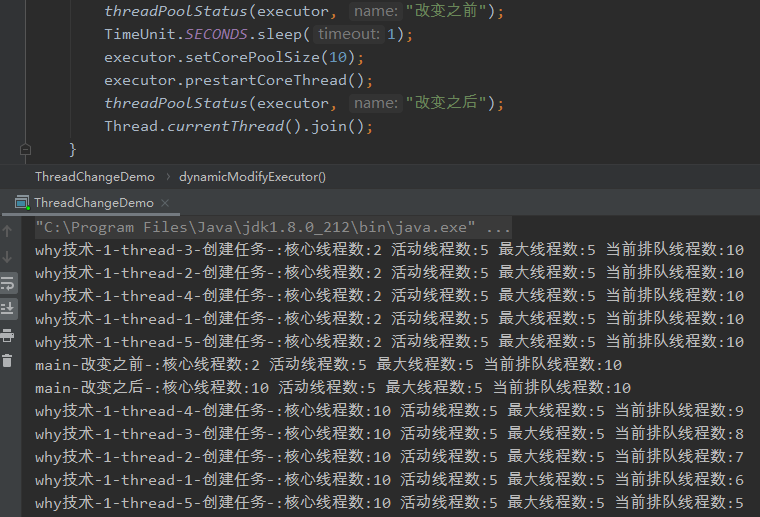
看一下上面程序的打印日志:
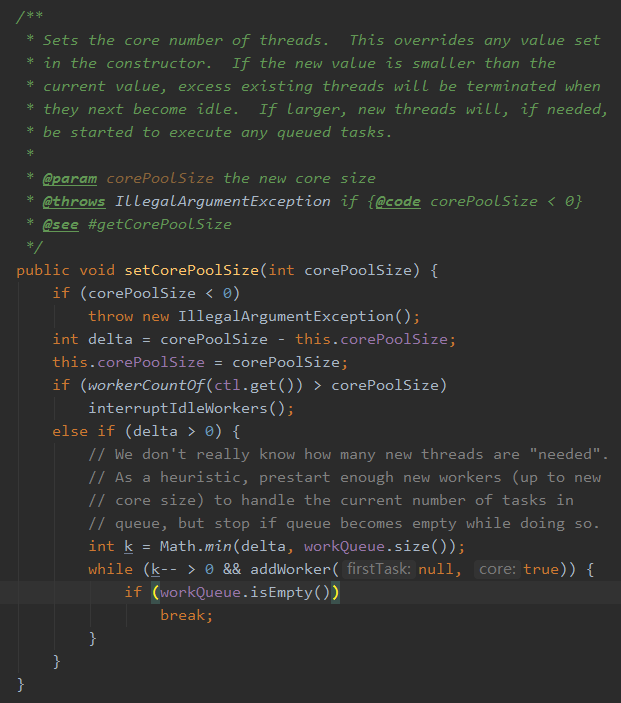
效果实现了,我先看一下原理是什么。先看 setCorePoolSize 方法:
这个方法在美团的文章中也说明了:
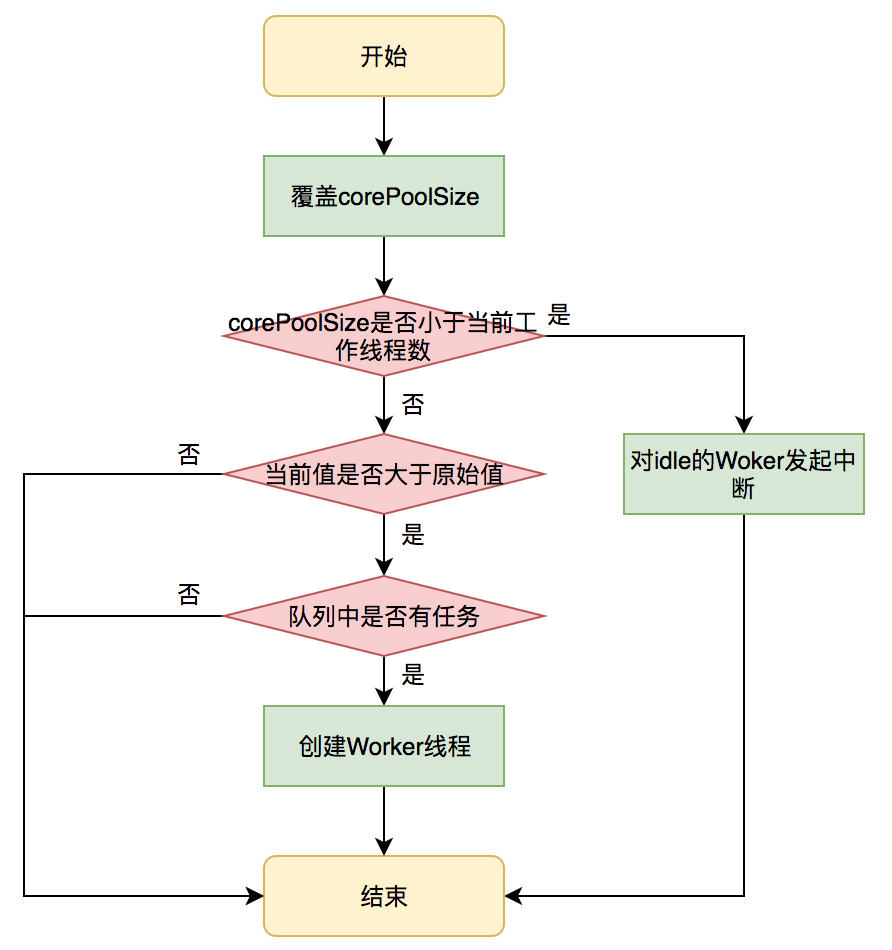
在运行期线程池使用方调用此方法设置corePoolSize之后,线程池会直接覆盖原来的corePoolSize值,并且基于当前值和原始值的比较结果采取不同的处理策略。
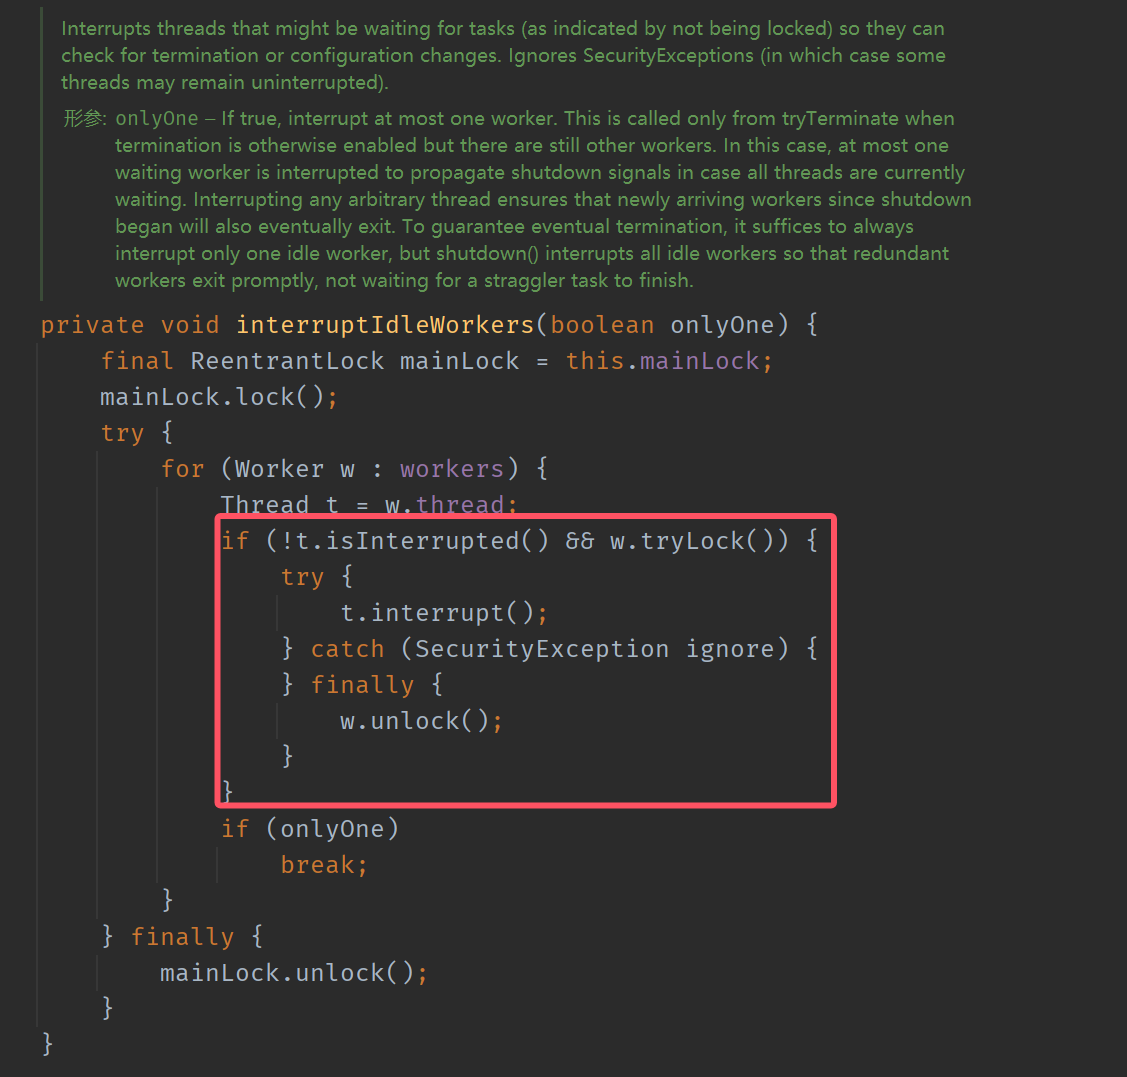
对于当前值小于当前工作线程数的情况,说明有多余的worker线程,此时会向当前idle的worker线程发起中断请求以实现回收,多余的worker在下次idle的时候也会被回收;
对于当前值大于原始值且当前队列中有待执行任务,则线程池会创建新的worker线程来执行队列任务,setCorePoolSize具体流程如下:
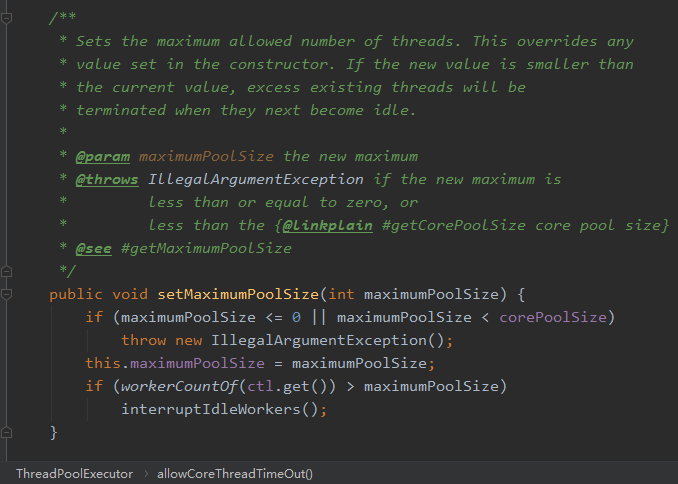
接着看 setMaximumPoolSize 源码:
这个地方就很简单了,逻辑不太复杂。
首先是参数合法性校验。
然后用传递进来的值,覆盖原来的值。
判断工作线程是否是大于最大线程数,如果大于,则对空闲线程发起中断请求。
经过前面两个方法的分析,我们知道了最大线程数和核心线程数可以动态调整。
10.3动态设置的注意点 调整的时候可能会出现核心线程数调整之后无效的情况,比如下面这种:
改变之前的核心线程数是 2,最大线程数为 5,我们动态修改核心线程数为 10。但是从日志还是可以看出,修改之后核心线程数确实变成了 10,但活跃线程数还是为 5。而且我调用了 prestartCoreThread 方法,该方法见名知意,你也知道是启动所有的核心线程数,所有不存在线程没有创建的问题。
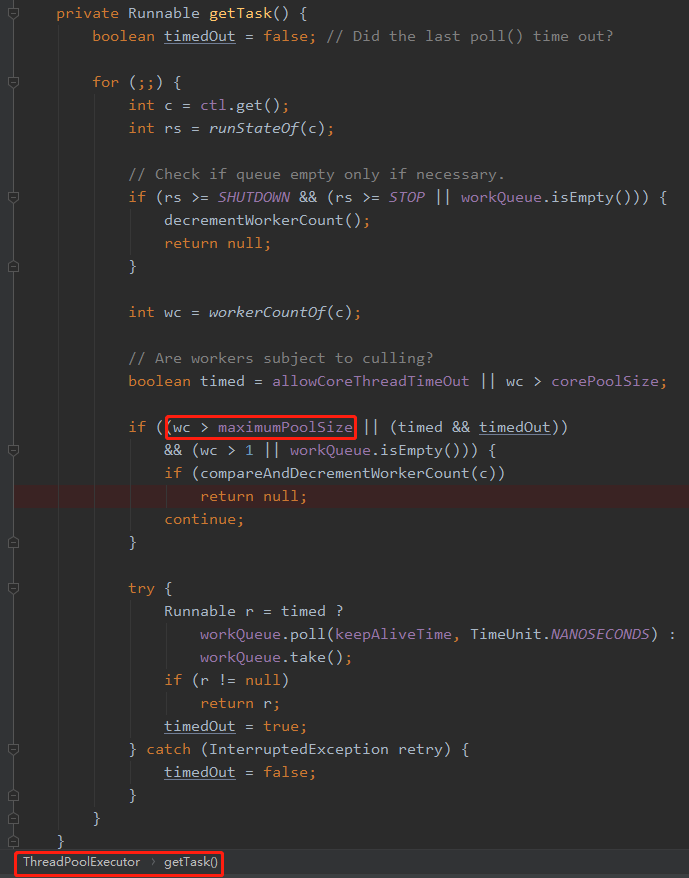
这是为什么呢?源码之下无秘密 ,我带你去看一眼:java.util.concurrent.ThreadPoolExecutor#getTask
在这个方法中我们可以看到,如果工作线程数大于最大线程数,则对工作线程数量进行减一操作,然后返回 null。
所以,这个地方的实际流程应该是:
创建新的工作线程 worker,然后工作线程数进行加一操作。
运行创建的工作线程 worker,开始获取任务 task。
工作线程数量大于最大线程数,对工作线程数进行减一操作。
返回 null,即没有获取到 task。
清理该任务,流程结束。
这样一加一减,所以真正在执行任务的工作线程数的数量一直没有发生变化,也就是最大线程数。
怎么解决这个问题呢?答案已经呼之欲出啦。
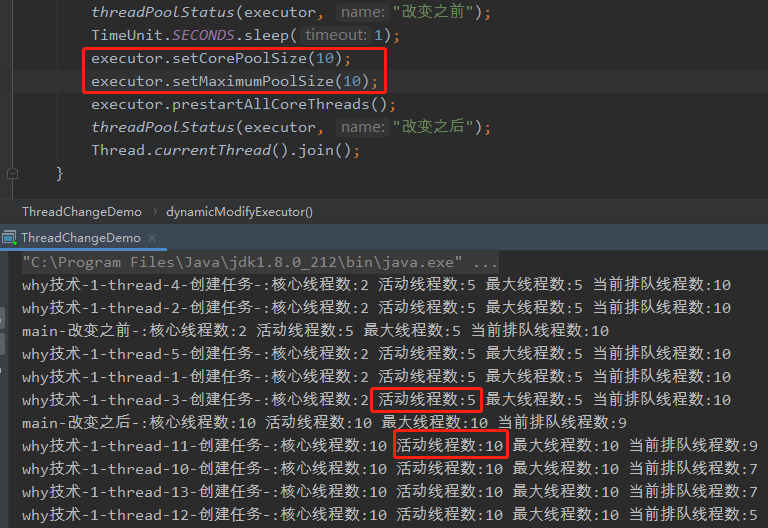
设置核心线程数的时候,同时设置最大线程数即可。其实可以把二者设置为相同的值:
这样,活动线程数就能正常提高了。有的小伙伴就会问了:如果调整之后把活动线程数设置的值太大了,岂不是业务低峰期我们还需要人工把值调的小一点?当 allowCoreThreadTimeOut 参数设置为 true 的时候,核心线程在空闲了 keepAliveTime 的时间后也会被回收的,相当于线程池自动给你动态修改了。
11.ScheduledThreadPoolExecutor详解 ScheduledThreadPoolExecutor继承自ThreadPoolExecutor。它主要用来在给定的延迟之后运行任务,或者定期执行任务。ScheduledThreadPoolExecutor的功能与Timer类似,但ScheduledThreadPoolExecutor功能更强大、更灵活。Timer对应的是单个后台线程,而ScheduledThreadPoolExecutor可以在构造函数中指定多个对应的后台线程数。
DelayQueue是一个无界队列,所以ThreadPoolExecutor的maximumPoolSize在ScheduledThreadPoolExecutor中没有什么意义(设置maximumPoolSize的大小没有什么效果)。ScheduledThreadPoolExecutor的执行主要分为两大部分。
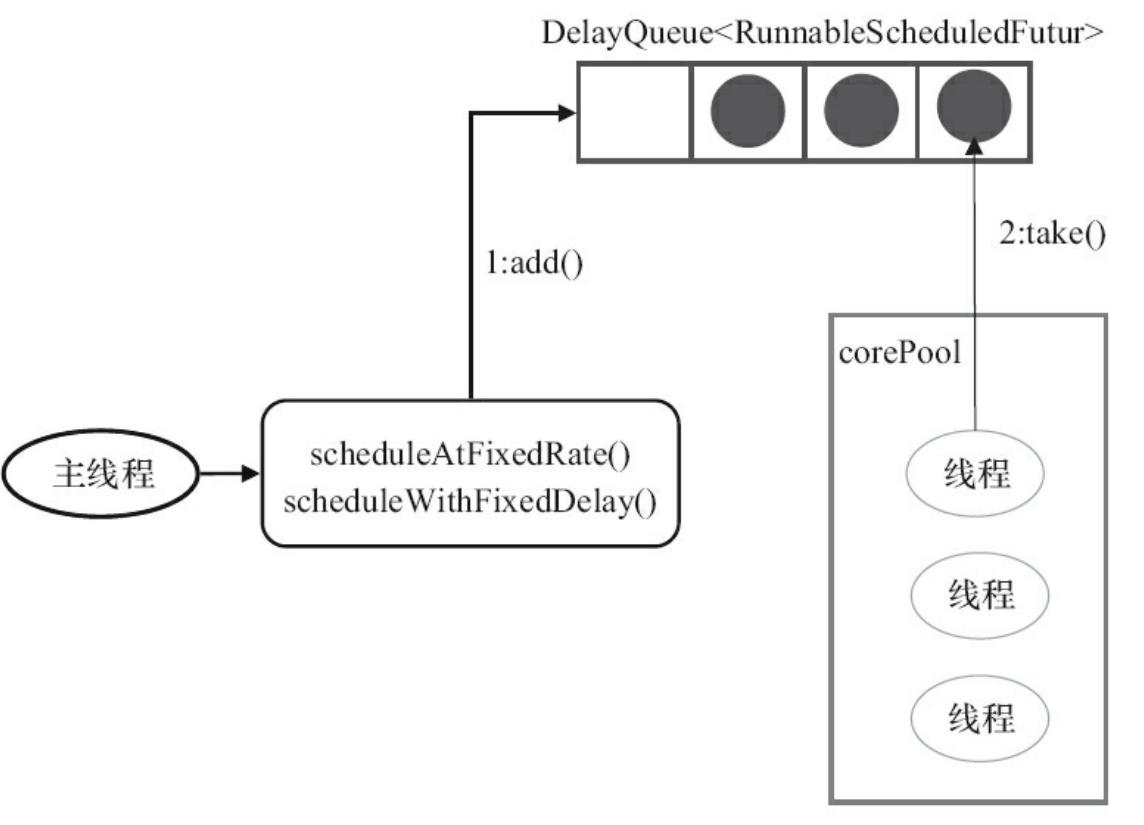
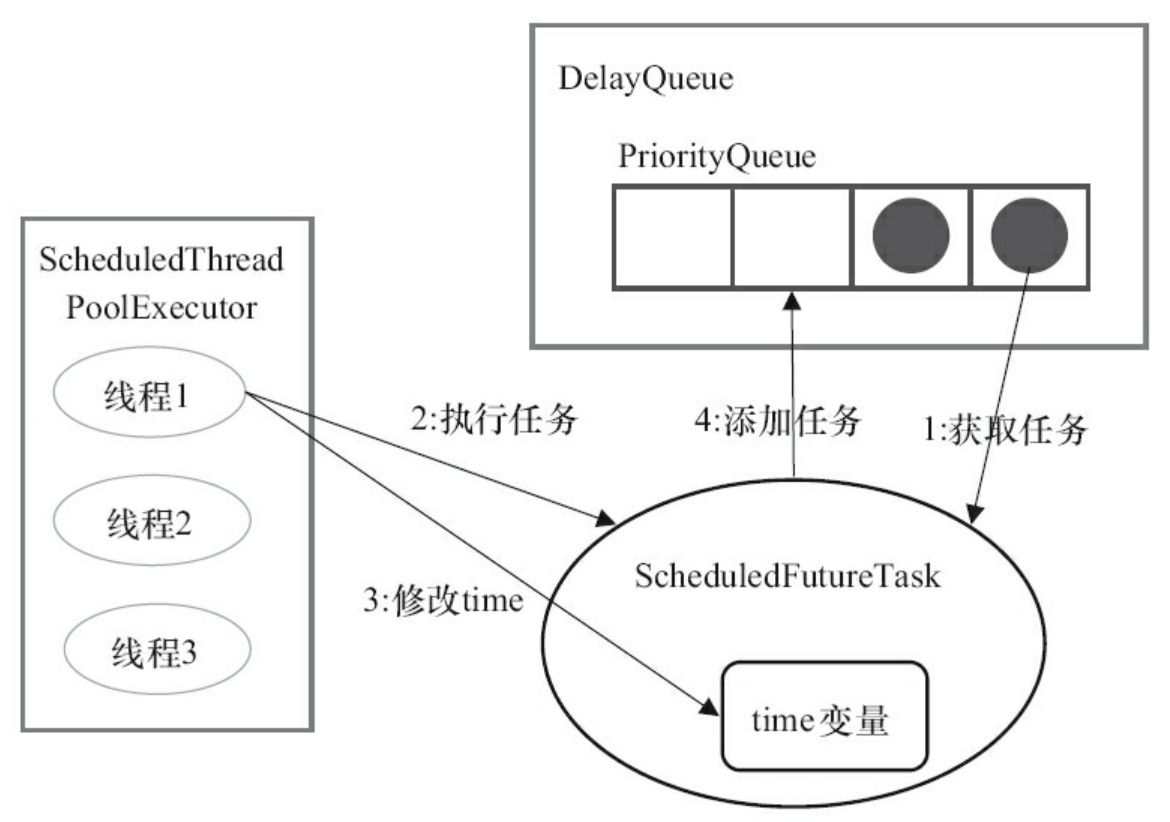
当调用ScheduledThreadPoolExecutor的scheduleAtFixedRate()方法或者scheduleWithFixedDelay()方法时,会向ScheduledThreadPoolExecutor的DelayQueue添加一个实现了RunnableScheduledFutur接口的ScheduledFutureTask。
线程池中的线程从DelayQueue中获取ScheduledFutureTask,然后执行任务。
ScheduledThreadPoolExecutor为了实现周期性的执行任务,对ThreadPoolExecutor做了如下的修改。
使用DelayQueue作为任务队列。
获取任务的方式不同(后文会说明)。
执行周期任务后,增加了额外的处理(后文会说明)。
前面我们提到过,ScheduledThreadPoolExecutor会把待调度的任务(ScheduledFutureTask)放到一个DelayQueue中。ScheduledFutureTask主要包含3个成员变量,如下。
long型成员变量time,表示这个任务将要被执行的具体时间。
long型成员变量sequenceNumber,表示这个任务被添加到ScheduledThreadPoolExecutor中的序号。
long型成员变量period,表示任务执行的间隔周期。
DelayQueue封装了一个PriorityQueue,这个PriorityQueue会对队列中的ScheduledFutureTask进行排序。排序时,time小的排在前面(时间早的任务将被先执行)。如果两个ScheduledFutureTask的time相同,就比较sequenceNumber,sequenceNumber小的排在前面(也就是说,如果两个任务的执行时间相同,那么先提交的任务将被先执行)。
首先,让我们看看ScheduledThreadPoolExecutor中的线程执行周期任务的过程。下图是ScheduledThreadPoolExecutor中的线程1执行某个周期任务的4个步骤。
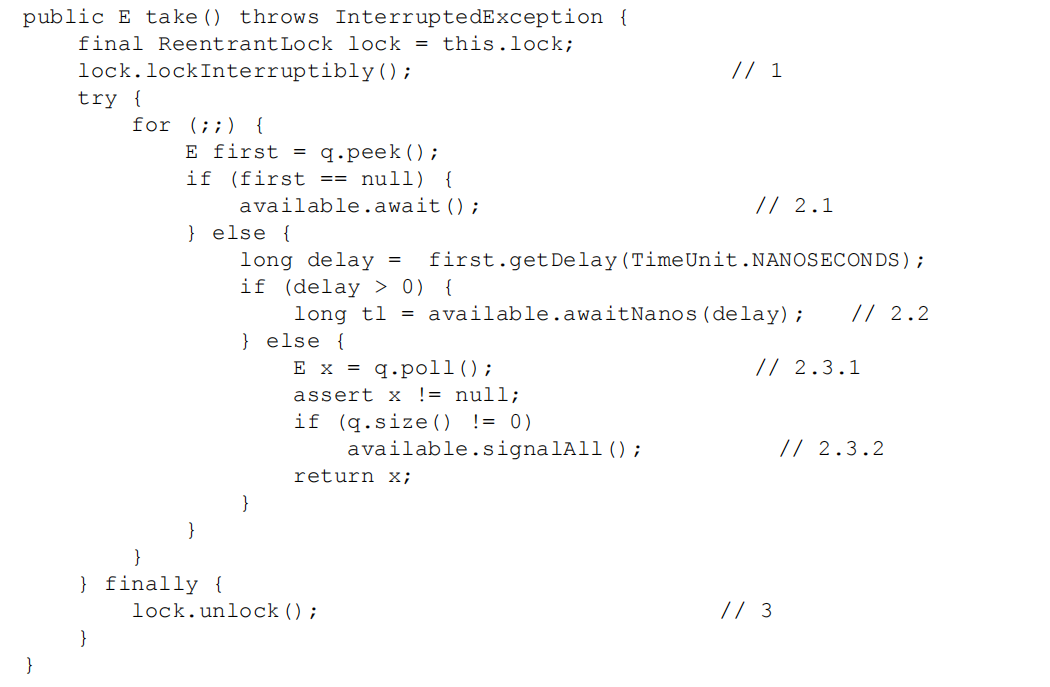
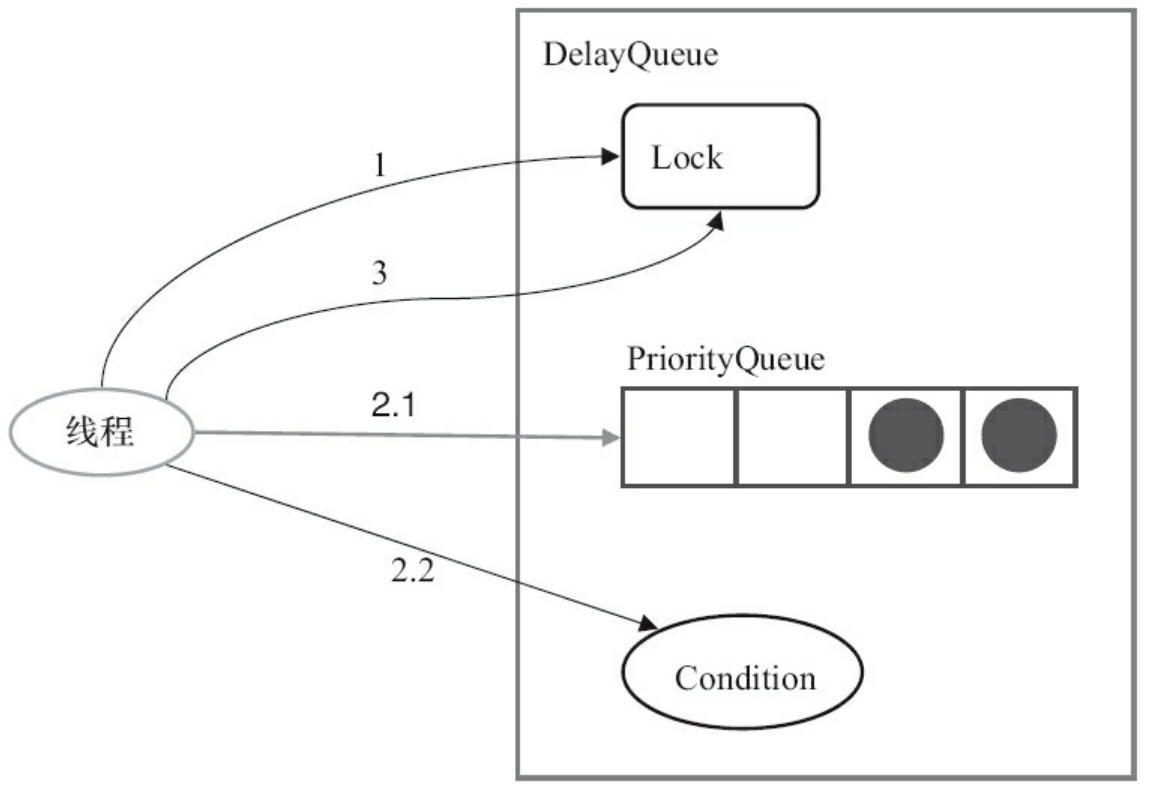
接下来,让我们看看上面的步骤1获取任务的过程。下面是DelayQueue.take()方法的源代码实现。
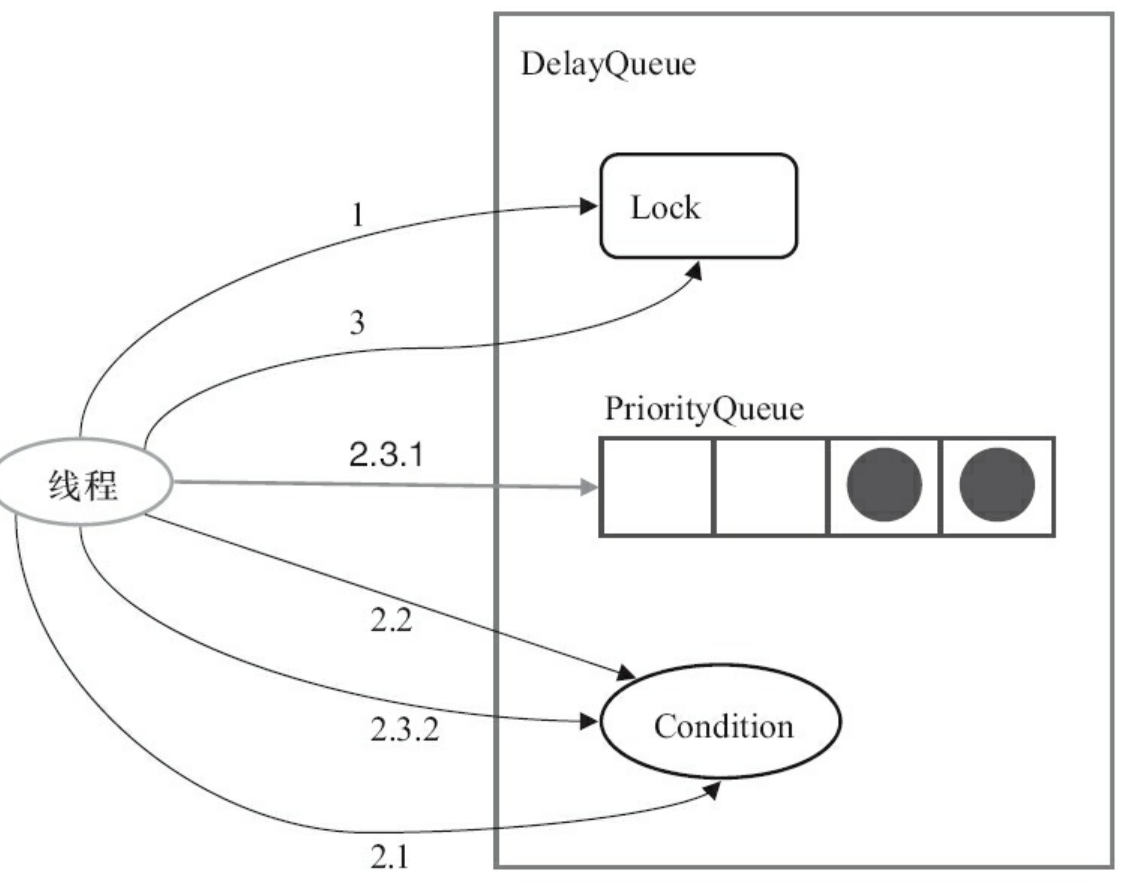
如图所示,获取任务分为3大步骤。
获取Lock。
获取周期任务。
如果PriorityQueue为空,当前线程到Condition中等待;否则执行下面的2.2。
如果PriorityQueue的头元素的time时间比当前时间大,到Condition中等待到time时间;否则执行下面的2.3。
获取PriorityQueue的头元素;如果PriorityQueue不为空,则唤醒在Condition中等待的所有线程。
释放Lock。
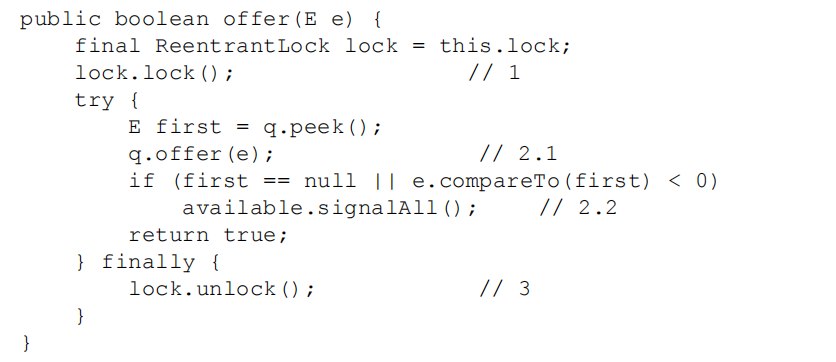
最后,让我们看看ScheduledThreadPoolExecutor中的线程执行任务的步骤4,把ScheduledFutureTask放入DelayQueue中的过程。下面是DelayQueue.add()的源代码实现。
如图所示,添加任务分为3大步骤。
获取Lock。
添加任务。
向PriorityQueue添加任务。
如果在上面2.1中添加的任务是PriorityQueue的头元素,唤醒在Condition中等待的所有线程。
释放Lock。
