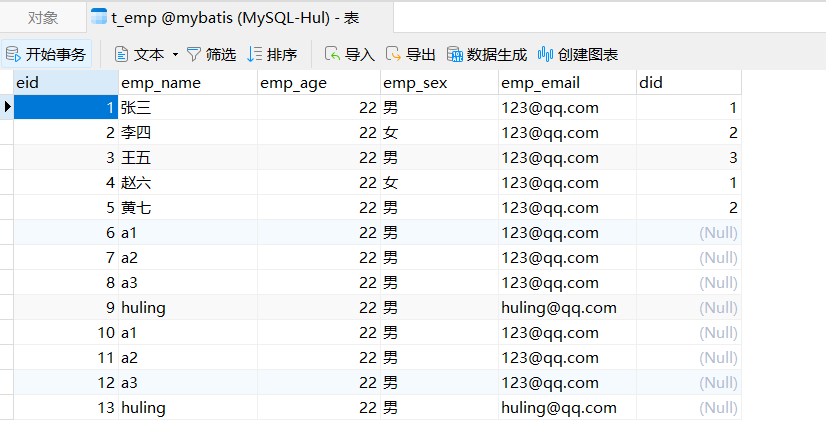
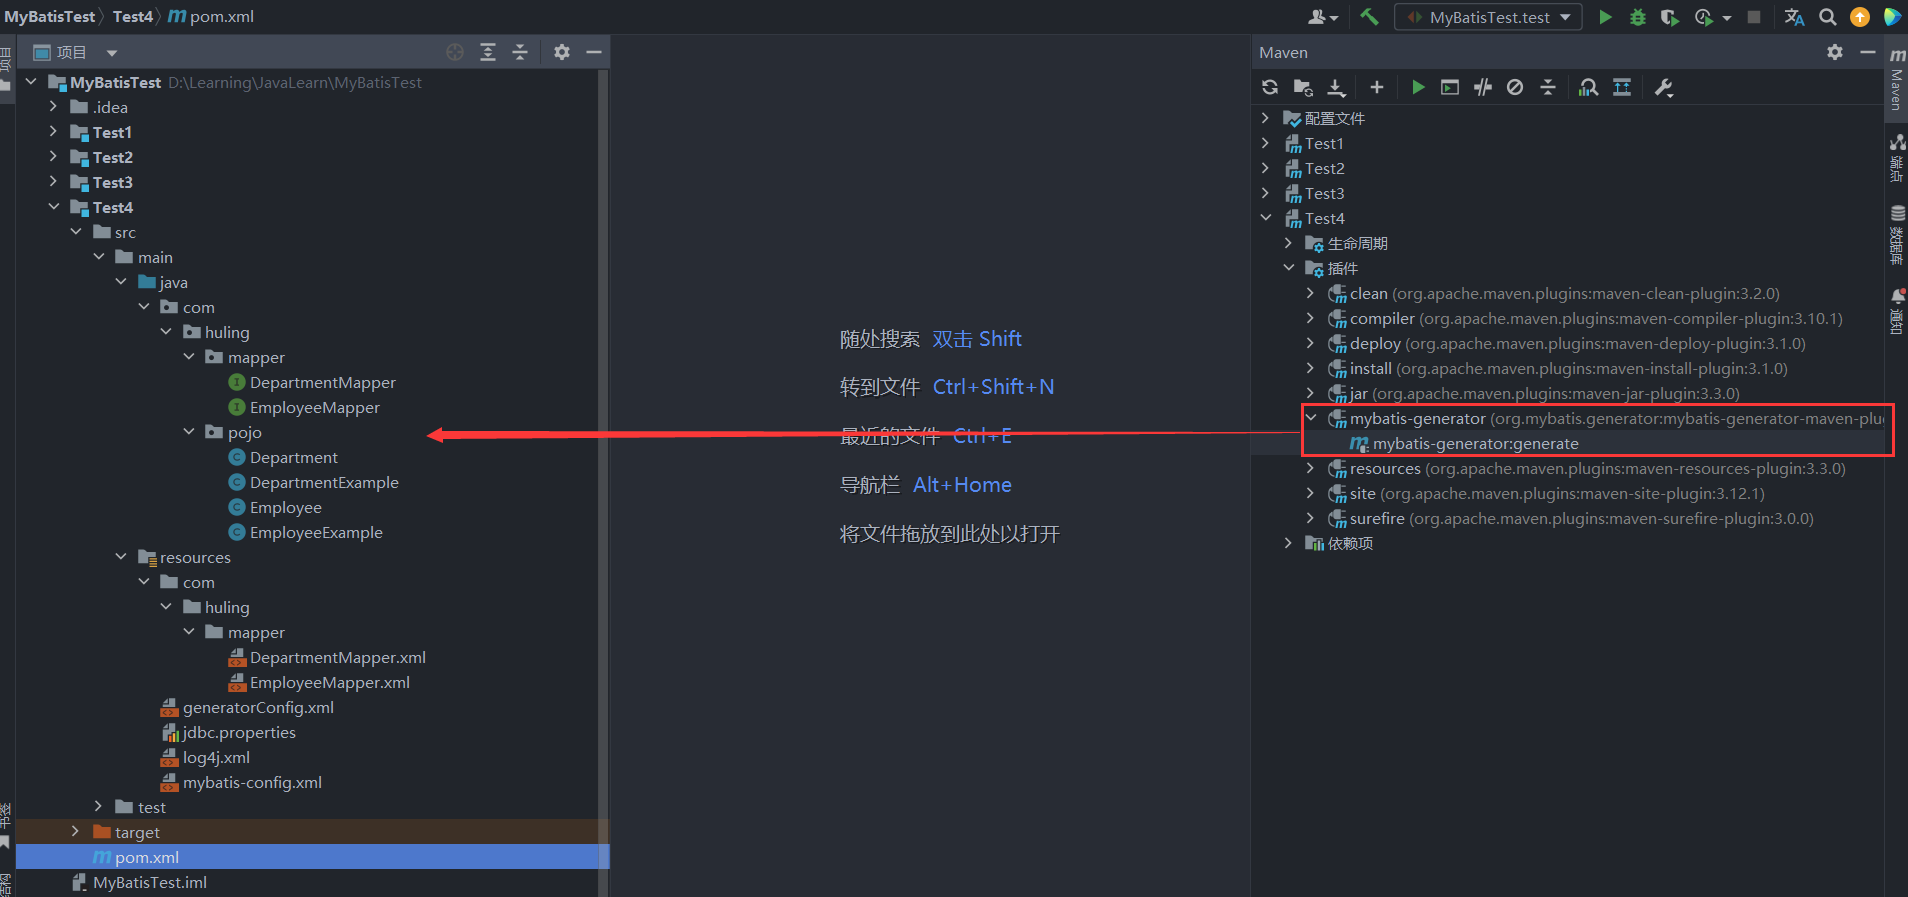
MyBatis核心之逆向工程透彻分析 一、MyBatis的开发环境介绍 本节主要介绍MyBatis的逆向工程,因此不需要自己创建实体类、数据持久层接口、XML映射文件等,只需要通过数据库中的表t_emp和t_dept即可:
首先,我们需要在原来的pom.xml中引入逆向工程所需的插件:
1 2 3 4 5 6 7 8 9 10 11 12 13 14 15 16 17 18 19 20 21 22 23 24 25 26 27 28 29 30 31 32 <build > <plugins > <plugin > <groupId > org.mybatis.generator</groupId > <artifactId > mybatis-generator-maven-plugin</artifactId > <version > 1.3.0</version > <dependencies > <dependency > <groupId > org.mybatis.generator</groupId > <artifactId > mybatis-generator-core</artifactId > <version > 1.3.2</version > </dependency > <dependency > <groupId > com.mchange</groupId > <artifactId > c3p0</artifactId > <version > 0.9.2</version > </dependency > <dependency > <groupId > mysql</groupId > <artifactId > mysql-connector-java</artifactId > <version > 8.0.28</version > </dependency > </dependencies > </plugin > </plugins > </build >
同样,我们需要创建MyBatis的核心配置文件mybatis-config.xml:
1
2
3
4
5
6
7
8
9
10
11
12
13
14
15
16
17
18
19
20
21
22
23
24
<?xml version="1.0" encoding="UTF-8" ?> <!DOCTYPE configuration PUBLIC "-//mybatis.org//DTD Config 3.0//EN" "https://mybatis.org/dtd/mybatis-3-config.dtd" > <configuration > <properties resource ="jdbc.properties" /> <typeAliases > <package name ="com.huling.pojo" /> </typeAliases > <environments default ="development" > <environment id ="development" > <transactionManager type ="JDBC" /> <dataSource type ="POOLED" > <property name ="driver" value ="${jdbc.driver}" /> <property name ="url" value ="${jdbc.url}" /> <property name ="username" value ="${jdbc.username}" /> <property name ="password" value ="${jdbc.password}" /> </dataSource > </environment > </environments > <mappers > <package name ="com.huling.mapper" /> </mappers > </configuration >
最后,我们还需要逆向工程的配置文件generatorConfig.xml:
1
2
3
4
5
6
7
8
9
10
11
12
13
14
15
16
17
18
19
20
21
22
23
24
25
26
27
28
29
30
31
32
33
34
35
36
37
38
39
<?xml version="1.0" encoding="UTF-8" ?> <!DOCTYPE generatorConfiguration PUBLIC "-//mybatis.org//DTD MyBatis Generator Configuration 1.0//EN" "http://mybatis.org/dtd/mybatis-generator-config_1_0.dtd" > <generatorConfiguration > <context id ="DB2Tables" targetRuntime ="MyBatis3" > <jdbcConnection driverClass ="com.mysql.cj.jdbc.Driver" connectionURL ="jdbc:mysql://localhost:3306/mybatis?serverTimezone=UTC& characterEncoding=utf8& useUnicode=true& useSSL=false& allowPublicKeyRetrieval=true" userId ="root" password ="root" > </jdbcConnection > <javaModelGenerator targetPackage ="com.huling.pojo" targetProject =".\src\main\java" > <property name ="enableSubPackages" value ="true" /> <property name ="trimStrings" value ="true" /> </javaModelGenerator > <sqlMapGenerator targetPackage ="com.huling.mapper" targetProject =".\src\main\resources" > <property name ="enableSubPackages" value ="true" /> </sqlMapGenerator > <javaClientGenerator type ="XMLMAPPER" targetPackage ="com.huling.mapper" targetProject =".\src\main\java" > <property name ="enableSubPackages" value ="true" /> </javaClientGenerator > <table tableName ="t_emp" domainObjectName ="Employee" /> <table tableName ="t_dept" domainObjectName ="Department" /> </context > </generatorConfiguration >
这样,我们就生成了针对t_emp和t_dept的实体类、Mapper接口、XML映射文件,下面我们详细看看MyBtis逆向工程帮我们生成的各项信息吧。
二、逆向工程的输出结果分析 我们首先先来看看生成的实体类是什么样的,通过查看源代码发现,实体类中的字段就是数据库表中字段全部转换为Java中经典的驼峰命名得到的,然后额外创建了Getter和Setter方法:
1
2
3
4
5
6
7
8
9
10
11
12
13
14
15
public class Employee { private Integer eid; private String empName; private Integer empAge; private String empSex; private String empEmail; private Integer did; }
也许你观察到了,实体类包下面有一些以Example接口的类如EmployeeExample,这正是我们后面单表的条件查询所需的重点参数类,后面我们会说到。
然后,我们看一下逆向工程帮我们生成的Mapper接口有哪些方法吧,查看源代码可以发现,里面的方法非常丰富,包括了根据主键查询、条件查询、普通更新、选择更新等等,后面我们重点关注selectByExample、updateByPrimaryKey、updateByPrimaryKeySelective这三个方法即可,通过这三个方法基本就涵括了逆向工程生成的各项功能的细节。
1
2
3
4
5
6
7
8
9
10
11
12
13
14
15
16
17
18
19
20
21
22
23
public interface EmployeeMapper { int countByExample (EmployeeExample example) ; int deleteByExample (EmployeeExample example) ; int deleteByPrimaryKey (Integer eid) ; int insert (Employee record) ; int insertSelective (Employee record) ; List<Employee> selectByExample (EmployeeExample example) ; Employee selectByPrimaryKey (Integer eid) ; int updateByExampleSelective (@Param("record") Employee record, @Param("example") EmployeeExample example) ; int updateByExample (@Param("record") Employee record, @Param("example") EmployeeExample example) ; int updateByPrimaryKeySelective (Employee record) ; int updateByPrimaryKey (Employee record) ; }
接着,我们通过案例测试一下逆向工程的功能如何使用,下面是测试程序:
1
2
3
4
5
6
7
8
9
10
11
12
13
14
15
16
17
18
19
20
21
public class MyBatisTest { @Test public void test () throws IOException { InputStream inputStream = Resources.getResourceAsStream("mybatis-config.xml" ); SqlSessionFactory factory = new SqlSessionFactoryBuilder ().build(inputStream); try (SqlSession session = factory.openSession(true )) { EmployeeMapper mapper = session.getMapper(EmployeeMapper.class); EmployeeExample example = new EmployeeExample (); example.createCriteria(). andEidEqualTo(3 ). andEmpAgeBetween(10 ,30 ). andDidIn(Arrays.asList(1 ,2 ,3 )); example.or().andDidIsNull(); List<Employee> list = mapper.selectByExample(example); list.forEach(System.out::println); } } }
测试输出结果为:
1
2
3
4
5
6
7
8
9
10
11
12
DEBUG 11 -25 10 :32 :53 ,943 ==> Preparing: select eid, emp_name, emp_age, emp_sex, emp_email, did from t_emp WHERE ( eid = ? and emp_age between ? and ? and did in ( ? , ? , ? ) ) or ( did is null ) (BaseJdbcLogger.java:137 ) DEBUG 11 -25 10 :32 :53 ,971 ==> Parameters: 3 (Integer), 10 (Integer), 30 (Integer), 1 (Integer), 2 (Integer), 3 (Integer) (BaseJdbcLogger.java:137 ) DEBUG 11 -25 10 :32 :53 ,987 <== Total: 9 (BaseJdbcLogger.java:137 ) Employee{eid=3 , empName='王五' , empAge=22 , empSex='男' , empEmail='123@qq.com' , did=3 } Employee{eid=6 , empName='a1' , empAge=22 , empSex='男' , empEmail='123@qq.com' , did=null } Employee{eid=7 , empName='a2' , empAge=22 , empSex='男' , empEmail='123@qq.com' , did=null } Employee{eid=8 , empName='a3' , empAge=22 , empSex='男' , empEmail='123@qq.com' , did=null } Employee{eid=9 , empName='huling' , empAge=22 , empSex='男' , empEmail='huling@qq.com' , did=null } Employee{eid=10 , empName='a1' , empAge=22 , empSex='男' , empEmail='123@qq.com' , did=null } Employee{eid=11 , empName='a2' , empAge=22 , empSex='男' , empEmail='123@qq.com' , did=null } Employee{eid=12 , empName='a3' , empAge=22 , empSex='男' , empEmail='123@qq.com' , did=null } Employee{eid=13 , empName='huling' , empAge=22 , empSex='男' , empEmail='huling@qq.com' , did=null }
观察日志中打印的SQL语句的WHERE条件,可以看出or两边是分隔开的两个连续的and连接条件,即eid = ? and emp_age between ? and ? and did in ( ? , ? , ? )和did is null,这么丰富的条件查询都是怎么做到的呢,这就是逆向工程为我们生成的条件类EmployeeExample的功劳了,下面我们详细看看它是什么。
三、逆向工程的核心实现分析
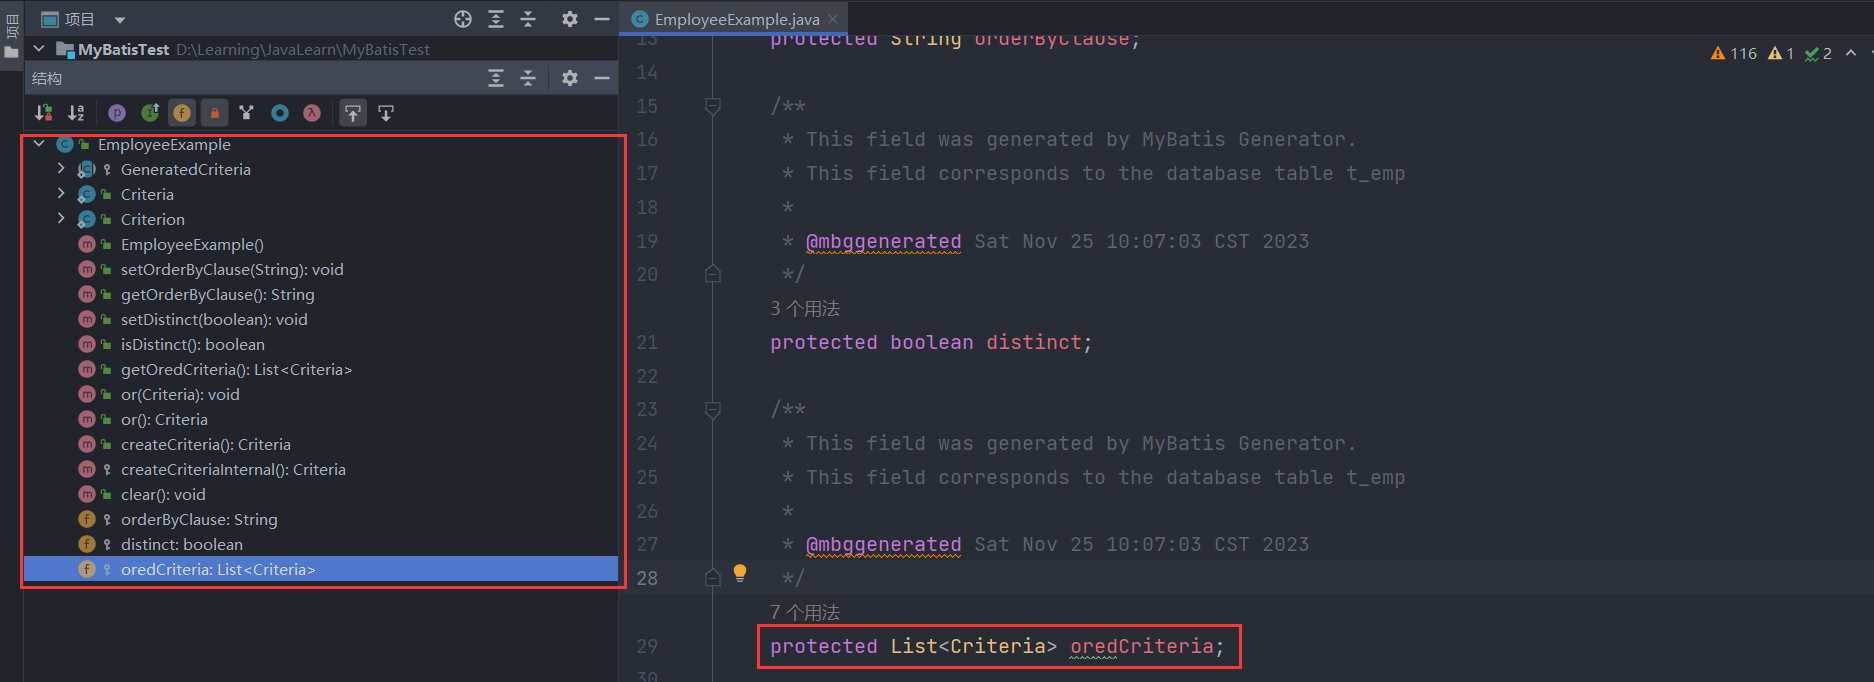
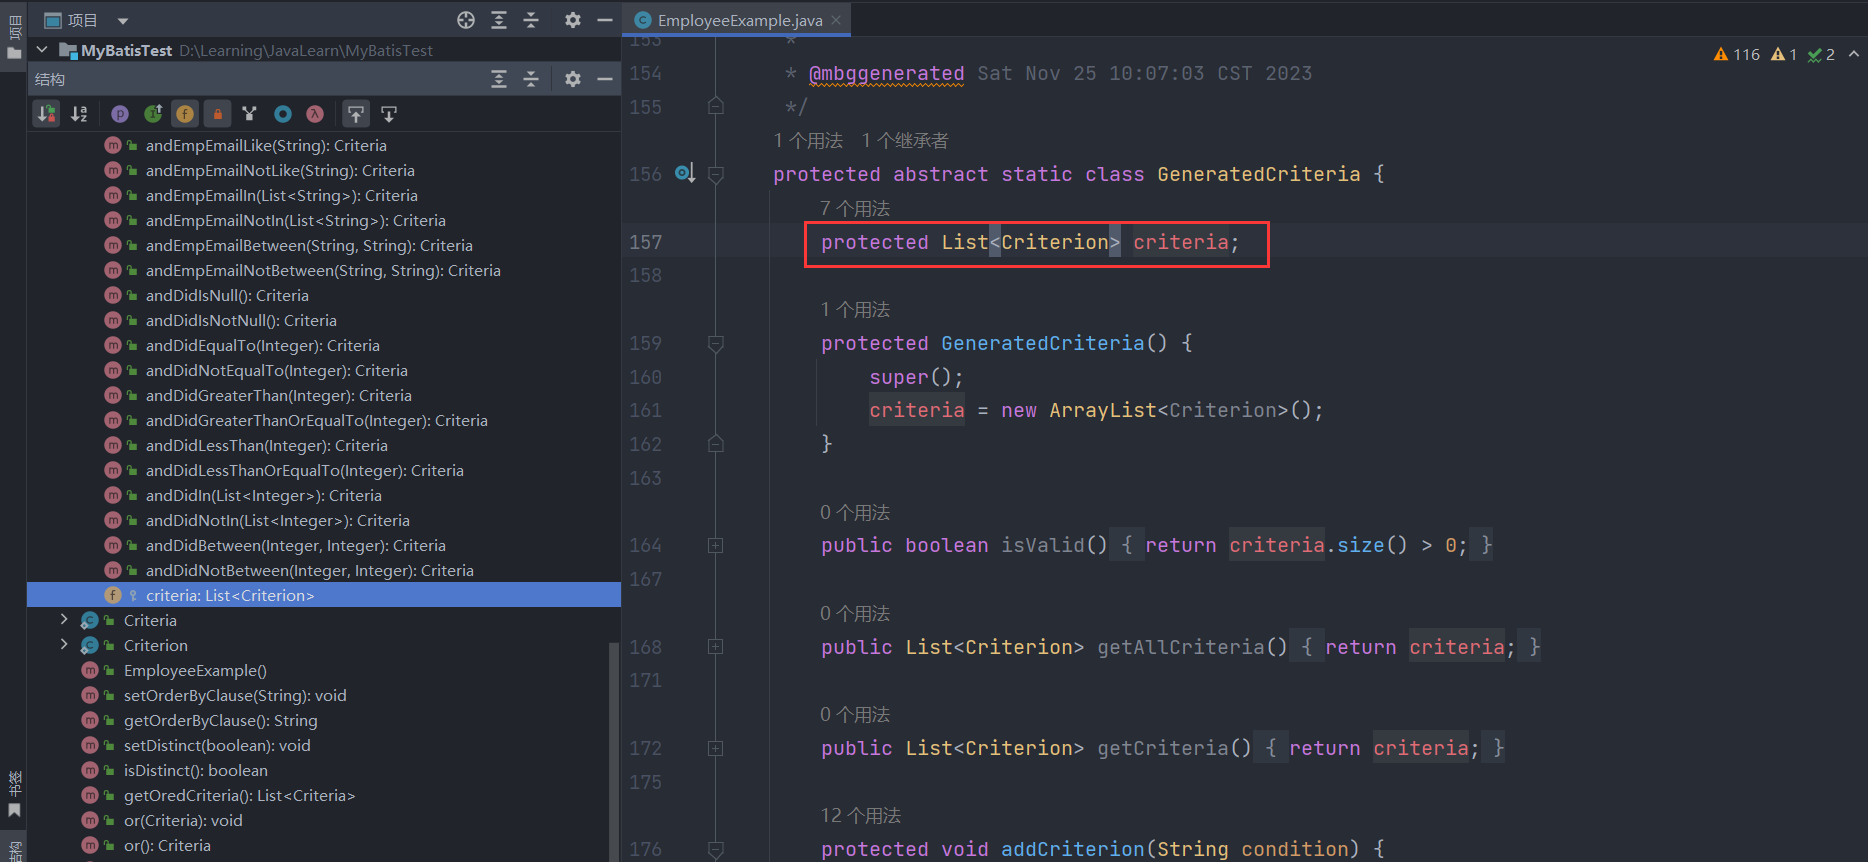
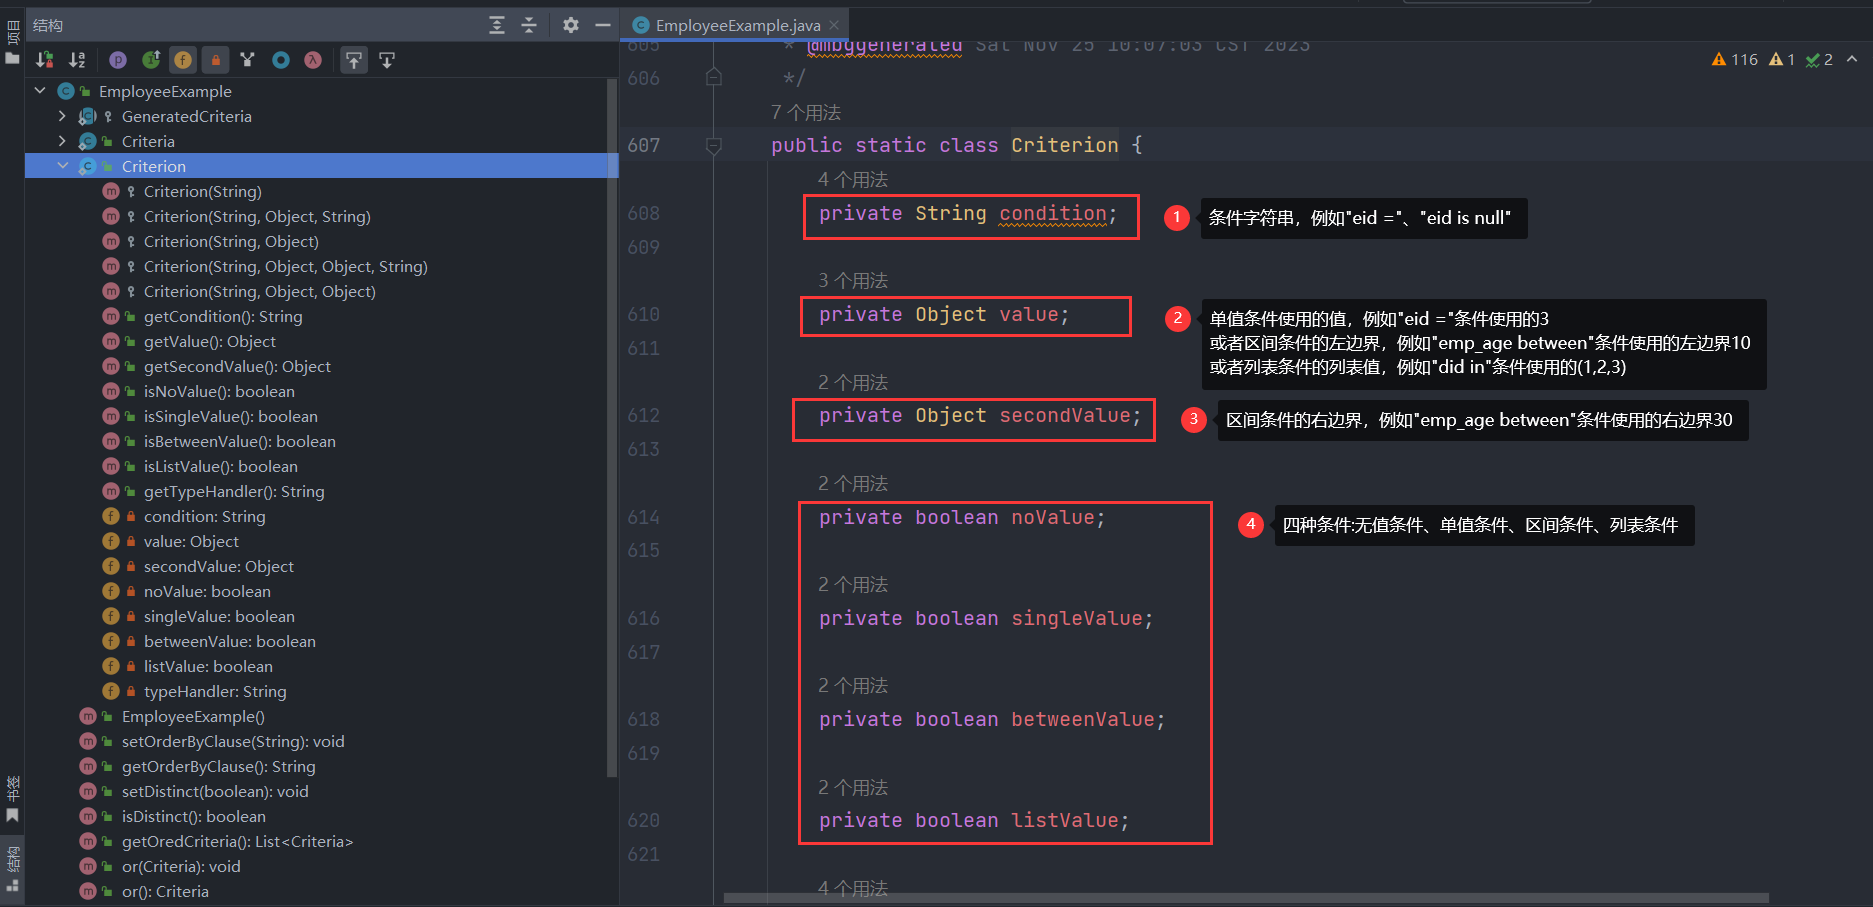
我们先来看一下EmployeeExample类的内部结构,其中有三个主要的字段:orderByClause是设置排序字段,distinct是设置是否记录去重、oredCriteria是核心的字段,表示条件组列表,里面的每一个Criteria都是and连接的连续条件,例如案例中说到的eid = ? and emp_age between ? and ? and did in ( ? , ? , ? )或did is null,而每个Criteria都是继承自GeneratedCriteria父类,其中包含了一个核心字段criteria,表示一个单独的条件,例如上面案例中的eid = ?、emp_age between ? and ?、did in ( ? , ? , ? )。
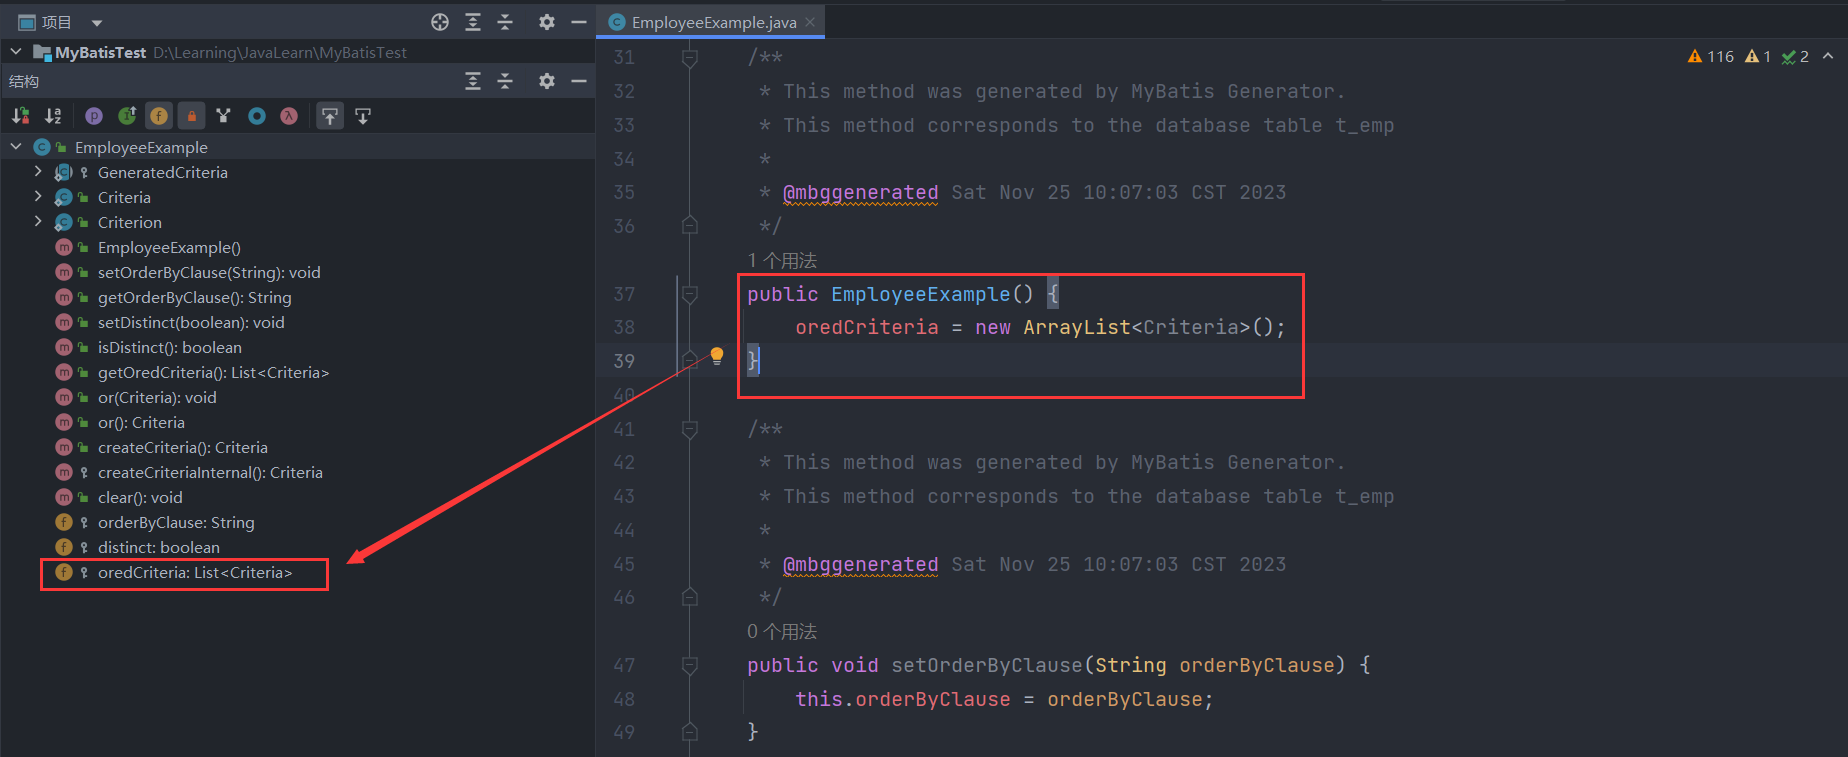
下面,我们从案例的测试程序作为入口,一步步探究逆向工程的生成细节。一般情况,我们需要先创建一个查询条件类EmployeeExample,这就用到了其无参构造函数创建了一个空的Criteria列表:
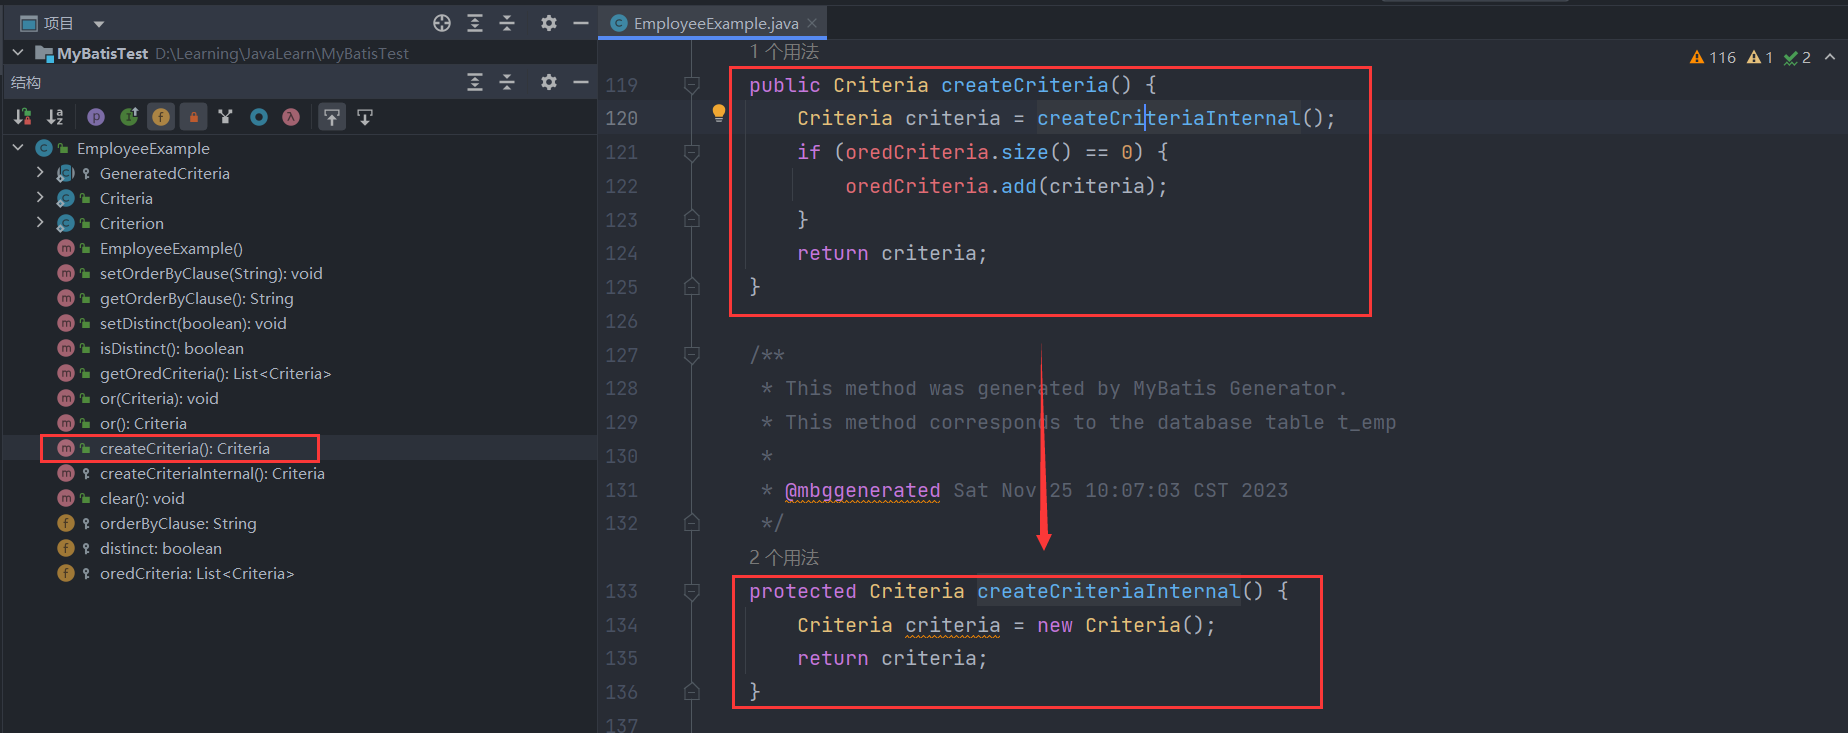
然后,我们根据自己的需要调用了example.createCriteria().andEidEqualTo(3).andEmpAgeBetween(10,30). andDidIn(Arrays.asList(1,2,3)),那么先来看看createCriteria方法干了那些事情吧:
可以发现,createCriteria就是帮我们初始化了之前空的oredCriteria列表,往里面添加了一个Criteria对象并返回给调用方继续链式使用,其中Criteria对象的创建的逻辑如下,其实就是Criteria对象创建了一个空的criteria列表,后续我们添加条件是会逐个封装为Criterion对象添加到此列表中。
1
2
3
4
5
6
7
8
9
10
11
12
13
14
15
16
17
18
public static class Criteria extends GeneratedCriteria { protected Criteria () { super (); } } protected abstract static class GeneratedCriteria { protected List<Criterion> criteria; protected GeneratedCriteria () { super (); criteria = new ArrayList <Criterion>(); } }
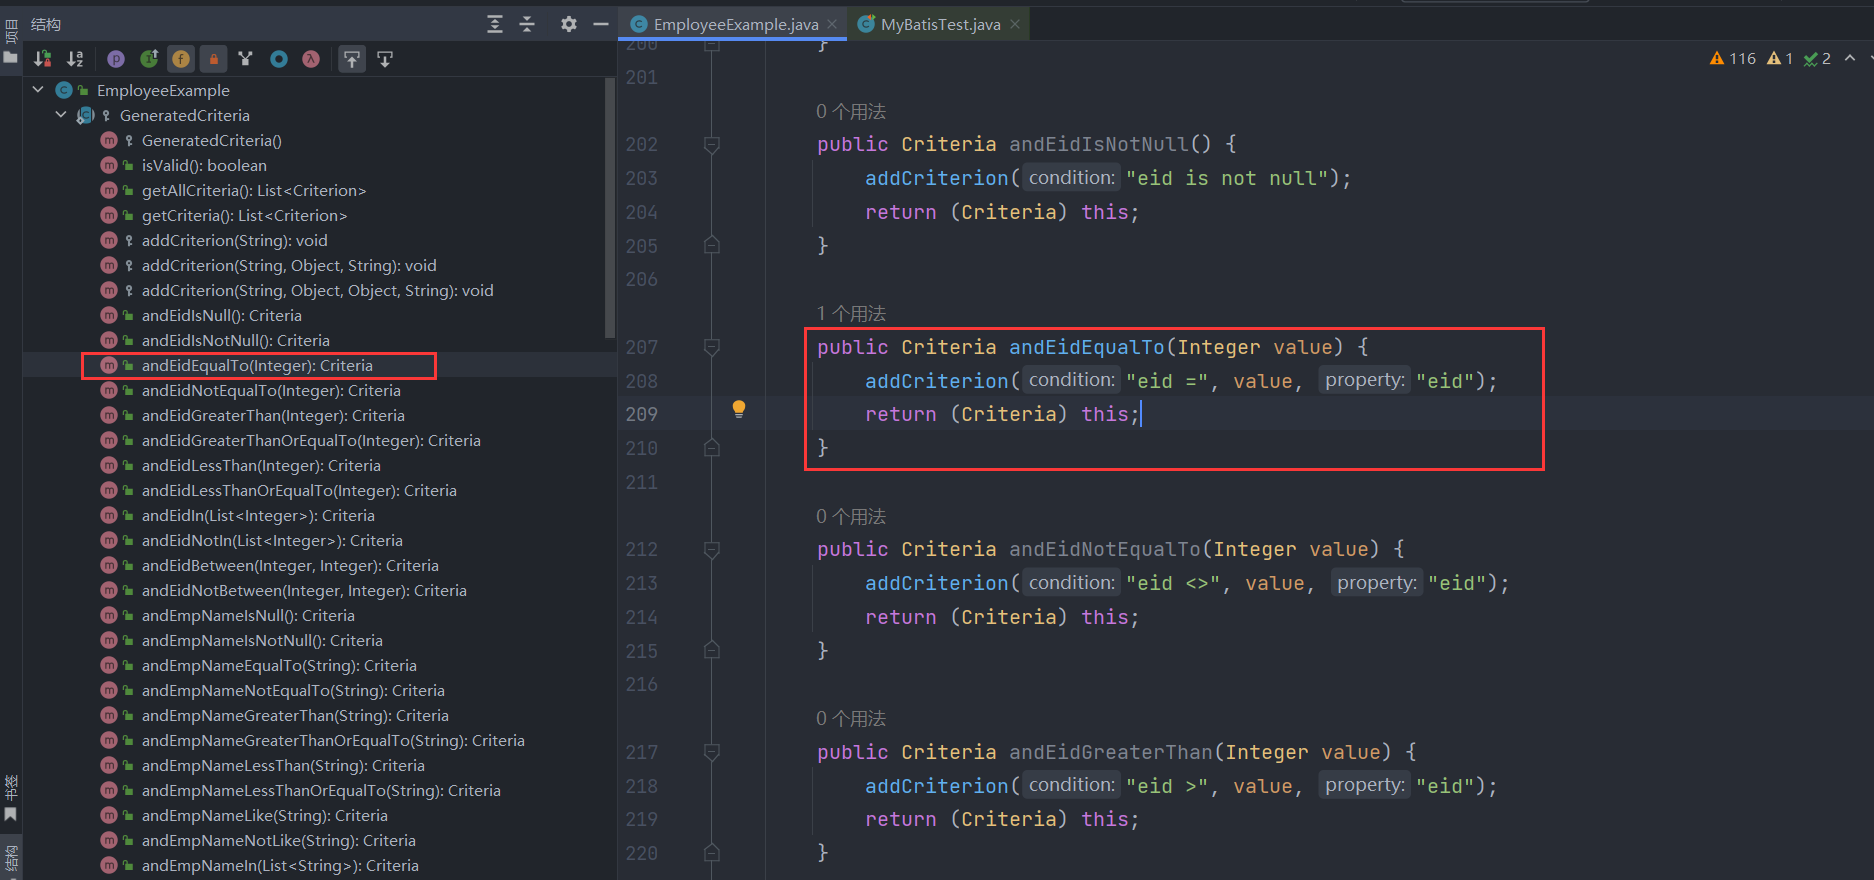
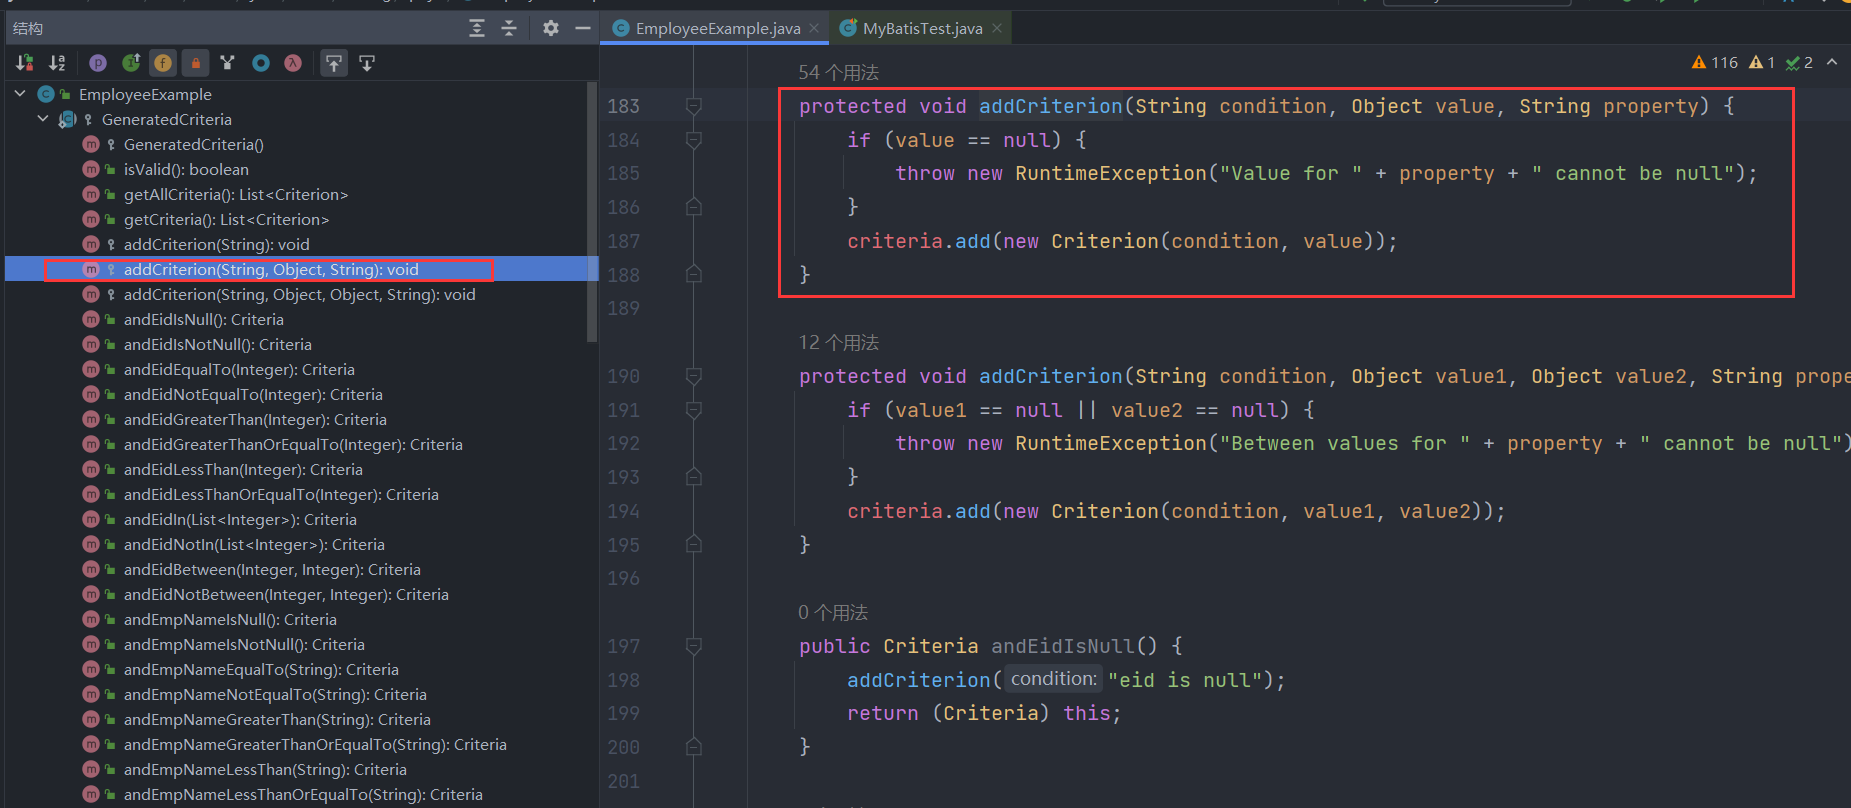
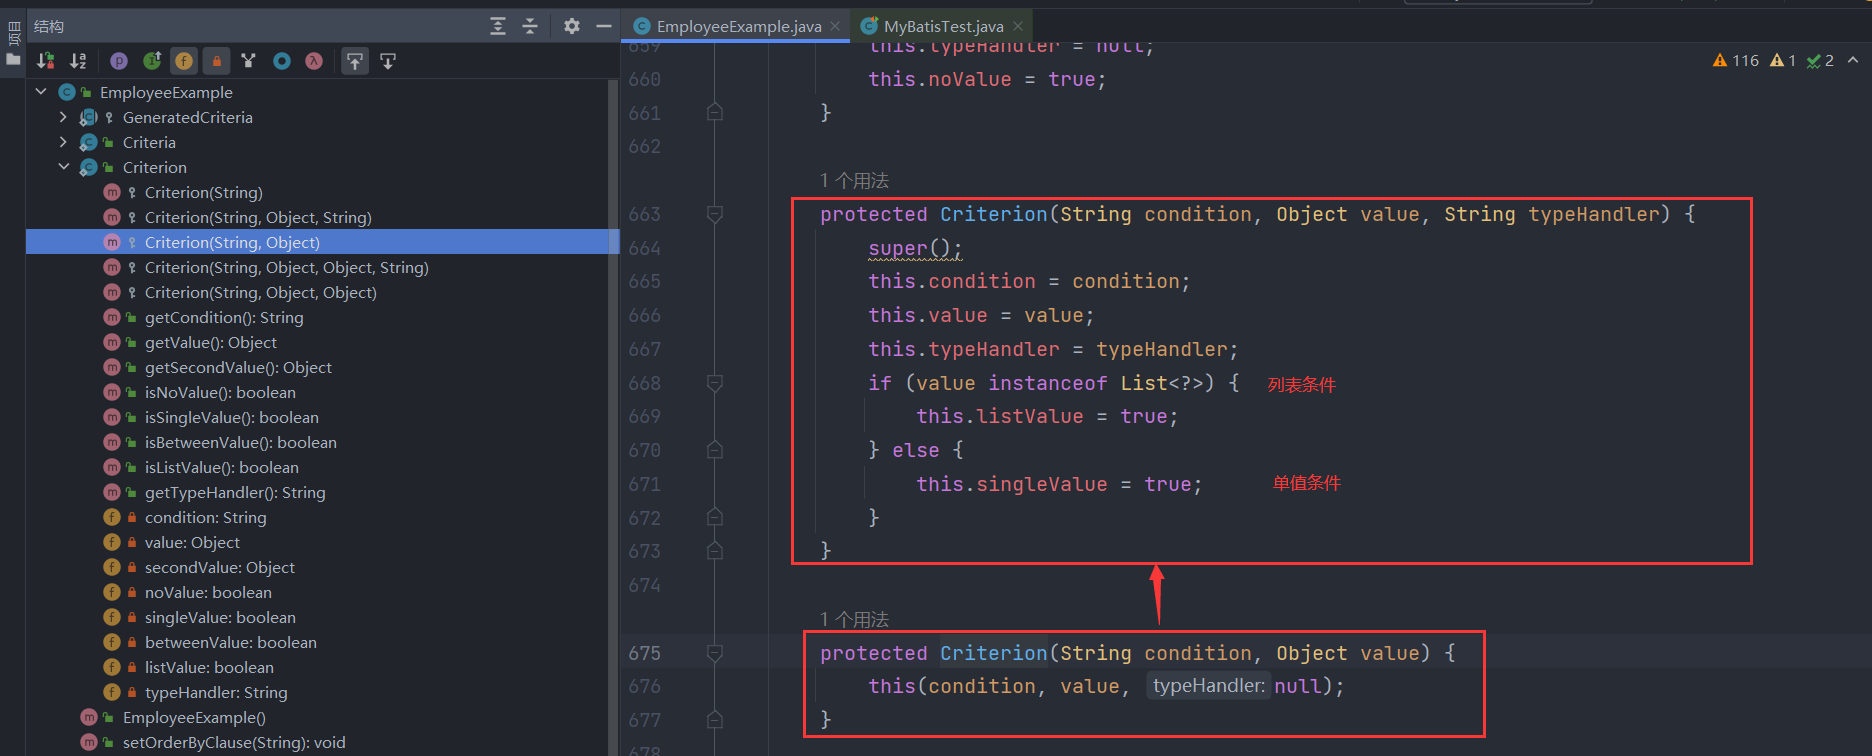
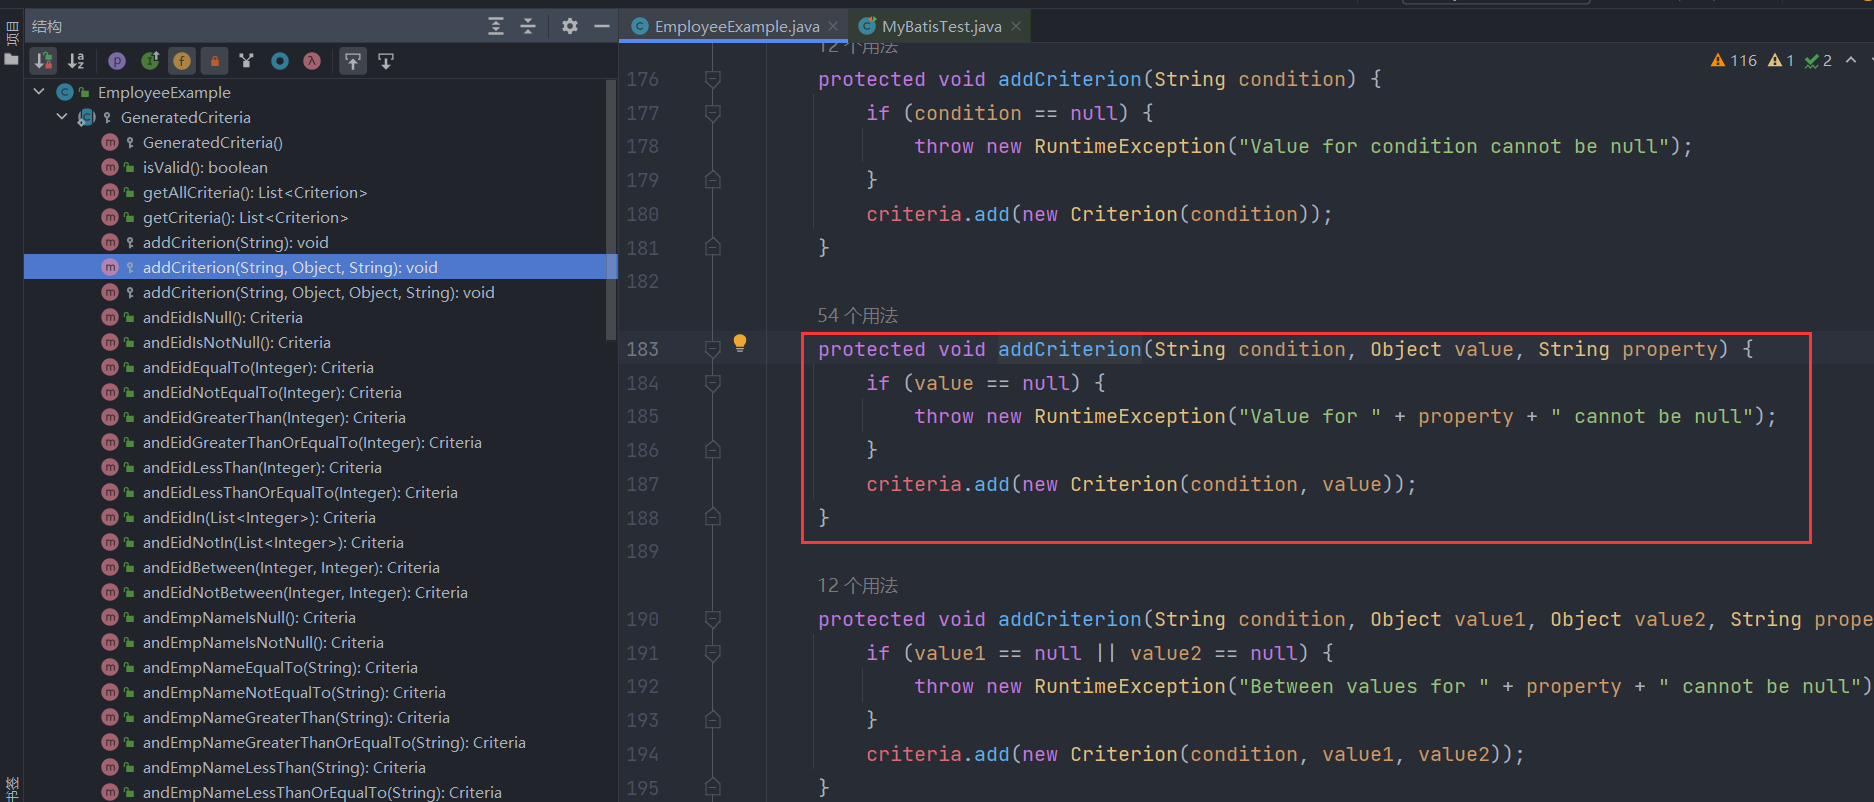
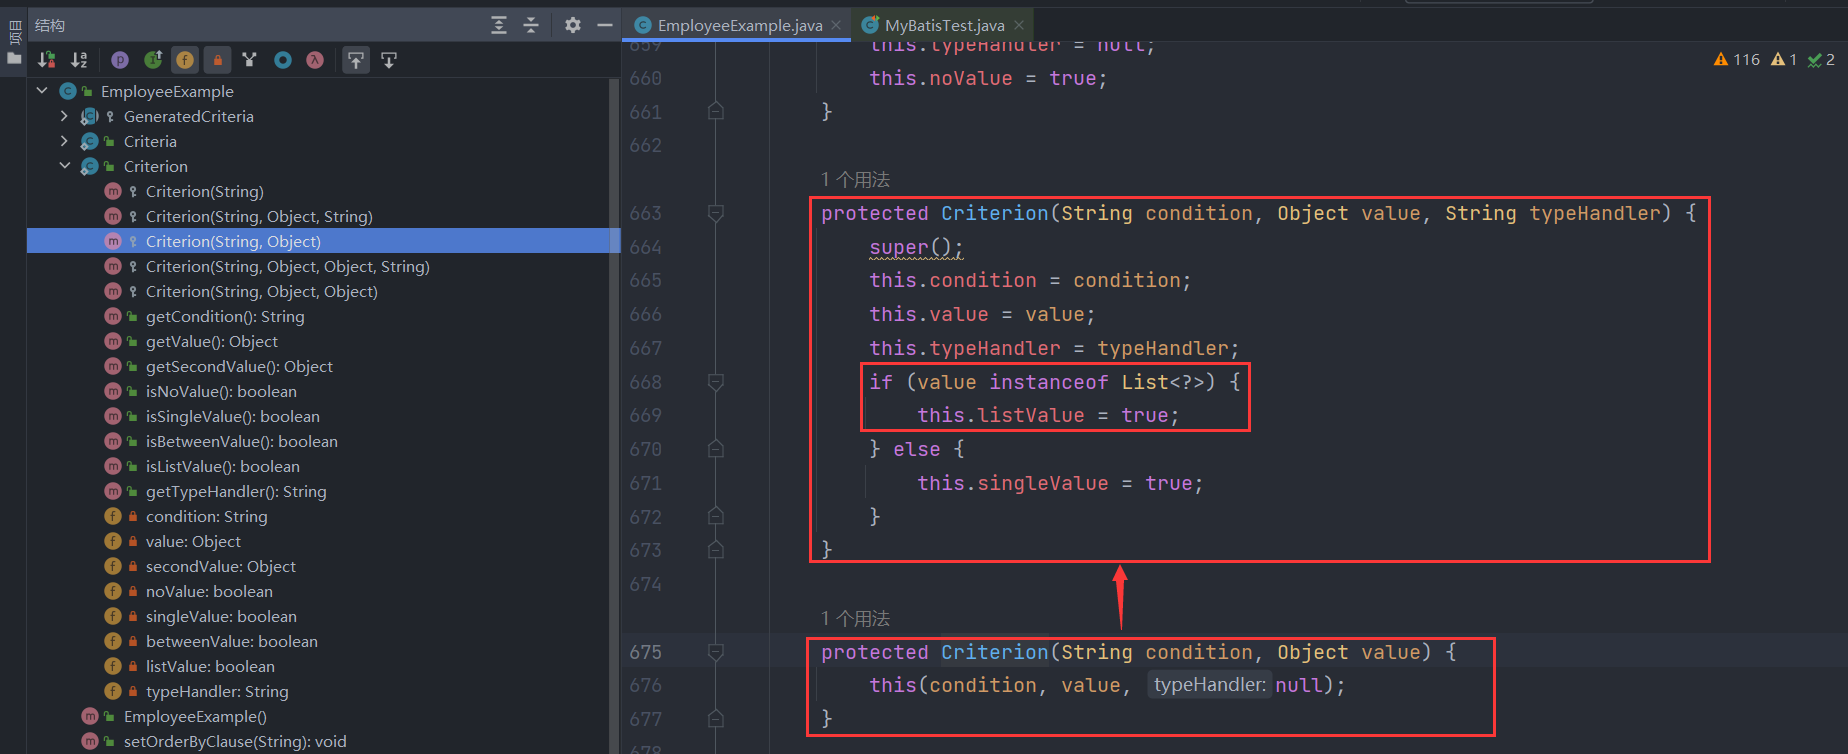
接着我们继续看andEidEqualTo(3)方法,其实就是封装了查询条件eid = 3为Criterion对象并加入到criteria条件列表中,封装的过程就是调用Criterion类的构造函数,会根据条件的类型设置不同的标记,例如对于本次条件eid = 3来说就是单值条件,因此传入的value不是List类型,该条件对应的Criterion对象的singleValue标记设为true:
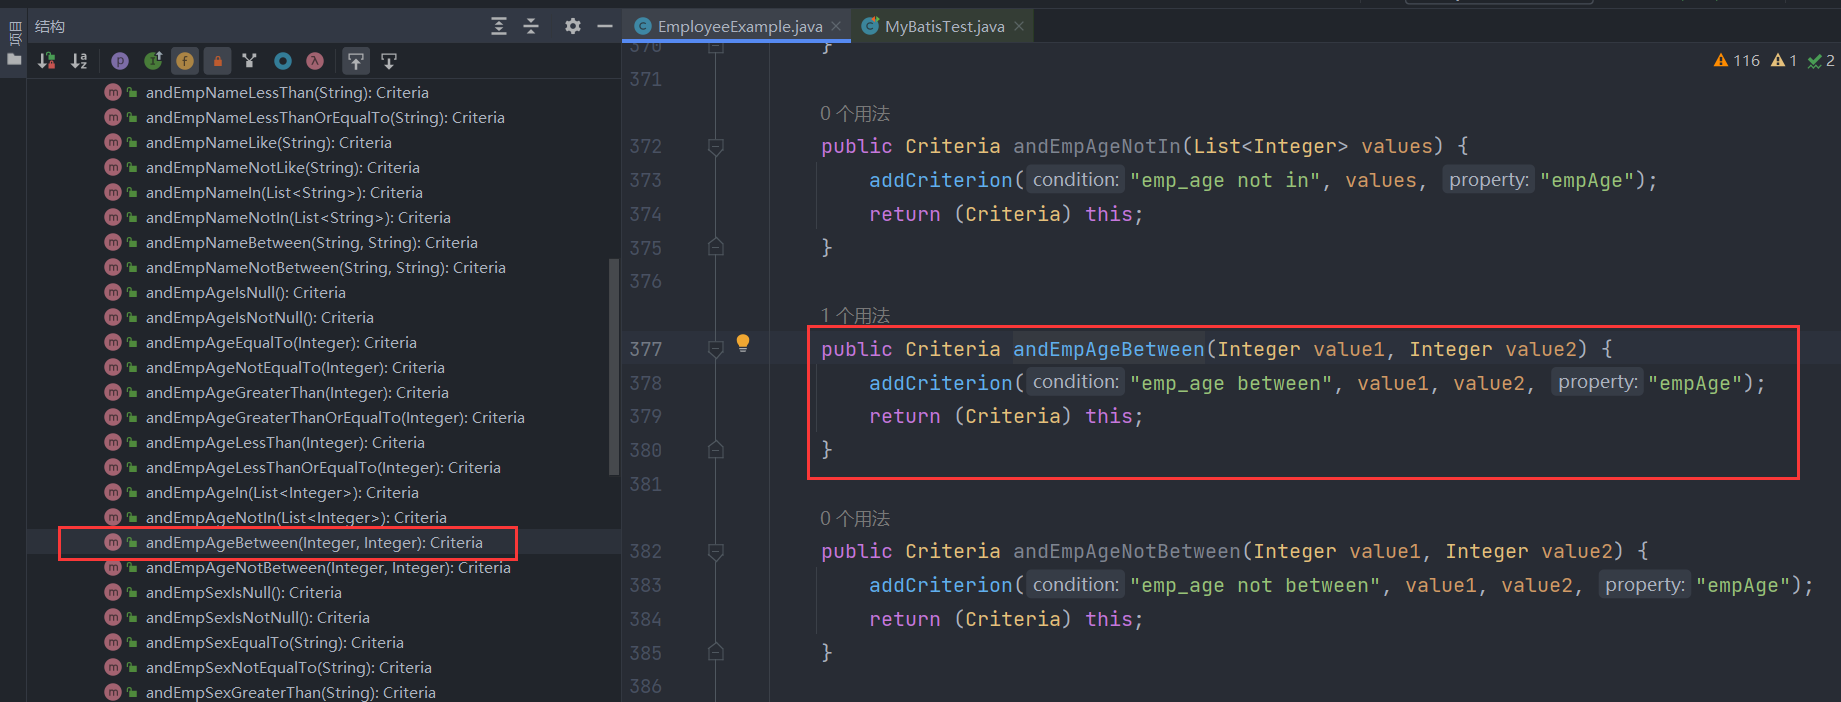
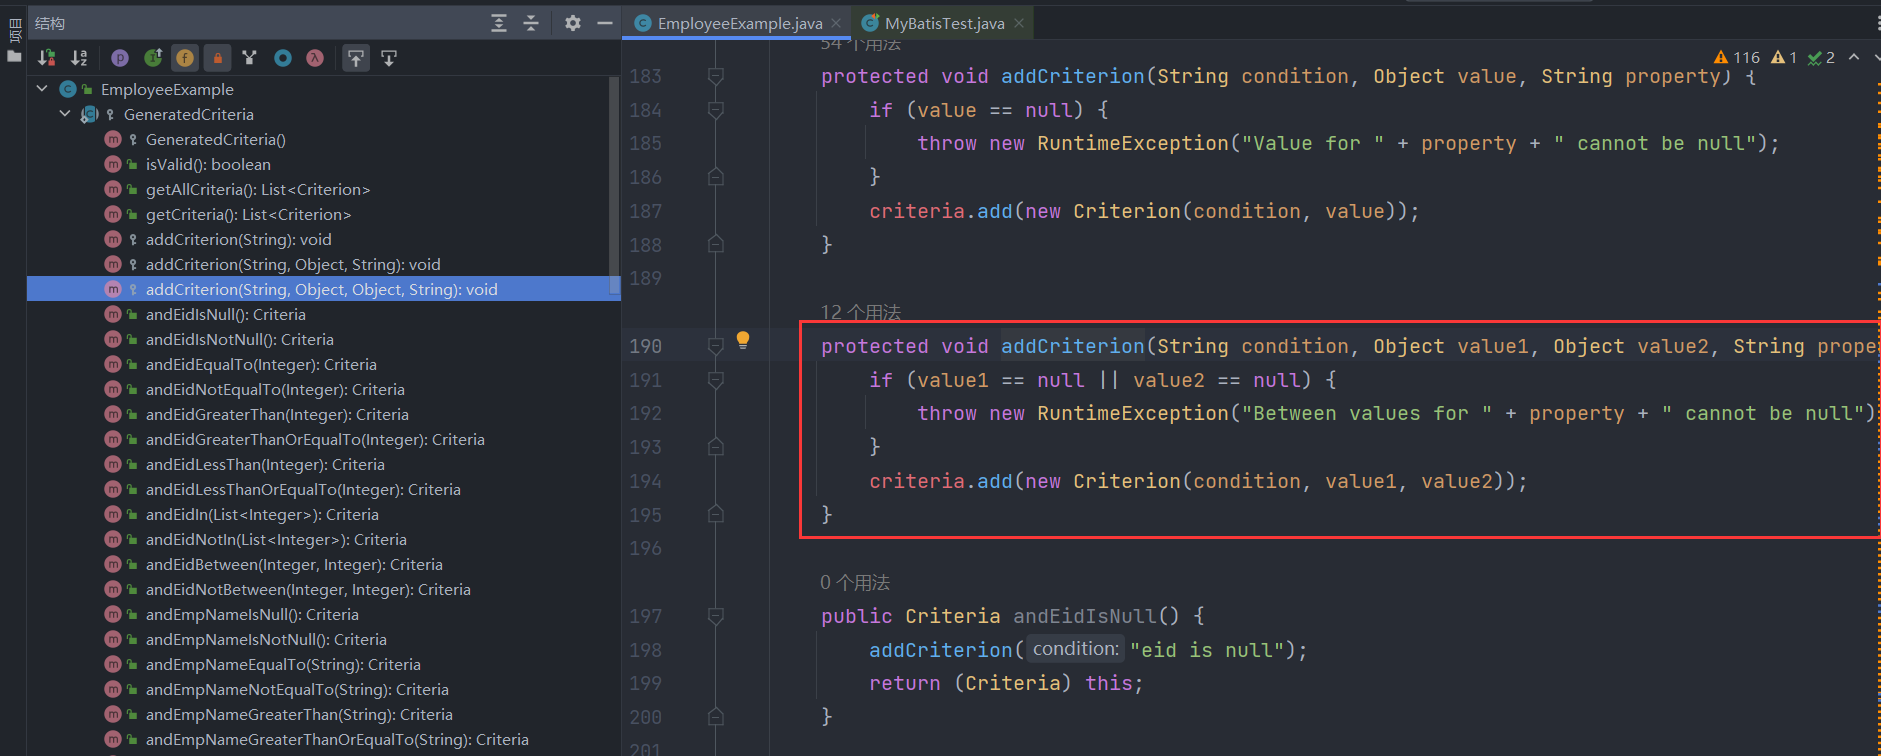
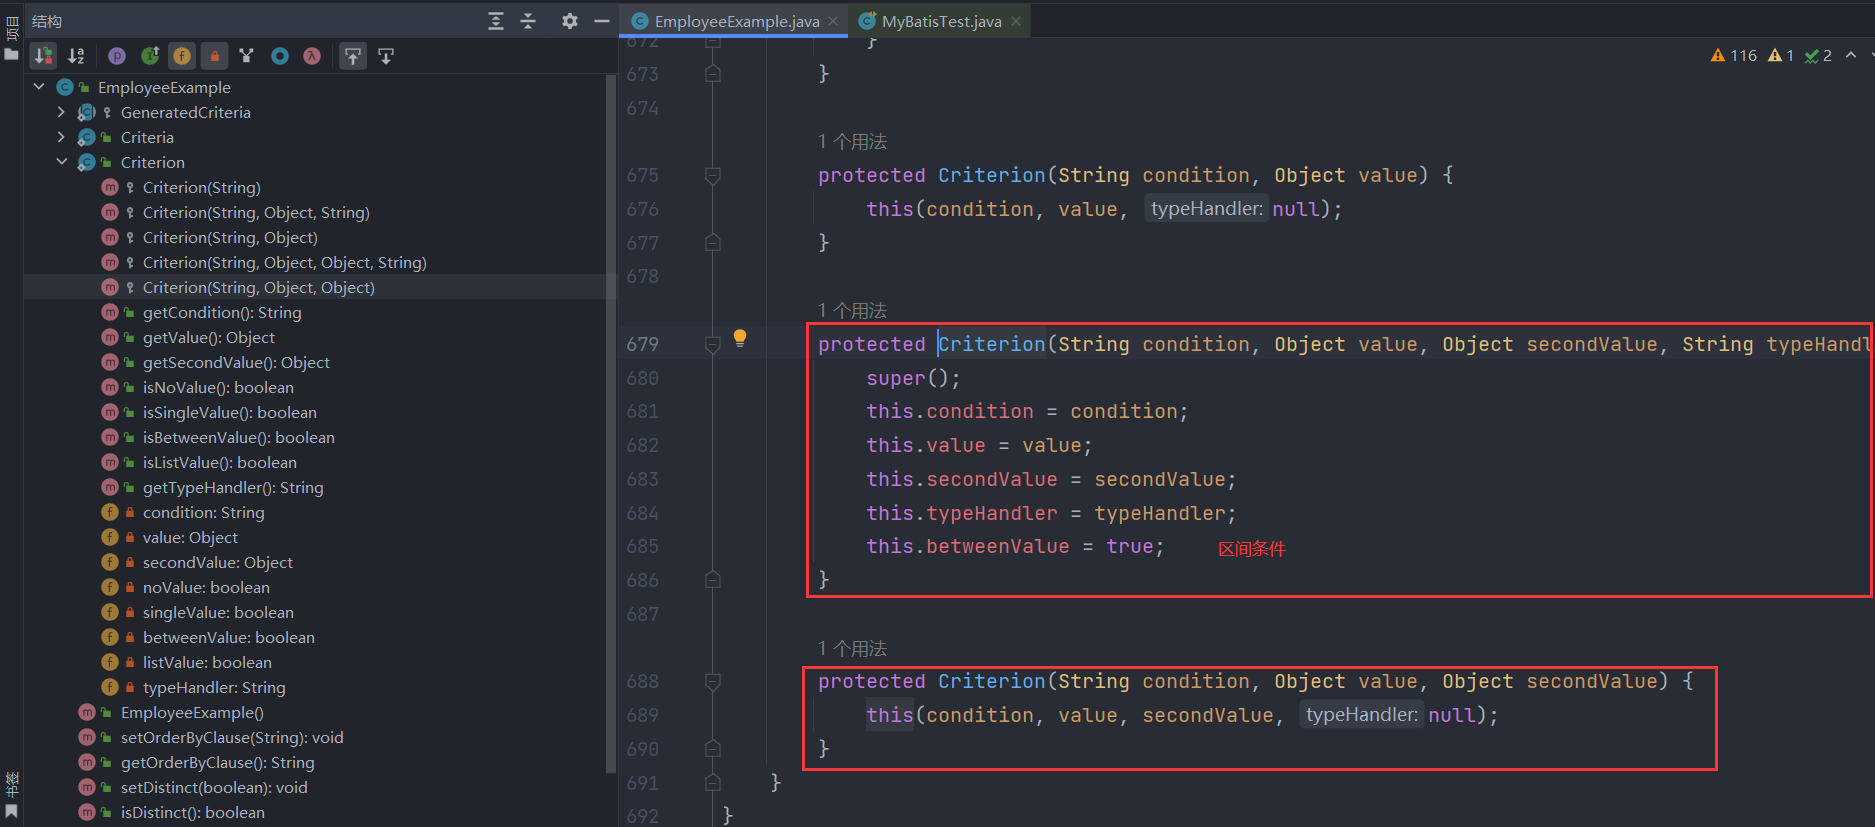
然后,我们再看第二个连续的条件andEmpAgeBetween(10,30),跟上面的逻辑大致一样,也是把查询条件emp_age between 10 and 30封装为一个Criterion条件对象并加入criteria条件列表中,封装的过程也是调用了Criterion类的构造函数,也会根据条件的类型设置不同的标记,例如本次条件emp_age between 10 and 30就是一个区间条件,该条件对应的Criterion对象的betweenValue标记设为true:
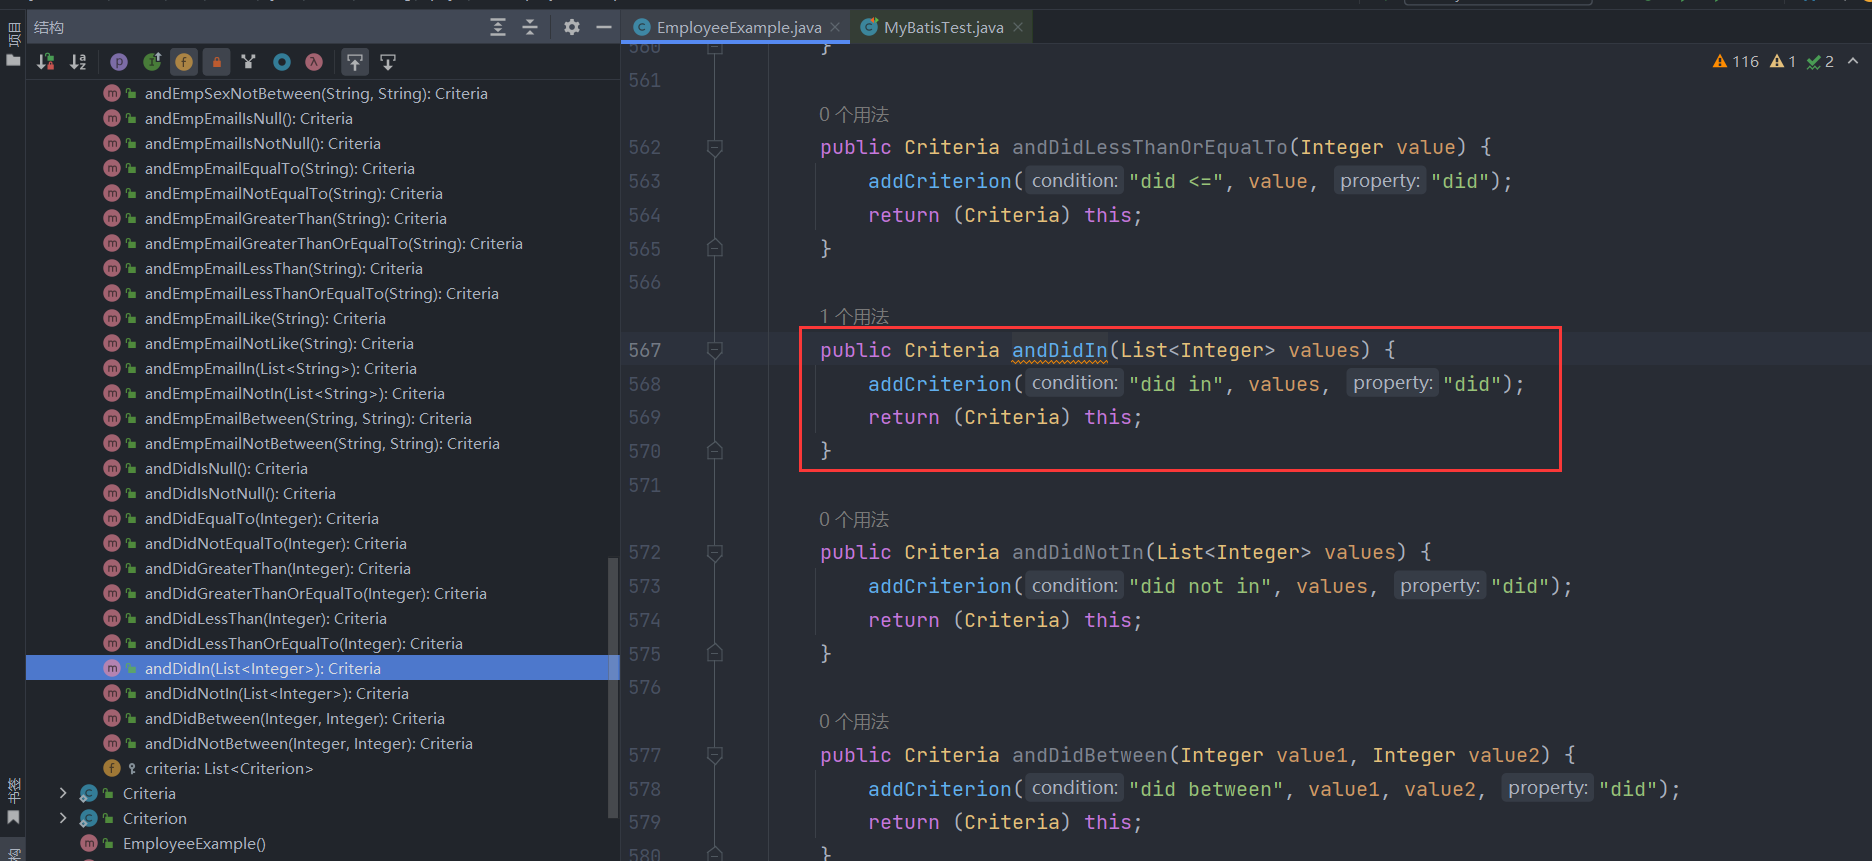
看到这,你应该也直到第三个连续的条件andDidIn(Arrays.asList(1,2,3))内部是怎么做的了吧,就是跟第一个条件一样,只不过封装后的Criterion对象的listValue标记设为true:
那么看到这,你应该知道条件查询的大致逻辑了,本质上就是往Criteria对象的字段criteria条件列表中添加一个个条件对象Criterion,而条件对象由分为不同的类型如单值条件(=,<>,>,>=,<,<=,like,not like)、无值条件(is null,is not null)、区间条件(between and,not between and)、列表条件(in,not in)四种,这些条件在criteria条件列表中都是使用and连接起来的,每个方法的返回值都是Criteria对象自身,因此可以做到链式调用!
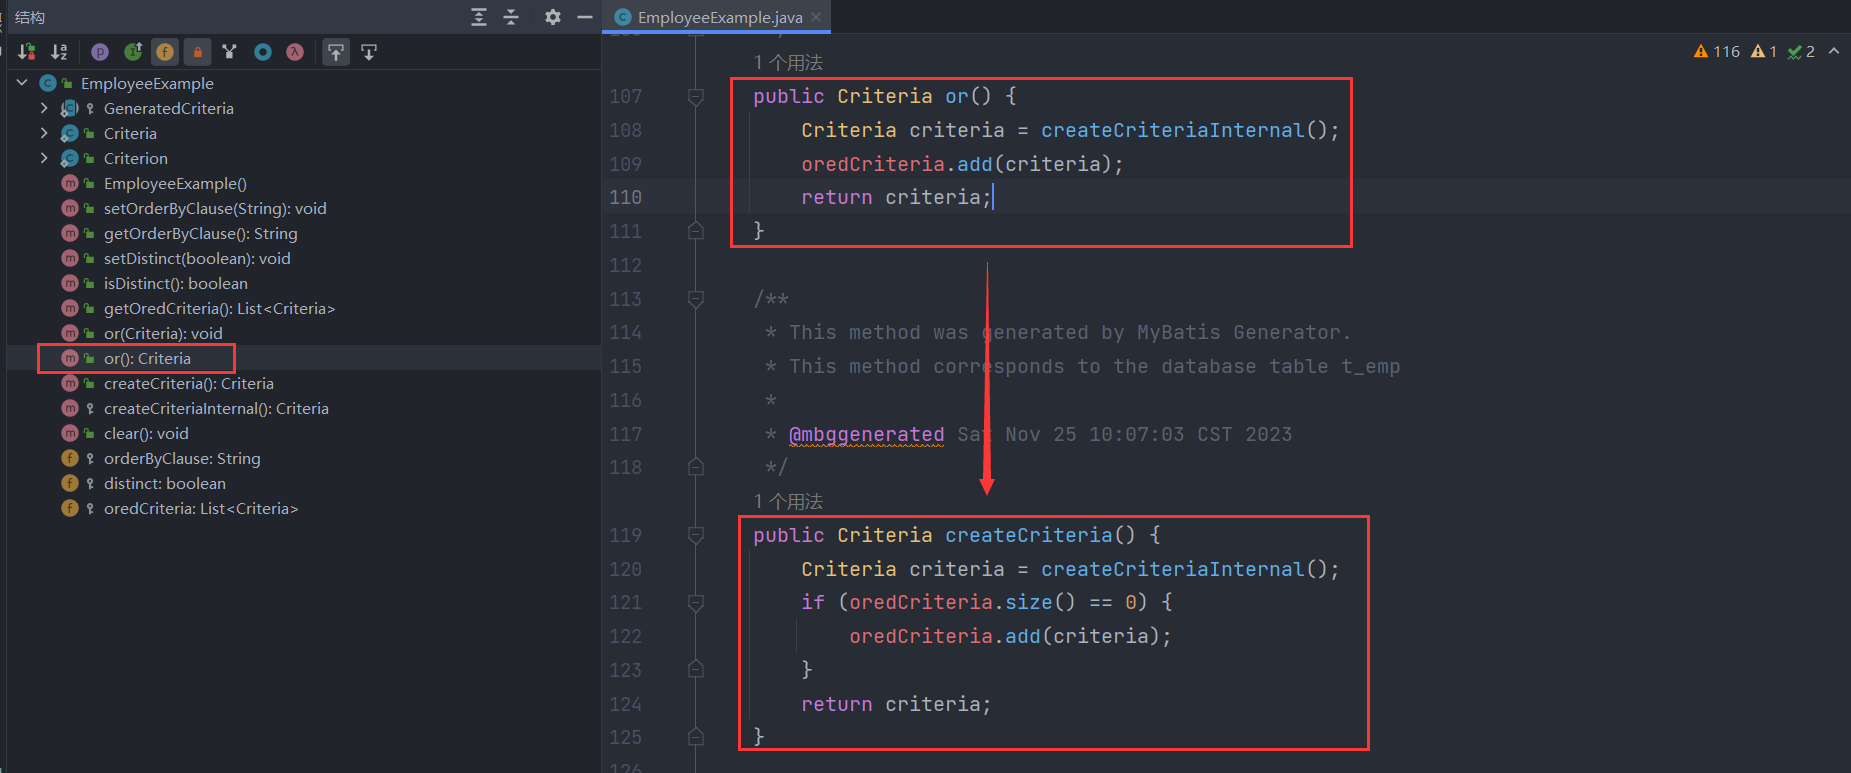
如果我们需要使用or连接符,我们必须调用EmployeeExample类的or方法创建一个新的Criteria对象加入oredCriteria列表中,然后我们往这个新的Criteria对象的criteria条件列表中添加一个个连续的条件(and连接),最终形成的效果就是案例中的WHERE条件( eid = ? and emp_age between ? and ? and did in ( ? , ? , ? ) ) or ( did is null )。(看一看吧,我们的案例设计的还不错,用到了四种类型的条件嘿嘿)
看完了上面关于类的设计,下面我们看一下逆向工程生成的XML映射文件如何实现的吧,也是以selectByExample方法为例,这个方法作为最复杂的功能基本概括了MyBatis逆向工程生成的XML映射文件的SQL实现逻辑,概况来说,通过遍历EmployeeExample的用or连接的oredCriteria(Criteria列表),而每个Criteria对象中都包含一组and连接的条件(Criterion列表),每个Criterion又会被解析成特定的SQL条件字符串,这样下来就实现了单表的多条件复杂查询。
1
2
3
4
5
6
7
8
9
10
11
12
13
14
15
16
17
18
19
20
21
22
23
24
25
26
27
28
29
30
31
32
33
34
35
36
37
38
39
40
41
42
43
44
45
46
47
48
49
50
51
52
53
54
55
56
57
58
59
60
61
62
63
64
65
66
67
68
69
70
71
72
73
74
75
<?xml version="1.0" encoding="UTF-8" ?> <!DOCTYPE mapper PUBLIC "-//mybatis.org//DTD Mapper 3.0//EN" "http://mybatis.org/dtd/mybatis-3-mapper.dtd" > <mapper namespace ="com.huling.mapper.EmployeeMapper" > <resultMap id ="BaseResultMap" type ="com.huling.pojo.Employee" > <id column ="eid" property ="eid" jdbcType ="INTEGER" /> <result column ="emp_name" property ="empName" jdbcType ="VARCHAR" /> <result column ="emp_age" property ="empAge" jdbcType ="INTEGER" /> <result column ="emp_sex" property ="empSex" jdbcType ="CHAR" /> <result column ="emp_email" property ="empEmail" jdbcType ="VARCHAR" /> <result column ="did" property ="did" jdbcType ="INTEGER" /> </resultMap > <sql id ="Example_Where_Clause" > <where > <foreach collection ="oredCriteria" item ="criteria" separator ="or" > <if test ="criteria.valid" > <trim prefix ="(" suffix =")" prefixOverrides ="and" > <foreach collection ="criteria.criteria" item ="criterion" > <choose > <when test ="criterion.noValue" > and ${criterion.condition} </when > <when test ="criterion.singleValue" > and ${criterion.condition} #{criterion.value} </when > <when test ="criterion.betweenValue" > and ${criterion.condition} #{criterion.value} and #{criterion.secondValue} </when > <when test ="criterion.listValue" > and ${criterion.condition} <foreach collection ="criterion.value" item ="listItem" open ="(" close =")" separator ="," > #{listItem} </foreach > </when > </choose > </foreach > </trim > </if > </foreach > </where > </sql > <sql id ="Base_Column_List" > eid, emp_name, emp_age, emp_sex, emp_email, did </sql > <select id ="selectByExample" resultMap ="BaseResultMap" parameterType ="com.huling.pojo.EmployeeExample" > select <if test ="distinct" > distinct </if > <include refid ="Base_Column_List" /> from t_emp <if test ="_parameter != null" > <include refid ="Example_Where_Clause" /> </if > <if test ="orderByClause != null" > order by ${orderByClause} </if > </select > </mapper >
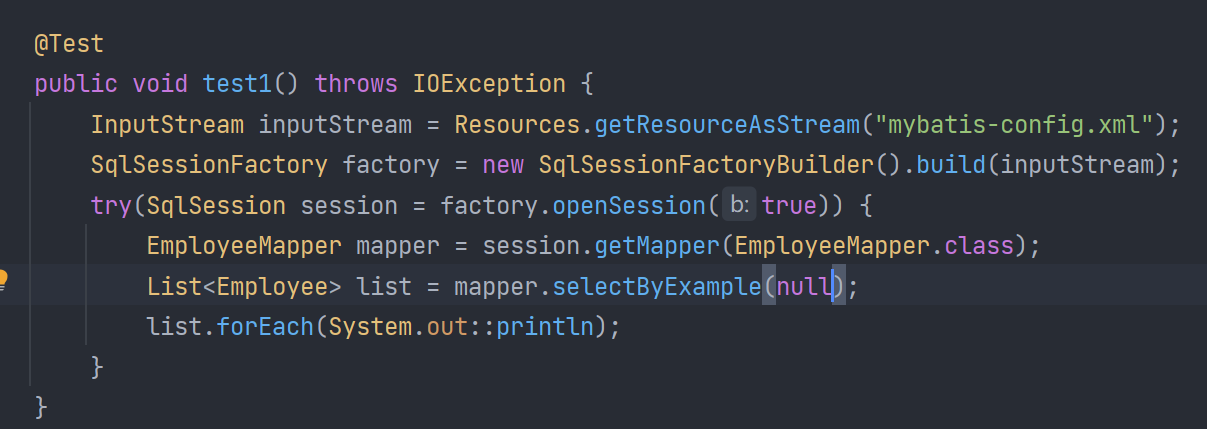
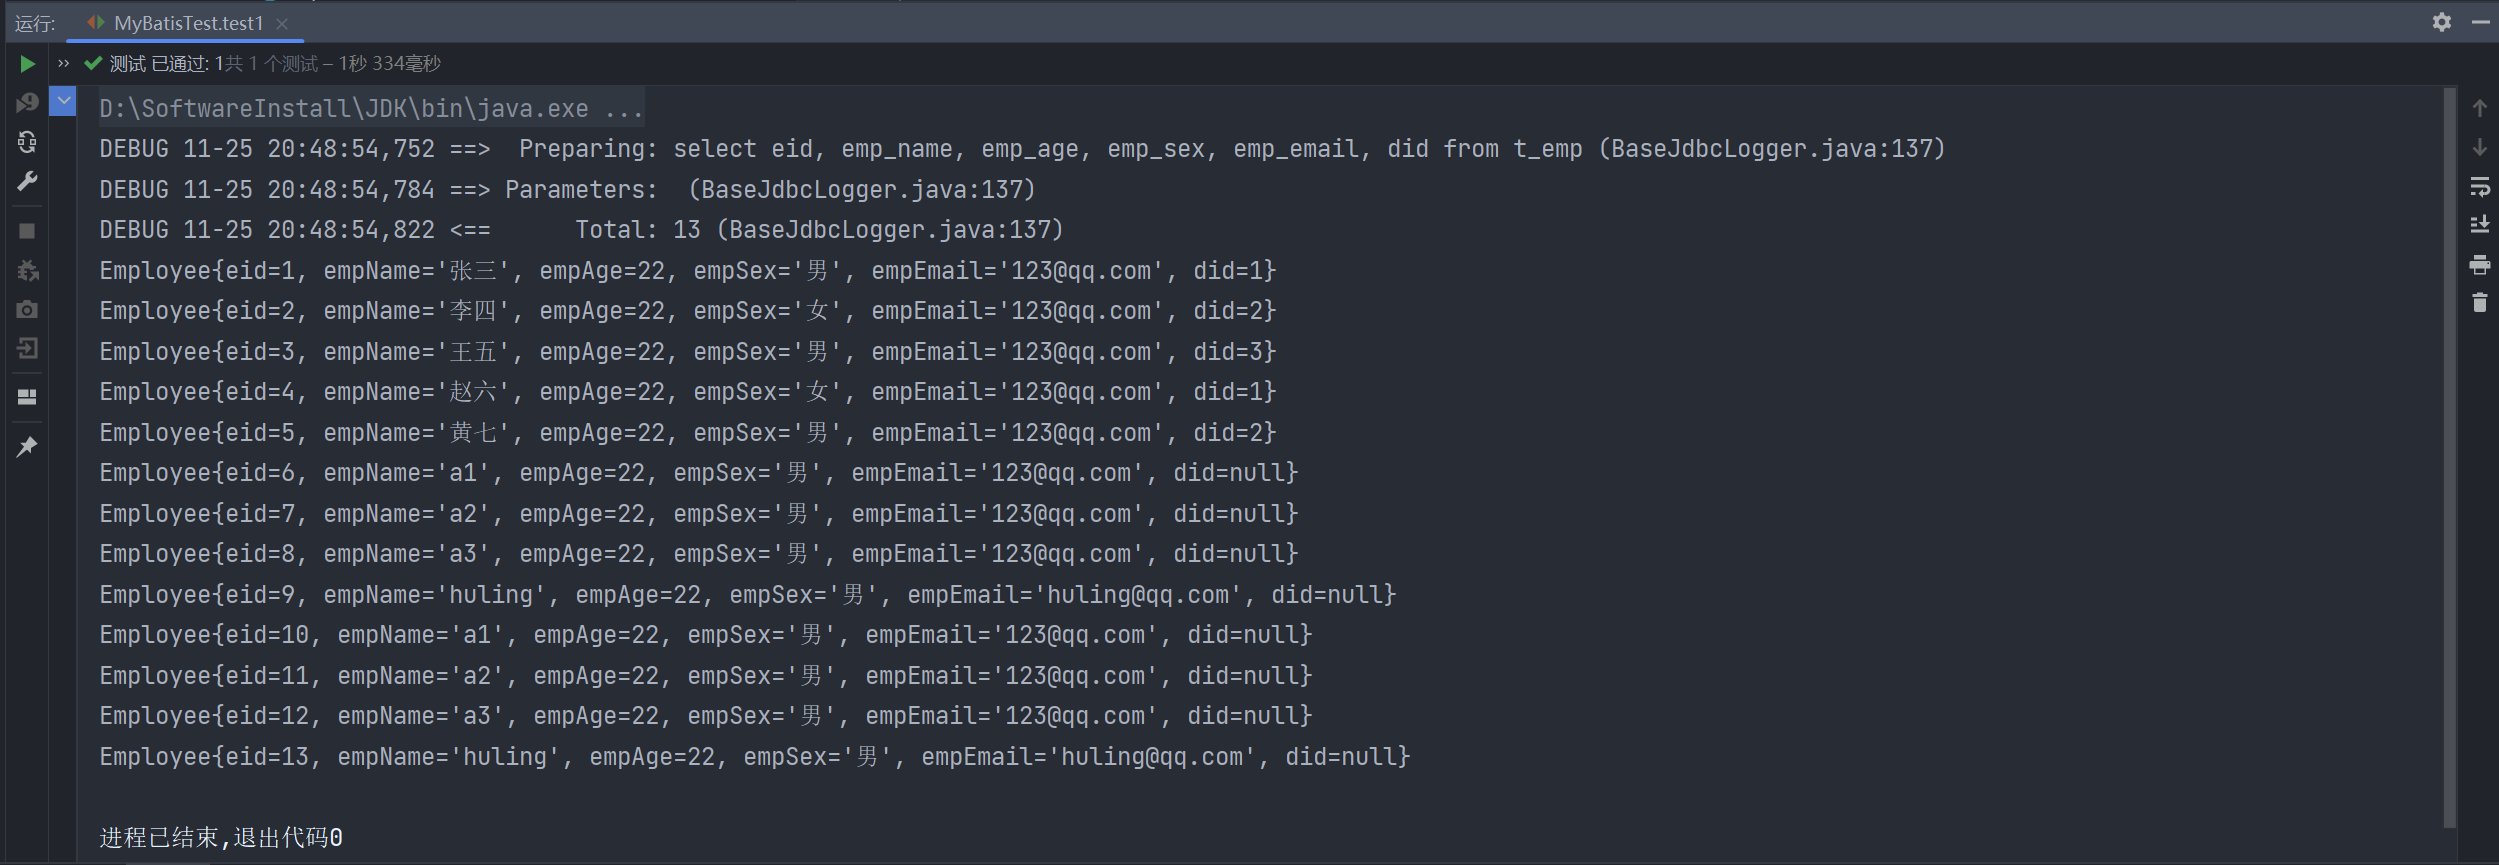
眼尖的同学可能发现了,_parameter 是个啥,怎么在 EmployeeExample 类中没有发现呢,这是因为 _parameter 其实是MyBatis动态SQL的内置参数之一,表示整个方法参数,也就是说如果方法只有单个参数, _parameter 就是参数本身,如果方法有多个参数,那么会被封装为一个Map对象赋给 _parameter,因此我们其实可以给selectByExample传入一个null表示查询所有员工记录!
说完selectByExample方法的XML映射实现,我们再看一下updateByPrimaryKey和updateByPrimaryKeySelective这两个方法的区别,如果不看XML映射文件可能仅靠方法的名字你还真猜不出两者的区别,其实前者会根据传入的Employee对象的字段新值全部直接更新,后者则会先判断Employee对象的字段新值是否为null,如果为null的话就忽略不更新此字段。
1
2
3
4
5
6
7
8
9
10
11
12
13
14
15
16
17
18
19
20
21
22
23
24
25
26
27
28
29
30
31
32
33
34
<?xml version="1.0" encoding="UTF-8" ?> <!DOCTYPE mapper PUBLIC "-//mybatis.org//DTD Mapper 3.0//EN" "http://mybatis.org/dtd/mybatis-3-mapper.dtd" > <mapper namespace="com.huling.mapper.EmployeeMapper" > <update id="updateByPrimaryKeySelective" parameterType="com.huling.pojo.Employee" > update t_emp <set > <if test="empName != null" > emp_name = #{empName,jdbcType=VARCHAR}, </if > <if test="empAge != null" > emp_age = #{empAge,jdbcType=INTEGER}, </if > <if test="empSex != null" > emp_sex = #{empSex,jdbcType=CHAR}, </if > <if test="empEmail != null" > emp_email = #{empEmail,jdbcType=VARCHAR}, </if > <if test="did != null" > did = #{did,jdbcType=INTEGER}, </if > </set> where eid = #{eid,jdbcType=INTEGER} </update> <update id="updateByPrimaryKey" parameterType="com.huling.pojo.Employee" > update t_emp set emp_name = #{empName,jdbcType=VARCHAR}, emp_age = #{empAge,jdbcType=INTEGER}, emp_sex = #{empSex,jdbcType=CHAR}, emp_email = #{empEmail,jdbcType=VARCHAR}, did = #{did,jdbcType=INTEGER} where eid = #{eid,jdbcType=INTEGER} </update> </mapper>
