Spring核心之IOC详解篇 一、设计模式之工厂模式 恐怖的代码耦合 我们先来看一个简单的分层Web开发的流程,首先我们编写自己的实体类User:
1
2
3
4
5
6
7
8
9
10
11
12
13
14
15
16
17
18
19
20
21
22
23
24
25
26
27
28
29
public class User { private String name; private String password; public User (String name, String password) { this .name = name; this .password = password; } public User () { System.out.println("User无参构造函数" ); } public String getName () { return name; } public void setName (String name) { this .name = name; } public String getPassword () { return password; } public void setPassword (String password) { this .password = password; } }
然后,我们编写持久层的DAO接口及其实现类:
1
2
3
4
5
6
7
8
9
10
11
12
13
14
15
16
17
18
19
20
21
22
public interface UserDAO { public void register (User user) ; public void login (String name, String password) ; } public class UserDAOImpl implements UserDAO { public UserDAOImpl () { System.out.println("UserDAOImpl无参构造函数" );; } @Override public void register (User user) { System.out.println("UserDAOImpl.register" ); } @Override public void login (String name, String password) { System.out.println("UserDAOImpl.login" ); } }
最后,我们编写业务逻辑层的Service接口及其实现类:
1
2
3
4
5
6
7
8
9
10
11
12
13
14
15
16
17
18
19
20
21
22
23
24
25
26
27
28
29
public interface UserService { public void register (User user) ; public void login (String name, String password) ; } public class UserServiceImpl implements UserService { UserDAO userDAO; public UserDAO getUserDAO () { return userDAO; } public void setUserDAO (UserDAO userDAO) { this .userDAO = userDAO; } @Override public void register (User user) { userDAO = new UserDAOImpl (); userDAO.register(user); } @Override public void login (String name, String password) { userDAO = new UserDAOImpl (); userDAO.login(name, password); } }
上面这段代码中UserServiceImpl需要调用持久层的方法操作数据库,因此依赖于UserDAOImpl,于是其定义了一个成员变量userDAO并使用userDAO = new UserDAOImpl()对其初始化,这段初始化的代码明显存在耦合度高的问题,假如有一天我们觉得UserDAOImpl不够好并重新编写了一个新的持久层的实现类UserDAOImplNew,我们需要找到业务逻辑层的实现类中每一个初始化UserDAOImpl的地方,并将其替换为UserDAOImplNew,这违反了开闭原则即对扩展开放、对修改关闭!
工厂设计模式登场 解决方案也很简单,就是利用工厂设计模式,通过一个对象工厂帮我们创建所需的对象,我们再也不需要在代码中硬编码写死,大大提高了程序的可维护性,下面看一个简单的工厂类的设计:
1
2
3
4
5
6
7
8
9
10
11
12
13
14
15
16
17
18
19
20
21
22
23
24
25
26
27
28
29
30
31
32
33
public class GenericBeanFactory { private static Properties env = new Properties (); static { try { InputStream inputStream = GenericBeanFactory.class.getResourceAsStream("/applicationContext.properties" ); env.load(inputStream); inputStream.close(); } catch (IOException e) { throw new RuntimeException (e); } } public static Object getBean (String key) { Object bean = null ; try { Class clazz = Class.forName(env.getProperty(key)); bean = clazz.getConstructor().newInstance(); } catch (ClassNotFoundException e) { throw new RuntimeException (e); } catch (InstantiationException e) { throw new RuntimeException (e); } catch (IllegalAccessException e) { throw new RuntimeException (e); } catch (InvocationTargetException e) { throw new RuntimeException (e); } catch (NoSuchMethodException e) { throw new RuntimeException (e); } return bean; } }
配置文件applicationContext.properties的内容如下:
1
2
userService = com.huling.basic.UserServiceImpl userDAO = com.huling.basic.UserDAOImpl
Bean工厂GenericBeanFactory会预先加载用户自定义的配置文件applicationContext.properties并将其中的内容导出到Properties对象中,后续如果我们需要创建对象可以直接通过getBean方法,传入对象在配置文件中的索引值如userDAO,获得其对应的全限定类名如com.huling.basic.UserDAOImpl,利用Java反射机制帮我们创建对象(默认调用无参构造函数),经过改造后的UserServiceImpl类的内容如下:
1
2
3
4
5
6
7
8
9
10
11
12
13
14
15
16
17
18
19
20
21
22
23
public class UserServiceImpl implements UserService { UserDAO userDAO; public UserDAO getUserDAO () { return userDAO; } public void setUserDAO (UserDAO userDAO) { this .userDAO = userDAO; } @Override public void register (User user) { userDAO = (UserDAO) GenericBeanFactory.getBean("userDAO" ); userDAO.register(user); } @Override public void login (String name, String password) { userDAO = (UserDAO) GenericBeanFactory.getBean("userDAO" ); userDAO.login(name, password); } }
假如有一天我们觉得UserDAOImpl不够好并重新编写了一个新的持久层的实现类UserDAOImplNew,我们只需要修改我们的配置文件并将com.huling.basic.UserDAOImpl替换为com.huling.basic.UserDAOImplNew即可,帮助程序大大地解耦合。
测试我们地简单工厂程序:
1 2 3 4 5 6 7 8 9 @Test public void test0 () { UserService userService = (UserService) GenericBeanFactory.getBean("userService" ); userService.login("huling" , "123456" ); userService.register(new User ()); }
二、Spring框架初体验 搭建Spring环境 第一步需要引入Spring的Maven依赖:
1 2 3 4 5 <dependency > <groupId > org.springframework</groupId > <artifactId > spring-context</artifactId > <version > 5.1.4.RELEASE</version > </dependency >
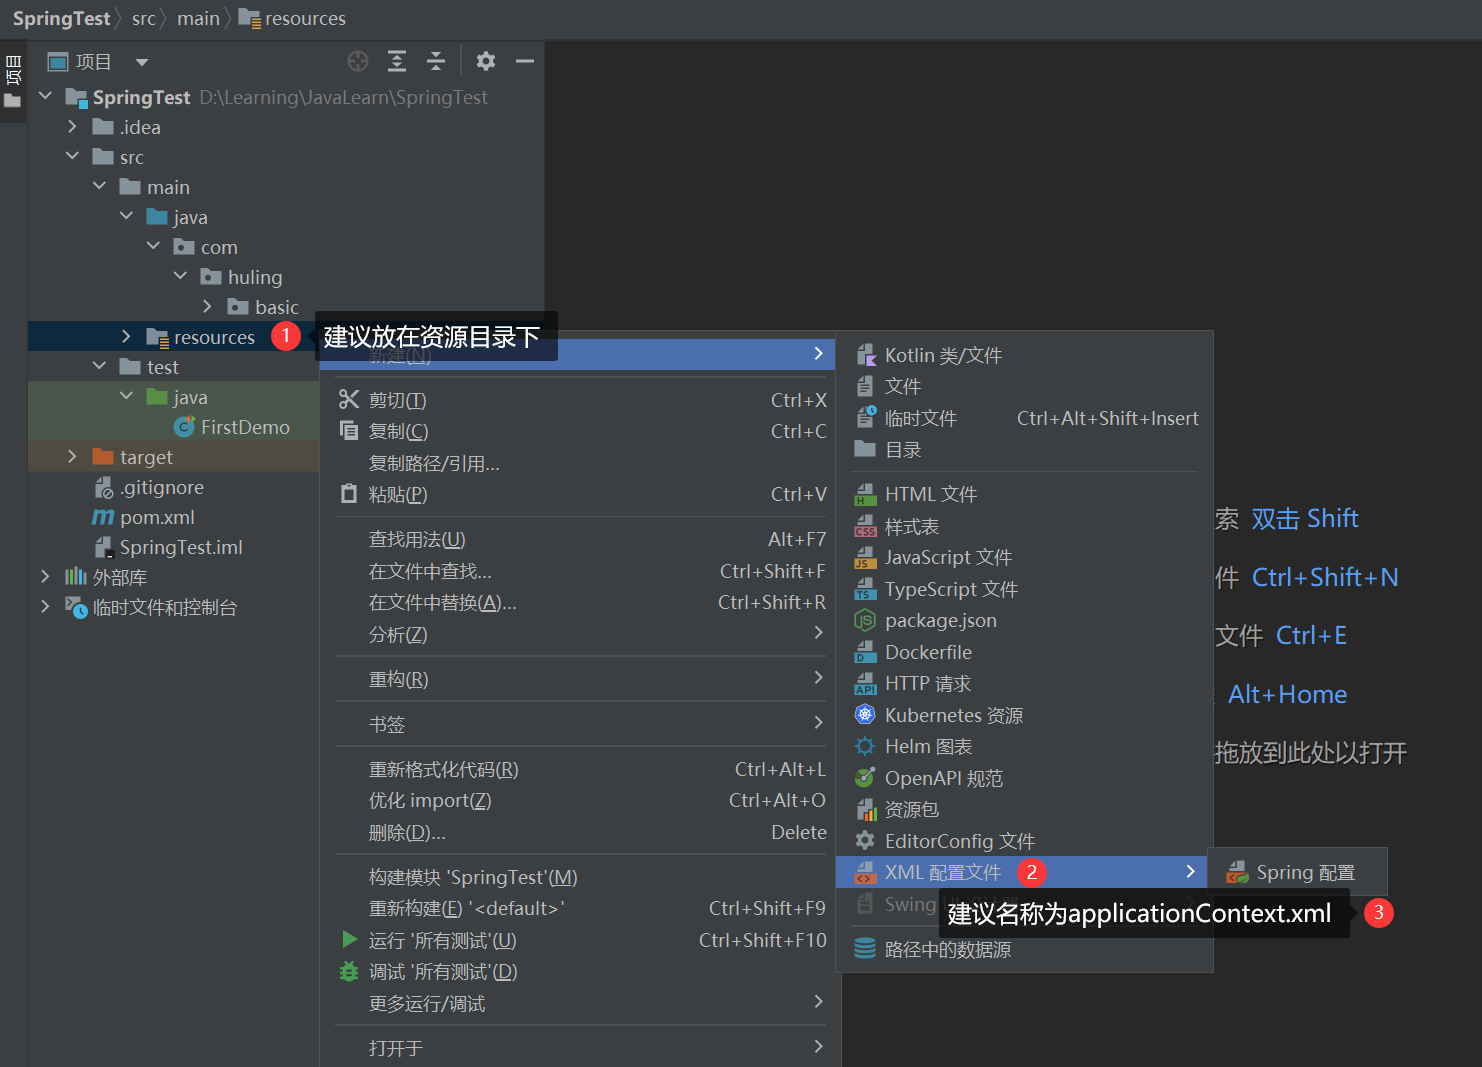
第二步创建配置文件:
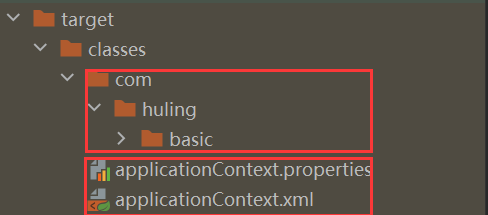
有一点需要注意,resources目录和java目录的内容在编译后会被整合到同一个目录classes下,因此两者是同级的,我们所说的类路径其实就是编译后的target目录下的classes子目录。
第三步测试Spring工厂的一些常见方法:
1
2
3
4
5
6
7
8
9
<?xml version="1.0" encoding="UTF-8" ?> <beans xmlns ="http://www.springframework.org/schema/beans" xmlns:xsi ="http://www.w3.org/2001/XMLSchema-instance" xsi:schemaLocation ="http://www.springframework.org/schema/beans http://www.springframework.org/schema/beans/spring-beans.xsd" > <bean id ="person" name ="p,p1,p2" class ="com.huling.basic.Person" /> <bean class ="com.huling.basic.User" /> <bean class ="com.huling.basic.User" /> <bean name ="user" class ="com.huling.basic.User" /> </beans >
bean标签中的id属性必须唯一,如果没有指定则默认使用name属性,如果name属性也没有设置则Spring会自动分配一个id值,规则是类的全限定名称#数字如com.huling.basic.User#0,其中数字表示在工厂中相同类型Bean的编码。name属性是对象的别名,可以指定多个,用英文逗号分隔即可。
测试程序如下:
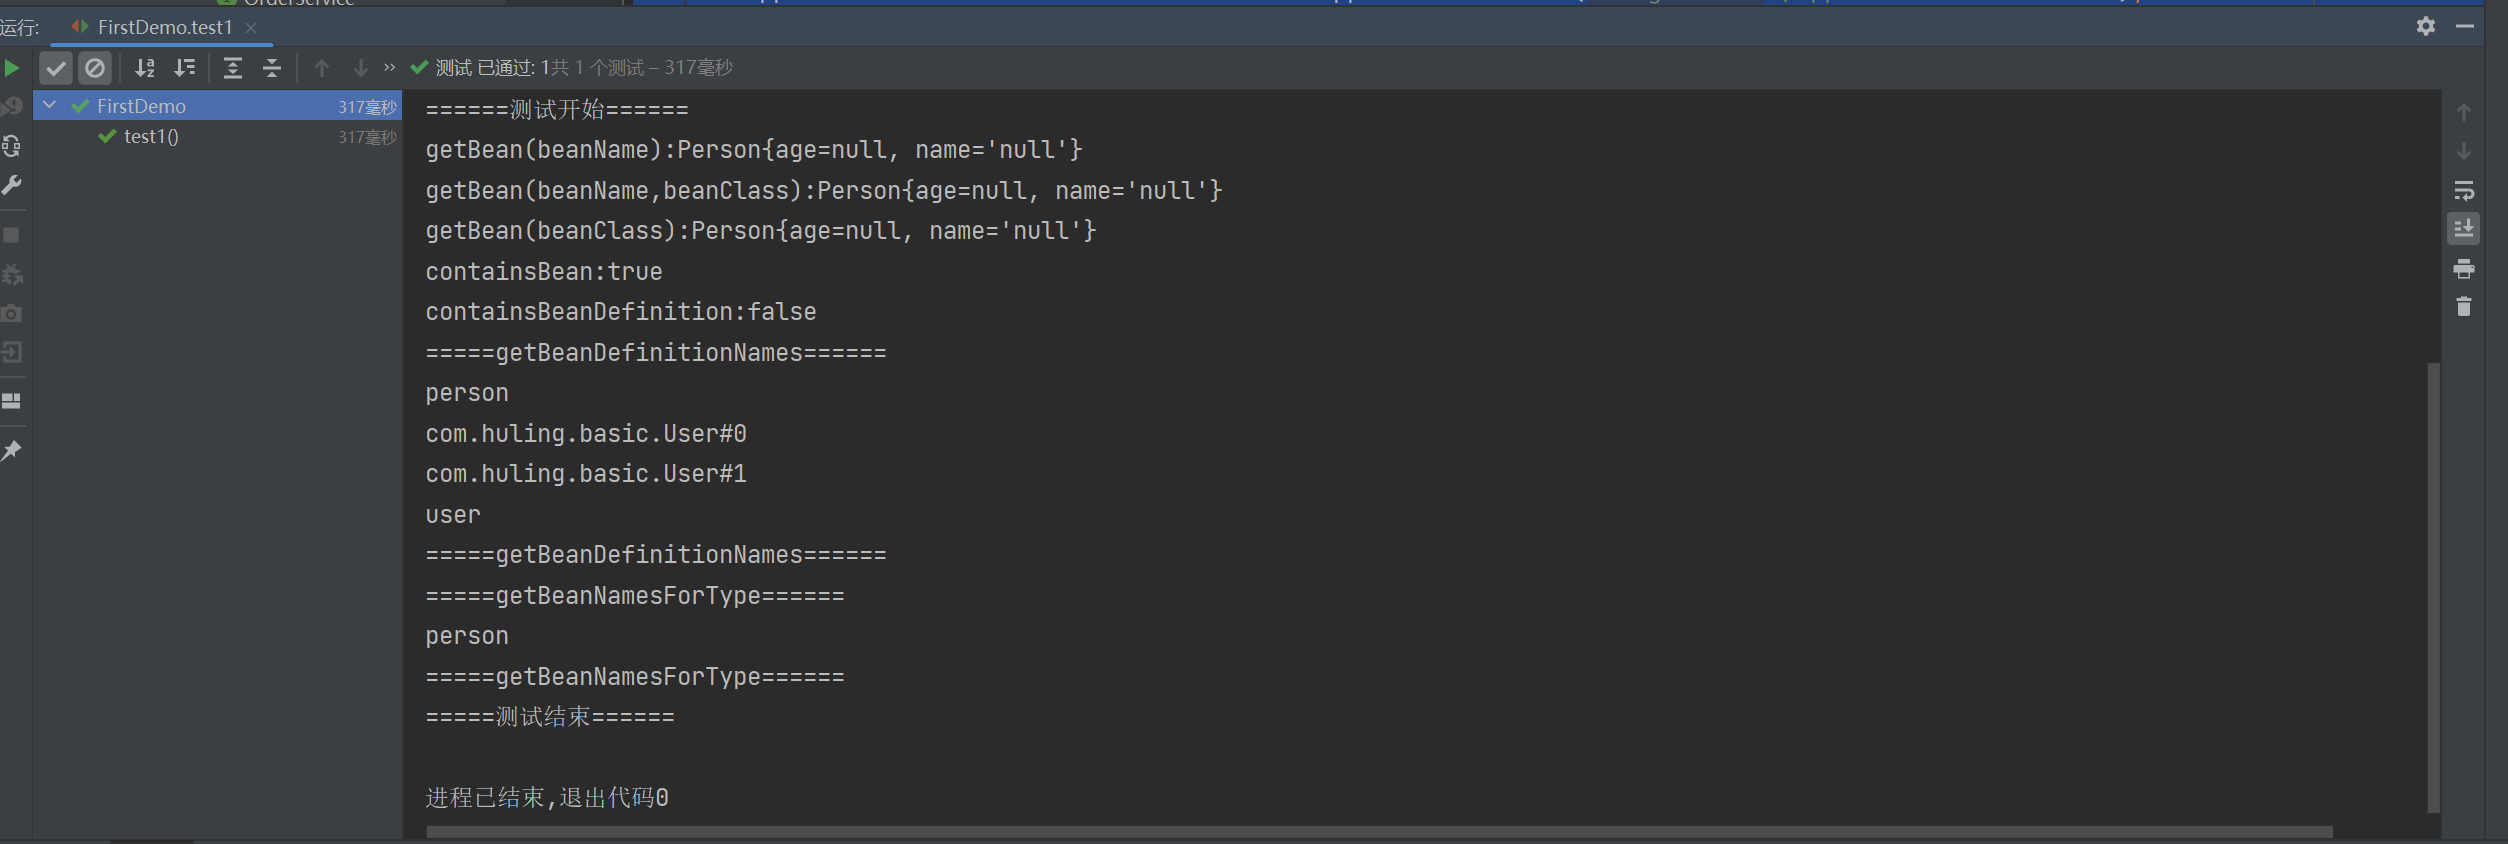
1 2 3 4 5 6 7 8 9 10 11 12 13 14 15 16 17 18 19 20 21 22 23 24 25 26 27 28 29 30 31 32 33 34 35 36 @Test public void test1 () { ApplicationContext ctx = new ClassPathXmlApplicationContext ("/applicationContext.xml" ); System.out.println("======测试开始======" ); Person person1 = (Person) ctx.getBean("person" ); System.out.println("getBean(beanName):" + person1); Person person2 = ctx.getBean("person" , Person.class); System.out.println("getBean(beanName,beanClass):" + person2); Person person3 = ctx.getBean(Person.class); System.out.println("getBean(beanClass):" + person3); System.out.println("containsBean:" + ctx.containsBean("p" )); System.out.println("containsBeanDefinition:" + ctx.containsBeanDefinition("p" )); System.out.println("=====getBeanDefinitionNames======" ); for (String beanDefinitionName : ctx.getBeanDefinitionNames()) { System.out.println(beanDefinitionName); } System.out.println("=====getBeanDefinitionNames======" ); System.out.println("=====getBeanNamesForType======" ); for (String beanName : ctx.getBeanNamesForType(Person.class)) { System.out.println(beanName); } System.out.println("=====getBeanNamesForType======" ); System.out.println("=====测试结束======" ); }
引出Spring容器 测试代码中我们用到了Spring的一个重要的接口ApplicationContext,它是Spring框架中的一个关键接口,用于管理和提供应用程序的配置信息和Bean实例。它是Spring IOC(控制反转)容器的实现之一,负责加载、配置和初始化Bean,并提供对它们的访问。ApplicationContext提供了以下主要功能:
Bean实例化和管理:ApplicationContext负责根据配置信息实例化和管理应用程序中的Bean。它会解析Bean的定义,创建Bean对象,并在需要时将其注入到其他Bean中。依赖注入(Dependency Injection):ApplicationContext实现了依赖注入,即自动将依赖关系通过配置或注解方式注入到对象中。这样可以降低组件之间的耦合度,并提高代码的可维护性和可测试性。生命周期管理:ApplicationContext能够管理Bean的生命周期。它在Bean实例化之后,可以调用特定的回调方法来执行初始化操作,并在应用程序关闭时销毁Bean实例。配置元数据的加载和解析:ApplicationContext负责加载并解析配置文件或配置类中的元数据信息。这些元数据包含了Bean的定义、依赖关系、切面配置等信息。AOP支持:ApplicationContext提供了对面向切面编程(AOP)的支持。它可以自动为Bean应用切面,并将切面逻辑织入到目标对象中。
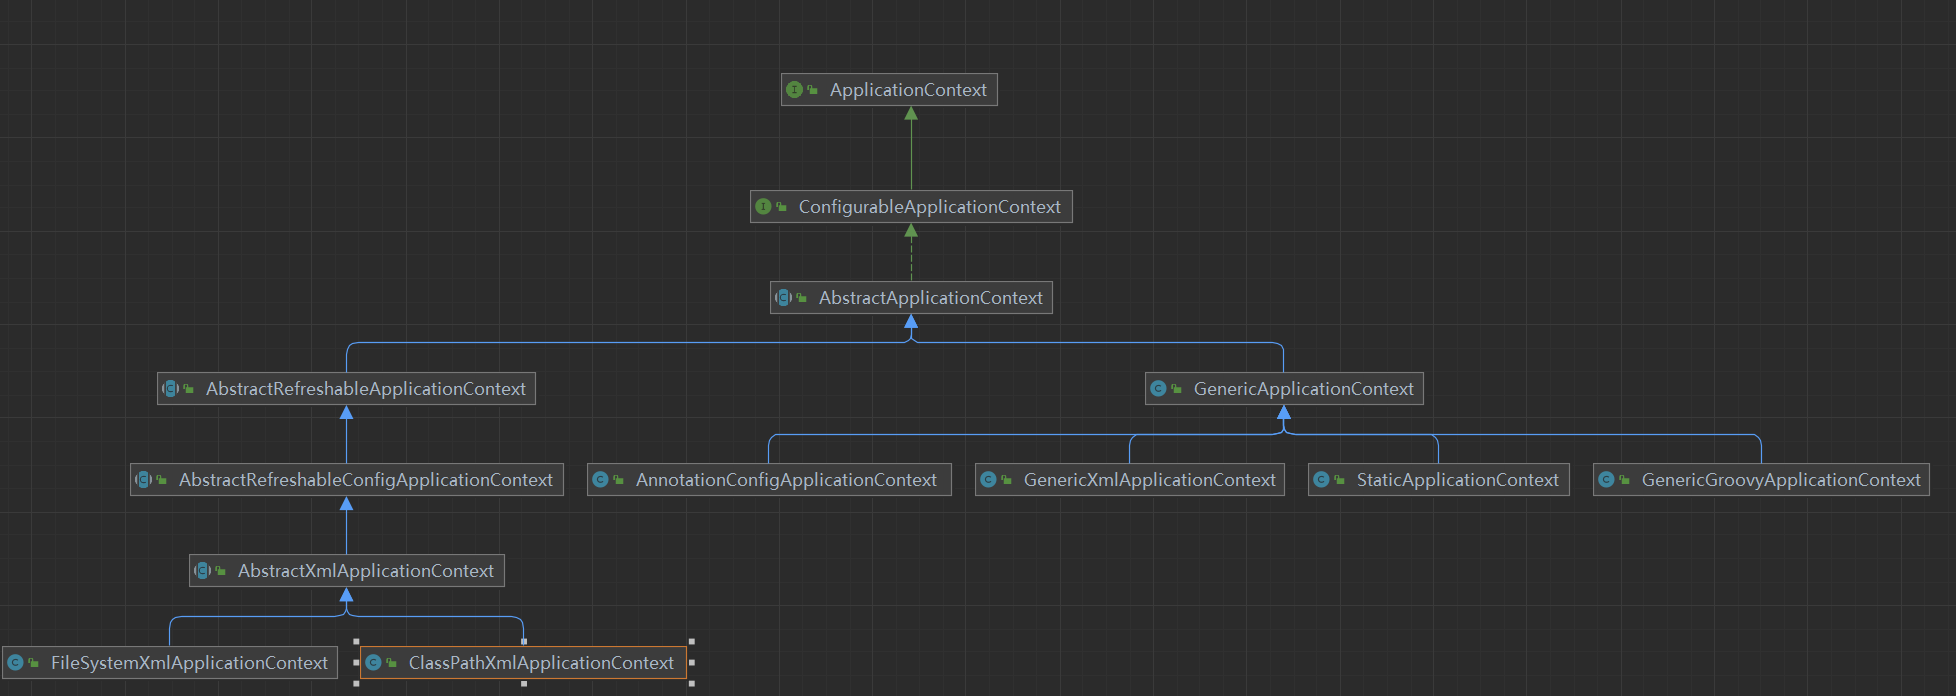
Spring的ApplicationContext有两个主要实现:
ClassPathXmlApplicationContext:从类路径下的XML配置文件加载和初始化应用程序上下文。它会在类路径下搜索并解析XML文件,将其中定义的Bean实例化并添加到容器中。AnnotationConfigApplicationContext:基于Java注解的配置方式加载和初始化应用程序上下文。它可以扫描指定的包或类,并根据注解配置来创建和管理Bean。
三、Spring整合日志框架 日志框架的必要性 Spring与日志框架进行整合,日志框架就可以在控制台中,输出Spring框架运行过程中的一些重要信息,便于我们了解Spring框架的运行过程,利于程序的调试。
整合日志框架的步骤 首先还是引入日志所需要的依赖:
1 2 3 4 5 6 7 8 9 10 <dependency > <groupId > org.slf4j</groupId > <artifactId > slf4j-log4j12</artifactId > <version > 1.7.25</version > </dependency > <dependency > <groupId > log4j</groupId > <artifactId > log4j</artifactId > <version > 1.2.17</version > </dependency >
然后在resources目录下创建日志配置文件log4j.properties:
1 2 3 4 5 6 7 log4j.rootLogger =debug,console log4j.appender.console =org.apache.log4j.ConsoleAppender log4j.appender.console.Target =System.out log4j.appender.console.layout =org.apache.log4j.PatternLayout log4j.appender.console.layout.ConversionPattern =%d{yyyy-MM-dd HH:mm:ss} %-5p %c{1}:%L - %m%n
最后测试效果:
1
2
3
4
5
6
@Test public void test () { ApplicationContext ctx = new ClassPathXmlApplicationContext ("/applicationContext.xml" ); Person person = (Person) ctx.getBean("person" ); System.out.println("person = " + person); }
四、Spring依赖注入机制 依赖注入的概念 依赖注入听起来比较抽象,其实就是==把对象间的依赖关系交给Spring框架处理,通过Spring的配置文件或者注解的形式完成依赖对象的注入/赋值==。Spring的注入主要有以下几种方式:
构造器注入(Constructor Injection):通过构造器来注入依赖对象,可以通过构造器参数的方式表达对象之间的依赖关系。Setter方法注入(Setter Injection):通过Setter方法来注入依赖对象,可以为对象的属性提供Setter方法,并由Spring容器在创建对象后随即调用Setter方法完成依赖注入。接口注入(Interface Injection):通过接口的方式来注入依赖对象,一般使用Java提供的接口来定义注入方法,由Spring容器在创建对象后调用接口方法完成依赖注入。注解注入(Annotation Injection):通过注解来标记需要注入的依赖对象,Spring通过扫描注解并自动完成依赖注入。常用的注解包括 @Autowired、@Resource、@Inject 等。
无论使用何种方式,依赖注入的核心思想是将对象的创建和依赖关系交给Spring容器来管理,使得代码更加灵活、可维护和可测试。
Spring底层使用工厂设计模式,把对于成员变量赋值的控制权,从代码中反转/转移到Spring工厂和配置文件中完成,大大降低代码的耦合性。
依赖注入的测试 为了后面的测试程序,我们编写一个Person类:
1
2
3
4
5
6
7
8
9
10
11
12
13
14
15
16
17
18
19
20
21
22
23
24
25
26
27
28
29
30
31
32
33
34
35
36
37
38
39
40
41
42
public class Person { private Integer age; private String name; public Integer getAge () { System.out.println("Person.getAge" ); return age; } public void setAge (Integer age) { System.out.println("Person.setAge(" + age + ")" ); this .age = age; } public String getName () { System.out.println("Person.getName" ); return name; } public void setName (String name) { System.out.println("Person.setName(" + name + ")" ); this .name = name; } public Person () { System.out.println("Person无参构造方法" ); } public Person (Integer age, String name) { System.out.println("Person(Integer age, String name)构造方法" ); this .age = age; this .name = name; } @Override public String toString () { return "Person{" + "age=" + age + ", name='" + name + '\'' + '}' ; } }
下面我们简单测试一下Spring为我们提供的构造注入和Setter注入方法,其中person对象会在调用无参构造函数后利用Setter注入方法完成依赖注入,person1对象会调用无参构造函数,person2对象会根据构造函数参数的个数和类型调用相应的有参构造函数完成依赖注入。
1
2
3
4
5
6
7
8
9
10
11
12
13
14
15
16
17
18
19
20
21
22
<?xml version="1.0" encoding="UTF-8" ?> <beans xmlns ="http://www.springframework.org/schema/beans" xmlns:xsi ="http://www.w3.org/2001/XMLSchema-instance" xsi:schemaLocation ="http://www.springframework.org/schema/beans http://www.springframework.org/schema/beans/spring-beans.xsd" > <bean id ="person" name ="p" class ="com.huling.basic.Person" > <property name ="age" > <value > 22</value > </property > <property name ="name" > <value > huling</value > </property > </bean > <bean id ="person1" class ="com.huling.basic.Person" /> <bean id ="person2" class ="com.huling.basic.Person" > <constructor-arg name ="age" type ="java.lang.Integer" > <value > 22</value > </constructor-arg > <constructor-arg name ="name" type ="java.lang.String" > <value > huling</value > </constructor-arg > </bean > </beans >
测试程序如下:
1 2 3 4 5 6 7 8 9 10 11 @Test public void test2 () { ApplicationContext ctx = new ClassPathXmlApplicationContext ("/applicationContext.xml" ); System.out.println("======测试开始======" ); Person person = ctx.getBean("person" , Person.class); System.out.println(person); }
通过测试结果我们也能观察到,ClassPathXmlApplicationContext一旦加载配置文件后Spring就已经为我们创建好了单例Bean的共享实例,这个行为也可以在配置文件的bean标签中通过scope属性和lazy-init属性进一步调节,后面会谈到。
简单类型的依赖注入 接着我们详细看一下简单的JDK内置类型(八种基本数据类型和String、数组、Set、List、Map、Properties)如何完成注入,我们以Setter注入为例:
1
2
3
4
5
6
7
8
9
10
11
12
13
14
15
16
17
18
19
20
21
22
23
24
25
26
27
28
29
30
31
32
33
34
35
36
37
38
39
40
41
42
43
44
45
46
47
48
49
50
51
52
53
54
55
56
57
58
59
60
61
62
63
64
65
66
67
68
69
70
71
72
73
74
public class Entity { private double d; private Double Double; private String str; private String[] arr; private Set<String> set; private List<String> list; private Map<String, String> map; private Properties properties; public double getD () { return d; } public void setD (double d) { this .d = d; } public java.lang.Double getDouble () { return Double; } public void setDouble (java.lang.Double aDouble) { Double = aDouble; } public String getStr () { return str; } public void setStr (String str) { this .str = str; } public String[] getArr() { return arr; } public void setArr (String[] arr) { this .arr = arr; } public Set<String> getSet () { return set; } public void setSet (Set<String> set) { this .set = set; } public List<String> getList () { return list; } public void setList (List<String> list) { this .list = list; } public Map<String, String> getMap () { return map; } public void setMap (Map<String, String> map) { this .map = map; } public Properties getProperties () { return properties; } public void setProperties (Properties properties) { this .properties = properties; } }
对应的配置文件applicationContext.xml的内容如下:
1
2
3
4
5
6
7
8
9
10
11
12
13
14
15
16
17
18
19
20
21
22
23
24
25
26
27
28
29
30
31
32
33
34
35
36
37
38
39
40
41
42
43
44
45
46
47
48
49
50
51
52
53
54
55
56
57
58
59
60
61
62
63
64
65
66
67
68
69
70
71
72
73
74
75
76
77
<?xml version="1.0" encoding="UTF-8" ?> <beans xmlns ="http://www.springframework.org/schema/beans" xmlns:xsi ="http://www.w3.org/2001/XMLSchema-instance" xsi:schemaLocation ="http://www.springframework.org/schema/beans http://www.springframework.org/schema/beans/spring-beans.xsd" > <bean id ="person" name ="p" class ="com.huling.basic.Person" > <property name ="age" > <value > 22</value > </property > <property name ="name" > <value > huling</value > </property > </bean > <bean id ="person1" class ="com.huling.basic.Person" /> <bean id ="person2" class ="com.huling.basic.Person" > <constructor-arg name ="age" type ="java.lang.Integer" > <value > 22</value > </constructor-arg > <constructor-arg name ="name" type ="java.lang.String" > <value > huling</value > </constructor-arg > </bean > <bean id ="user" class ="com.huling.basic.User" /> <bean id ="entity" class ="com.huling.basic.Entity" > <property name ="d" > <value > 1.20</value > </property > <property name ="double" > <value > 1.50</value > </property > <property name ="str" > <value > huling</value > </property > <property name ="arr" > <list > <value > arrElement1</value > <value > arrElement2</value > <value > arrElement3</value > </list > </property > <property name ="set" > <set > <value > setElement1</value > <value > setElement2</value > <value > setElement3</value > <value > setElement3</value > <value > setElement3</value > </set > </property > <property name ="list" > <list > <value > listElement1</value > <value > listElement2</value > <value > listElement3</value > <value > listElement3</value > <value > listElement3</value > </list > </property > <property name ="map" > <map > <entry > <key > <value > key1</value > </key > <value > value1</value > </entry > <entry > <key > <value > key2</value > </key > <value > value2</value > </entry > </map > </property > <property name ="properties" > <props > <prop key ="key1" > value1</prop > <prop key ="key2" > value2</prop > </props > </property > </bean > </beans >
编写的测试程序如下:
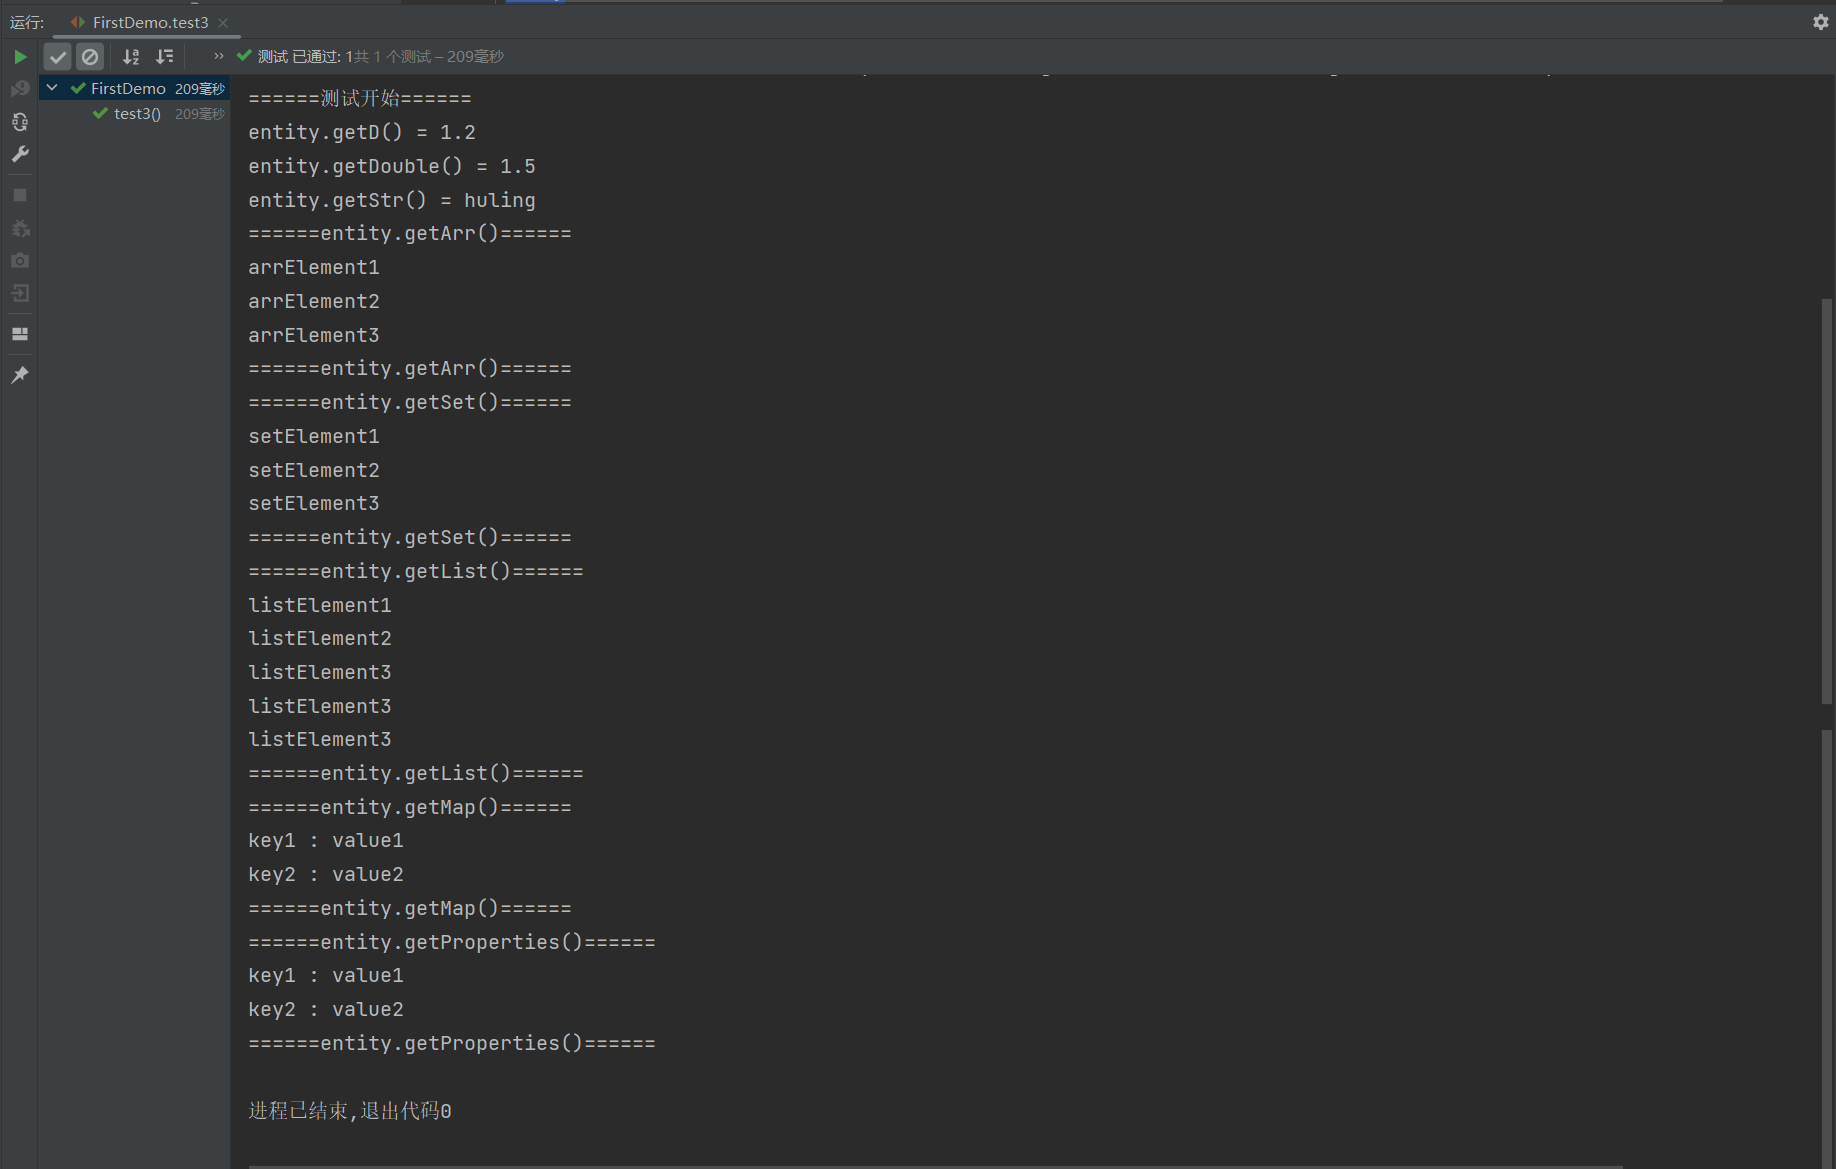
1 2 3 4 5 6 7 8 9 10 11 12 13 14 15 16 17 18 19 20 21 22 23 24 25 26 27 28 29 30 31 32 33 34 35 36 37 38 39 40 41 42 43 44 45 @Test public void test3 () { ApplicationContext ctx = new ClassPathXmlApplicationContext ("/applicationContext.xml" ); System.out.println("======测试开始======" ); Entity entity = ctx.getBean("entity" , Entity.class); System.out.println("entity.getD() = " + entity.getD()); System.out.println("entity.getDouble() = " + entity.getDouble()); System.out.println("entity.getStr() = " + entity.getStr()); System.out.println("======entity.getArr()======" ); String[] arr = entity.getArr(); for (String e : arr) { System.out.println(e); } System.out.println("======entity.getArr()======" ); System.out.println("======entity.getSet()======" ); Set<String> set = entity.getSet(); for (String e : set) { System.out.println(e); } System.out.println("======entity.getSet()======" ); System.out.println("======entity.getList()======" ); List<String> list = entity.getList(); for (String e : list) { System.out.println(e); } System.out.println("======entity.getList()======" ); System.out.println("======entity.getMap()======" ); Map<String, String> map = entity.getMap(); System.out.println("key1 : " + map.get("key1" )); System.out.println("key2 : " + map.get("key2" )); System.out.println("======entity.getMap()======" ); System.out.println("======entity.getProperties()======" ); Properties properties = entity.getProperties(); System.out.println("key1 : " + properties.getProperty("key1" )); System.out.println("key2 : " + properties.getProperty("key2" )); System.out.println("======entity.getProperties()======" ); }
自定义类型的依赖注入 除了JDK的内置类型,程序员还需要和自己开发的自定义类型打交道,例如UserService等,因此我们还需要明白Spring如何帮我们完成自定义类型的依赖注入,为了后续测试的方便,我们编写开发了OrderService接口及其实现类:
1
2
3
4
5
6
7
8
9
10
11
12
13
14
15
16
17
18
19
20
public interface OrderService { public void getOrderById (int id) ; } public class OrderServiceImpl implements OrderService { UserDAO userDAO; public UserDAO getUserDAO () { return userDAO; } public void setUserDAO (UserDAO userDAO) { this .userDAO = userDAO; } @Override public void getOrderById (int id) { System.out.println("OrderServiceImpl.getOrderById" ); } }
可以看出,用户服务和订单服务都需要操作用户数据库,因此都需要依赖UserDAO,我们看一下配置文件怎么注入自定义的UserDAOImpl对象:
1 2 3 4 5 6 7 8 9 10 11 <bean id ="useService" class ="com.huling.basic.UserServiceImpl" > <property name ="userDAO" > <bean class ="com.huling.basic.UserDAOImpl" /> </property > </bean > <bean id ="orderService" class ="com.huling.basic.OrderServiceImpl" > <property name ="userDAO" > <bean class ="com.huling.basic.UserDAOImpl" /> </property > </bean >
上面这种方式可维护性较差,一旦需要更换UserDAO的实现类需要修改多处,并且UserDAO对象创建了多份冗余实例,因此我们更推荐下面这种写法:
1 2 3 4 5 6 7 8 9 10 11 12 <bean id ="userDAO" class ="com.huling.basic.UserDAOImpl" /> <bean id ="userService" class ="com.huling.basic.UserServiceImpl" > <property name ="userDAO" > <ref bean ="userDAO" /> </property > </bean > <bean id ="orderService" class ="com.huling.basic.OrderServiceImpl" > <property name ="userDAO" > <ref bean ="userDAO" /> </property > </bean >
需要注意,Spring的单例Bean并不具备线程安全特性,但关于一个Bean对象是否安全需要结合多方面考虑例如是否定义了普通变量或静态变量、Scope属性是singleton还是prototype、是有状态Bean还是无状态Bean等等。
如果单例Bean是一个无状态Bean,也就是Bean中不存在只读不写(不存在共享变量的修改),那么这个单例Bean是线程安全的。比如Spring MVC的Controller、Service、Dao等,这些Bean大多是无状态的,只关注于方法本身。如果单例Bean是有状态Bean,那么Bean是线程不安全的。
复杂类型的依赖注入 所谓的复杂类型,就是不能直接通过new来创建的对象,例如:JDBC中的Connection、MyBatis中的SqlSessionFactory。我们先看一下Spring为我们提供的第一种注入复杂类型对象的方法:
1
2
3
4
5
6
7
8
9
10
11
12
13
14
15
16
17
18
19
20
21
22
23
24
25
26
27
28
29
30
31
32
33
34
35
36
37
38
39
40
41
42
43
44
45
46
47
48
49
50
51
52
53
54
55
56
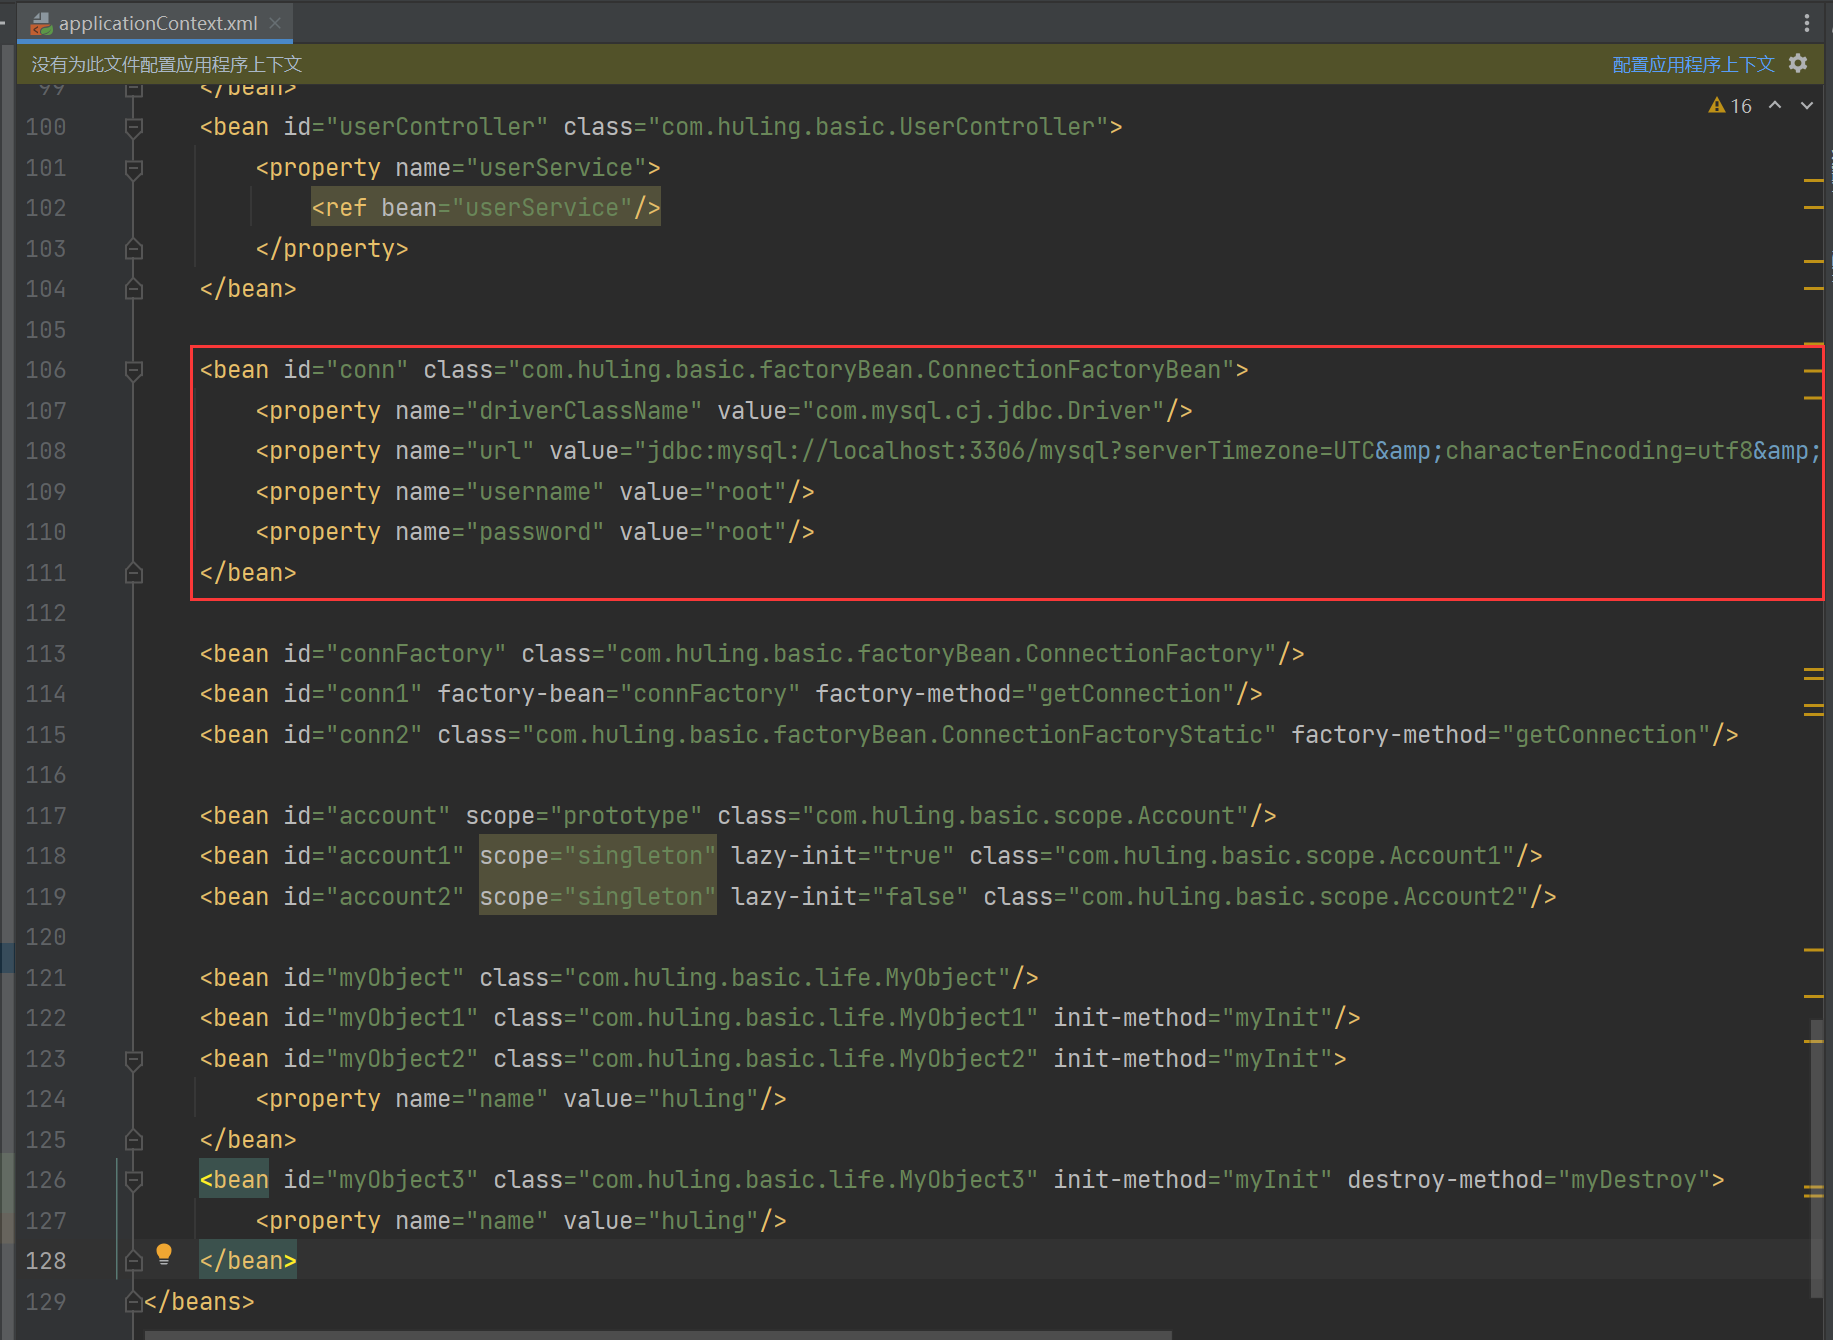
public class ConnectionFactoryBean implements FactoryBean <Connection> { private String driverClassName; private String url; private String username; private String password; public String getDriverClassName () { return driverClassName; } public void setDriverClassName (String driverClassName) { this .driverClassName = driverClassName; } public String getUrl () { return url; } public void setUrl (String url) { this .url = url; } public String getUsername () { return username; } public void setUsername (String username) { this .username = username; } public String getPassword () { return password; } public void setPassword (String password) { this .password = password; } @Override public Connection getObject () throws Exception { Class.forName(driverClassName); Connection connection = DriverManager.getConnection(url, username, password); return connection; } @Override public Class<?> getObjectType() { return Connection.class; } @Override public boolean isSingleton () { return false ; } }
通过继承FactoryBean接口并实现相关方法,其中getObject返回创建的复杂类型对象,getObjectType方法返回复杂类型的Class对象,isSingleton方法决定创建的复杂对象是否单例。我们看配置文件的内容:
1 2 3 4 5 6 <bean id ="conn" class ="com.huling.basic.factoryBean.ConnectionFactoryBean" > <property name ="driverClassName" value ="com.mysql.cj.jdbc.Driver" /> <property name ="url" value ="jdbc:mysql://localhost:3306/mysql?serverTimezone=UTC& characterEncoding=utf8& useUnicode=true& useSSL=false& allowPublicKeyRetrieval=true" /> <property name ="username" value ="root" /> <property name ="password" value ="root" /> </bean >
测试程序如下:
1 2 3 4 5 6 7 8 9 10 11 12 13 14 15 16 17 18 19 @Test public void test6 () { ApplicationContext ctx = new ClassPathXmlApplicationContext ("/applicationContext.xml" ); System.out.println("======测试开始======" ); Connection conn1 = (Connection) ctx.getBean("conn" ); System.out.println(conn1); Connection conn2 = (Connection) ctx.getBean("conn" ); System.out.println(conn2); ConnectionFactoryBean bean1 = (ConnectionFactoryBean) ctx.getBean("&conn" ); System.out.println(bean1); ConnectionFactoryBean bean2 = (ConnectionFactoryBean) ctx.getBean("&conn" ); System.out.println(bean2); }
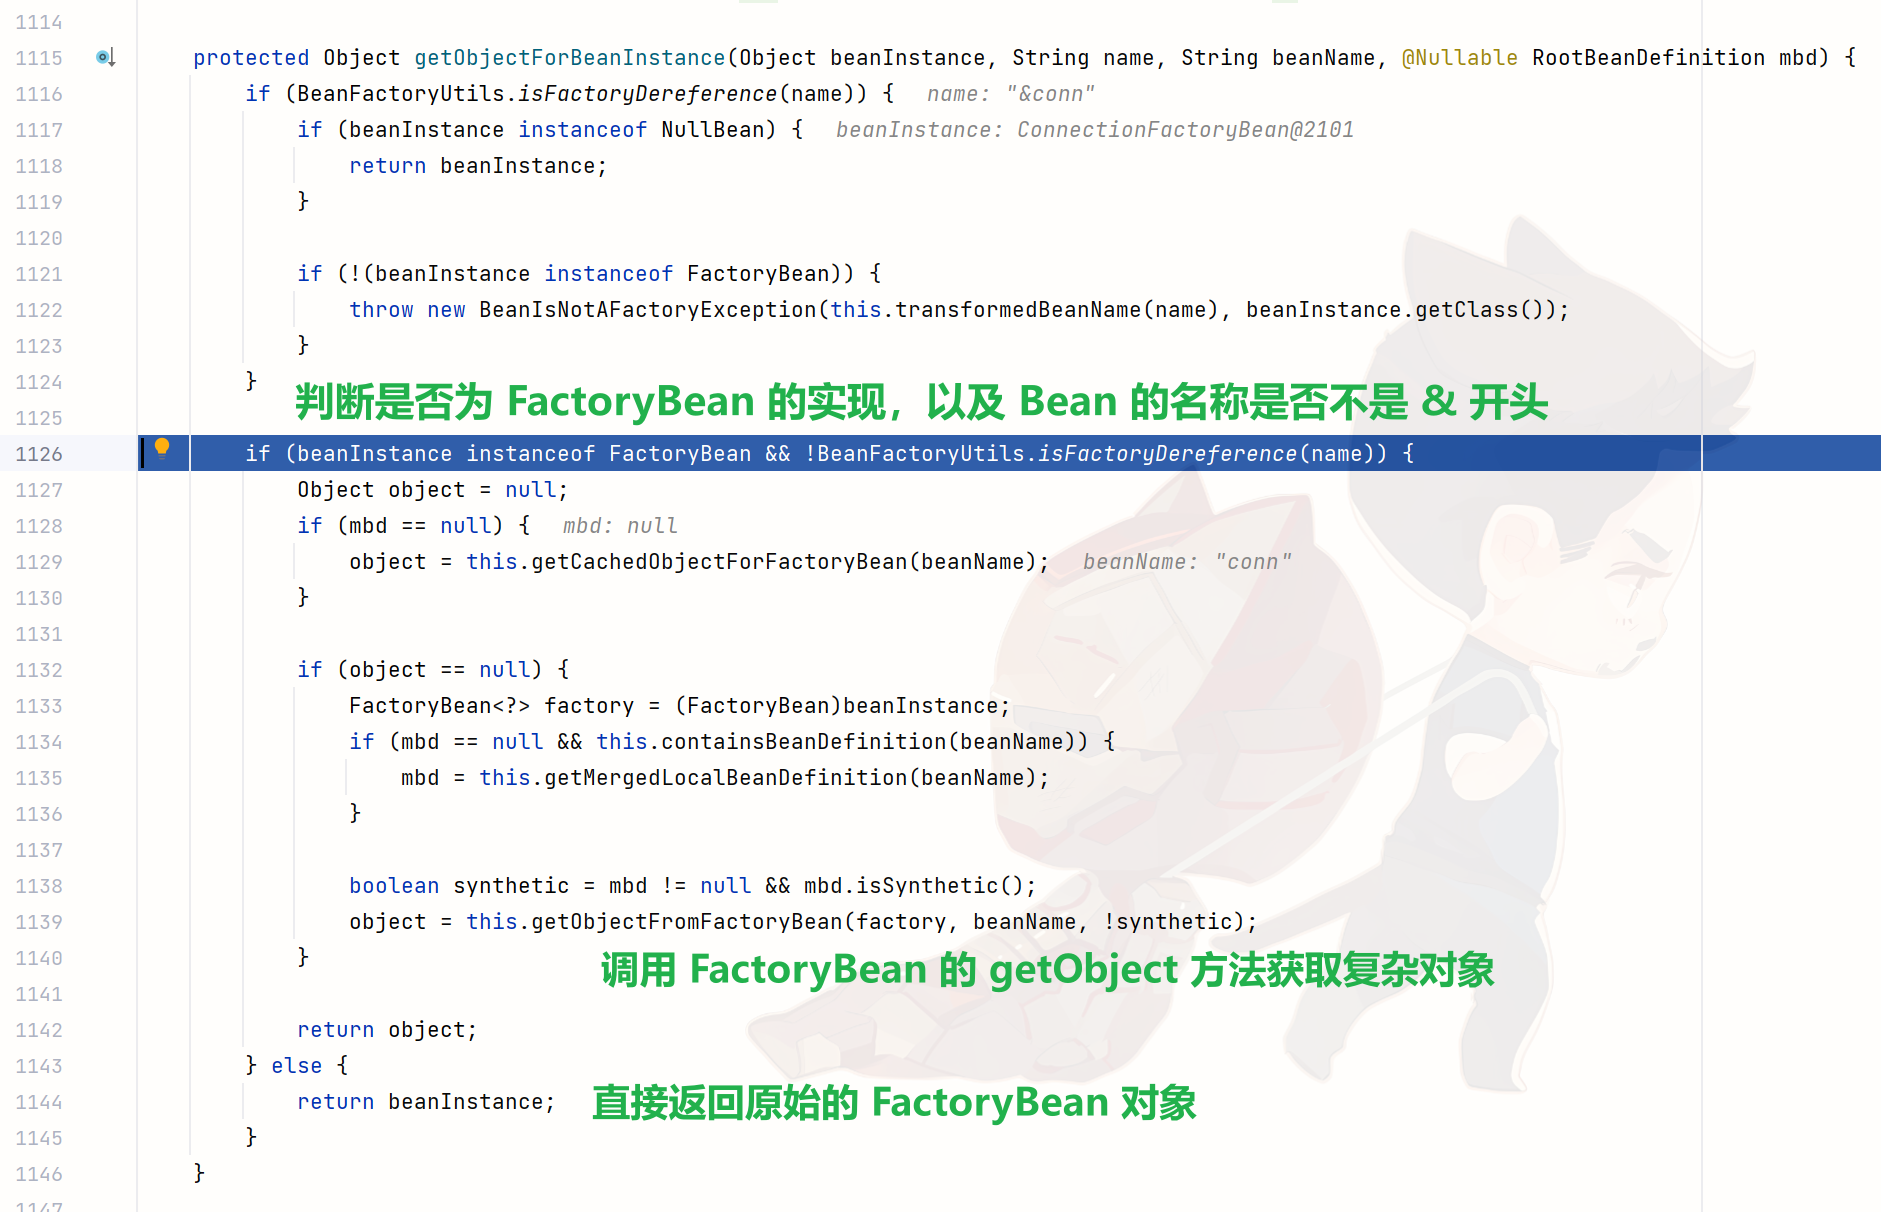
值得关注的是,当我们使用id值默认获得的是FactoryBean实现类的getObject方法返回的复杂对象,如果就是想要获得FactoryBean实现类本身的对象,需要在id值前面加一个&符号;并且我们在isSingleton方法中设置的true或false是针对getObject方法时返回共享实例还是新的实例对象,FactoryBean实现类本身不受影响!
FactoryBean的实现原理也很好理解,当我们通过conn获得ConnectionFactoryBean类的对象,进而通过instanceof运算符判断出是FactoryBean接口的实现类后,会继续判断Bean的名称是否以&符号开头,如果不是的话则调用FactoryBean的getObject方法获取复杂对象,否则直接返回原始的FactoryBean实现类。
虽然但是,这种使用Spring为我们预先提供的接口的办法适合于目前从零开发的项目,如果我们想要整合以前的项目创建复杂对象该如何处理呢,下面就看看Spring为我们提供的第二种注入复杂类型对象的方法:
1 2 3 4 5 6 7 8 9 10 11 12 13 14 15 16 17 18 19 20 21 22 23 24 25 26 27 28 29 30 31 32 33 34 35 public class ConnectionFactory { public Connection getConnection () { Connection connection = null ; try { Class.forName("com.mysql.cj.jdbc.Driver" ); connection = DriverManager.getConnection("jdbc:mysql://localhost:3306/mysql?serverTimezone=UTC&characterEncoding=utf8&useUnicode=true&useSSL=false&allowPublicKeyRetrieval=true" , "root" , "root" ); } catch (ClassNotFoundException e) { throw new RuntimeException (e); } catch (SQLException e) { throw new RuntimeException (e); } return connection; } } public class ConnectionFactoryStatic { public static Connection getConnection () { Connection connection = null ; try { Class.forName("com.mysql.cj.jdbc.Driver" ); connection = DriverManager.getConnection("jdbc:mysql://localhost:3306/mysql?serverTimezone=UTC&characterEncoding=utf8&useUnicode=true&useSSL=false&allowPublicKeyRetrieval=true" , "root" , "root" ); } catch (ClassNotFoundException e) { throw new RuntimeException (e); } catch (SQLException e) { throw new RuntimeException (e); } return connection; } }
为了使得原系统的创建复杂对象的方法能够与Spring整合,我们需要写下面的配置文件:
1 2 3 <bean id ="connFactory" class ="com.huling.basic.factoryBean.ConnectionFactory" /> <bean id ="conn1" factory-bean ="connFactory" factory-method ="getConnection" /> <bean id ="conn2" class ="com.huling.basic.factoryBean.ConnectionFactoryStatic" factory-method ="getConnection" />
测试程序如下:
1 2 3 4 5 6 7 8 9 10 11 12 @Test public void test7 () { ApplicationContext ctx = new ClassPathXmlApplicationContext ("/applicationContext.xml" ); System.out.println("======测试开始======" ); Connection conn1 = ctx.getBean("conn1" , Connection.class); System.out.println(conn1); Connection conn2 = ctx.getBean("conn2" , Connection.class); System.out.println(conn2); }
五、Bean创建次数 为什么需要控制Bean的创建次数呢,原因其实很好理解,是为了节省内存资源,提高资源的复用性,尤其是SqlSessionFactory这种重量级的资源,需要限制为共享单例。控制复杂类型对象的创建次数的方法我们前面已经说过了,就是设置isSingleton返回值,下面我们说一下怎么控制简单对象的创建次数(包括实例工厂和静态工厂也是同理):
1
2
3
4
5
6
7
8
9
10
11
12
13
14
15
16
17
public class Account { public Account () { System.out.println("Account构造函数" ); } } public class Account1 { public Account1 () { System.out.println("Account1构造函数" ); } } public class Account2 { public Account2 () { System.out.println("Account2构造函数" ); } }
上面是我们新编写的三个自定义类型,通过配置文件中bean标签中的的scope属性和lazy-init属性,我们可以控制Bean对象的创建次数以及创建时机(==单例Bean没有设置懒加载时加载完配置文件创建Spring工厂的同时就会立刻创建单例Bean,设置懒加载后需要时才会创建;原型Bean只有需要时才会创建==):
1 2 3 <bean id ="account" scope ="prototype" class ="com.huling.basic.scope.Account" /> <bean id ="account1" scope ="singleton" lazy-init ="true" class ="com.huling.basic.scope.Account1" /> <bean id ="account2" scope ="singleton" lazy-init ="false" class ="com.huling.basic.scope.Account2" />
测试程序如下:
1 2 3 4 5 6 7 8 9 10 11 12 13 14 @Test public void test8 () { ApplicationContext ctx = new ClassPathXmlApplicationContext ("/applicationContext.xml" ); System.out.println("======测试开始======" ); Account account_1 = ctx.getBean("account" , Account.class); System.out.println(account_1); Account account_2 = ctx.getBean("account" , Account.class); System.out.println(account_2); Account1 account1 = ctx.getBean("account1" , Account1.class); System.out.println(account1); }
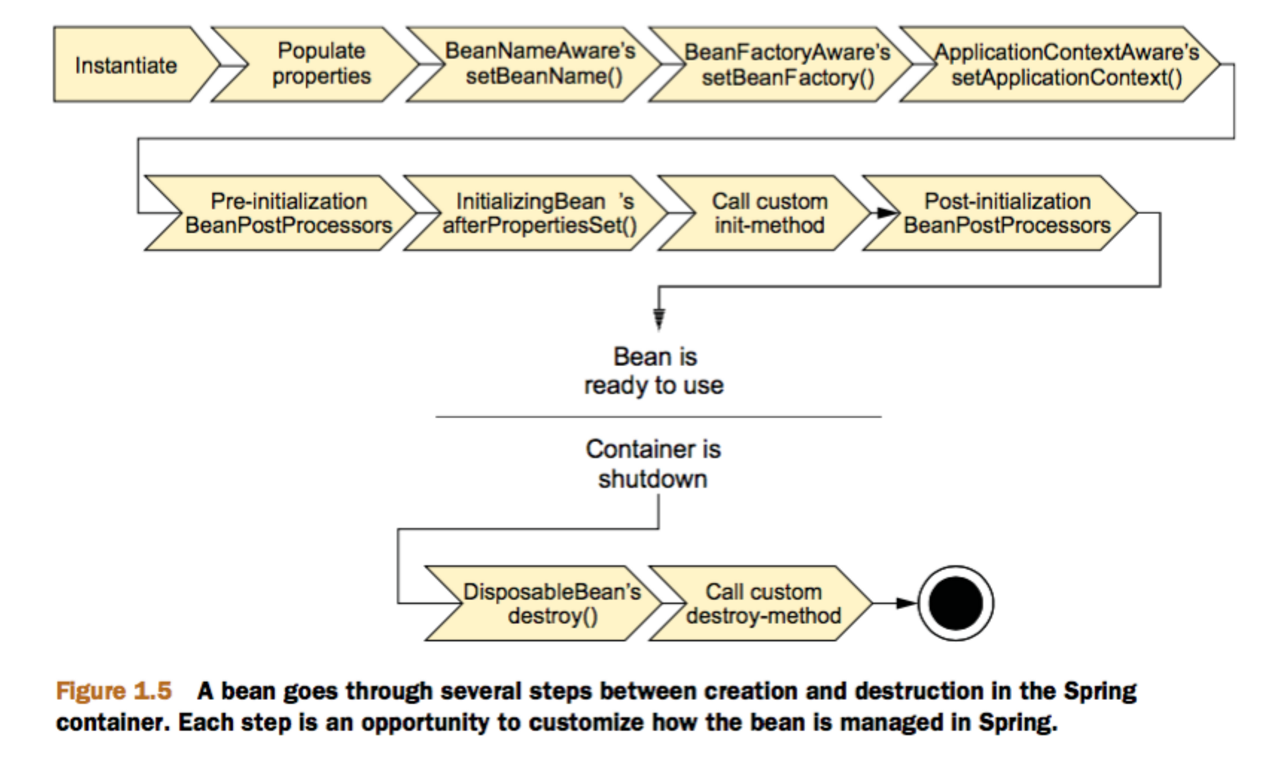
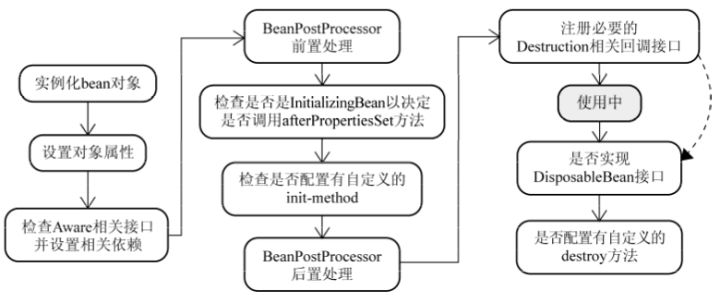
六、Bean生命周期
1.实例化阶段 先确保整个Bean对应的类以及被加载好了,以及类是public的,然后如果由工厂方法,则直接调用工厂方法创建整个Bean,如果没有的话就调用它的构造方法来创建这个Bean。
这里需要注意一下,在Spring的完整Bean创建和初始化流程中,容器会在调用createBeanInstance之前检查Bean定义的作用域。如果是Singleton,容器会在其内部单例缓存中查找现有实例。如果实例已存在,它将会重用;如果不存在,才会调用createBeanInstance来创建新的实例。
2.初始化阶段 2.1设置属性值 在设置属性值之前,还有一个重要的内容就是三级缓存解决循环依赖问题,详见hollis的文章:✅什么是Spring的三级缓存 (yuque.com)
设置属性值populateBean负责将属性值应用到新创建的实例Bean上,它处理了自动装配、属性注入、依赖检查等多个方面。
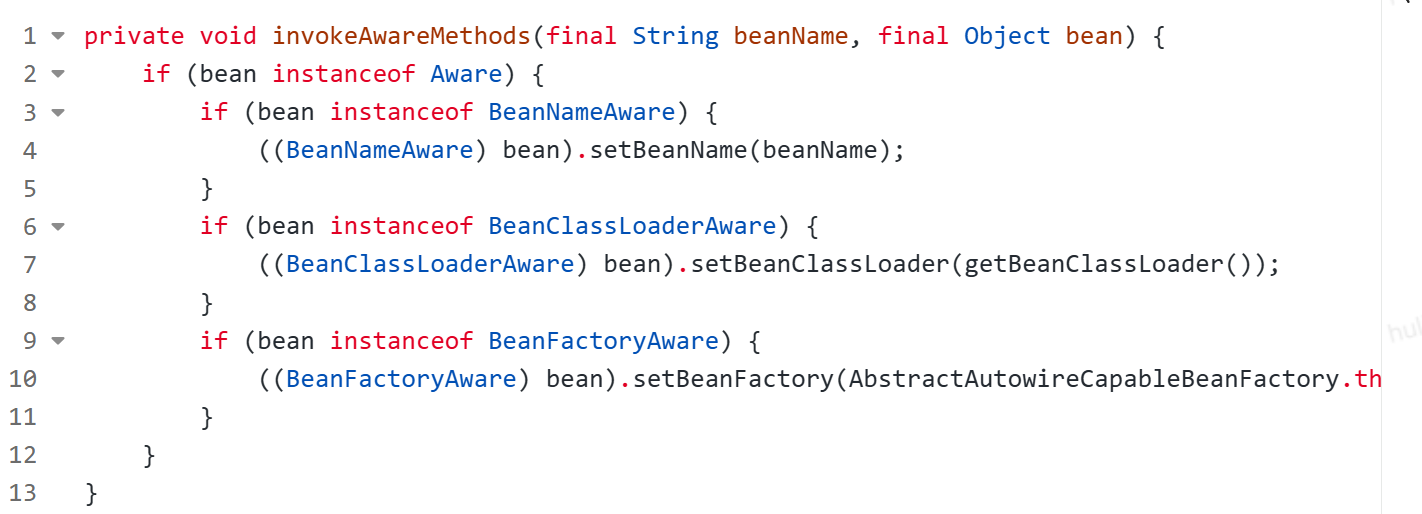
2.2检查Aware 这些Aware接口提供了一种机制,使得Bean可以与Spring框架的内部组件交互,从而更灵活地利用Spring框架提供的功能。
BeanNameAware:通过这个接口,Bean可以获取自己在Spring容器中的名字,这对于需要根据Bean的名称进行某些操作的场景很有用。
BeanClassLoaderAware:通过这个接口使得Bean能够访问加载它的类加载器,这在需要进行类加载操作时特别有用,例如动态记载类。
BeanFactoryAware:通过这个接口可以获取对BeanFactory的引用,获得对BeanFactory的访问权限。
2.3Bean后置处理器 Spring的BeanPostProcessor名称后置处理器,这是一个拓展机制,用于在Spring容器实例化、配置完成之后,在初始化前和初始化后,对Bean进行再加工的自定义处理。
1 2 3 4 5 6 7 8 9 10 11 12 13 14 15 16 17 18 public class MyPostProcessor implements BeanPostProcessor { @Override public Object postProcessBeforeInitialization (Object bean, String beanName) throws BeansException { if (bean instanceof MyObject3) { System.out.println("MyPostProcessor.postProcessBeforeInitialization" ); } return bean; } @Override public Object postProcessAfterInitialization (Object bean, String beanName) throws BeansException { if (bean instanceof MyObject3) { System.out.println("MyPostProcessor.postProcessAfterInitialization" ); } return bean; } }
postProcessBeforeInitialization
在Bean初始化之前调用,开发者可以通过该方法对Bean进行自定义处理,包括修改Bean的属性值、添加一些特殊处理等。此方法的第一个参数即本次创建的Bean对象,第二个参数即本次创建Bean的名字。需要注意处理完成后需要将Bean作为返回值返回,归还给Spring管理。
postProcessAfterInitialization
在Bean初始化之后调用,开发者可以通过该方法对Bean进行自定义处理,比如动态代理、AOP增强等。此方法的第一个参数即本次创建的Bean对象,第二个参数即本次创建Bean的名字。需要注意处理完成后需要将Bean作为返回值返回,归还给Spring管理。
配置文件增加下面一行:
1 <bean id ="myPostProcessor" class ="com.huling.basic.postprocess.MyPostProcessor" />
测试程序如下:
1 2 3 4 5 6 7 8 9 10 11 @Test public void test11 () { ClassPathXmlApplicationContext ctx = new ClassPathXmlApplicationContext ("/applicationContext.xml" ); System.out.println("======测试开始======" ); MyObject3 myObject3 = ctx.getBean("myObject3" , MyObject3.class); System.out.println(myObject3); ctx.close(); }
2.4InitializingBean 我们先来看Spring初始化Bean的相关方案,首先类似于复杂类型对象的注入需要FactoryBean接口,如果Bean想实现初始化操作,可以选择继承InitializingBean接口并实现afterPropertiesSet方法。
Spring框架充斥着《接口的契约性》的设计理念,程序员编写的类一旦继承并实现了Spring提供的接口,Spring就会遵守规矩的履行相关职责,我们后面还能多多体会这种设计。
1
2
3
4
5
6
7
8
9
10
public class MyObject implements InitializingBean { public MyObject () { System.out.println("MyObject构造方法" ); } @Override public void afterPropertiesSet () throws Exception { System.out.println("MyObject初始化" ); } }
当然,同样类似于之前说复杂类型对象的注入,我们可能有一些原先的系统需要跟现在的Spring整合,人家老系统的类代码里写好了初始化相关方法,于是为了无缝整合、不对原系统侵入式开发,Spring允许我们使用init-method属性指定对象的初始化方法,下面是原先系统类的示例:
1
2
3
4
5
6
7
8
9
public class MyObject1 { public MyObject1 () { System.out.println("MyObject1构造方法" ); } public void myInit () { System.out.println("MyObject1初始化" ); } }
配置文件的内容如下:
1 2 <bean id ="myObject" class ="com.huling.basic.life.MyObject" /> <bean id ="myObject1" class ="com.huling.basic.life.MyObject1" init-method ="myInit" />
我们也可以同时使用上面说的两种初始化方案:
1
2
3
4
5
6
7
8
9
10
11
12
13
14
15
16
17
18
19
20
21
22
23
24
25
public class MyObject2 implements InitializingBean { private String name; public String getName () { return name; } public void setName (String name) { System.out.println("MyObject2.setName" ); this .name = name; } public MyObject2 () { System.out.println("MyObject2构造方法" ); } @Override public void afterPropertiesSet () { System.out.println("MyObject2.afterPropertiesSet" ); } public void myInit () { System.out.println("MyObject2.myInit" ); } }
配置文件的内容如下:
1 2 3 4 5 <bean id ="myObject" class ="com.huling.basic.life.MyObject" /> <bean id ="myObject1" class ="com.huling.basic.life.MyObject1" init-method ="myInit" /> <bean id ="myObject2" class ="com.huling.basic.life.MyObject2" init-method ="myInit" > <property name ="name" value ="huling" /> </bean >
测试程序如下:
1 2 3 4 5 6 7 8 9 10 11 12 13 14 @Test public void test9 () { ApplicationContext ctx = new ClassPathXmlApplicationContext ("/applicationContext.xml" ); System.out.println("======测试开始======" ); MyObject myObject = ctx.getBean("myObject" , MyObject.class); System.out.println(myObject); MyObject1 myObject1 = ctx.getBean("myObject1" , MyObject1.class); System.out.println(myObject1); MyObject2 myObject2 = ctx.getBean("myObject2" , MyObject2.class); System.out.println(myObject2); }
2.5自定义init方法 3.销毁阶段 于初始化方案类似,Bean的销毁也有两种方案,即实现DisposableBean接口或者利用destroy-method属性指定对象的销毁方法:
1
2
3
4
5
6
7
8
9
10
11
12
13
14
15
16
17
18
19
20
21
22
23
24
25
26
27
28
29
30
31
32
33
34
public class MyObject3 implements InitializingBean , DisposableBean { private String name; public String getName () { return name; } public void setName (String name) { System.out.println("MyObject3.setName" ); this .name = name; } public MyObject3 () { System.out.println("MyObject3构造方法" ); } @Override public void afterPropertiesSet () { System.out.println("MyObject3.afterPropertiesSet" ); } public void myInit () { System.out.println("MyObject3.myInit" ); } @Override public void destroy () throws Exception { System.out.println("MyObject3.destroy" ); } public void myDestroy () { System.out.println("MyObject3.myDestroy" ); } }
配置文件的内容如下:
1 2 3 4 5 6 7 8 <bean id ="myObject" class ="com.huling.basic.life.MyObject" /> <bean id ="myObject1" class ="com.huling.basic.life.MyObject1" init-method ="myInit" /> <bean id ="myObject2" class ="com.huling.basic.life.MyObject2" init-method ="myInit" > <property name ="name" value ="huling" /> </bean > <bean id ="myObject3" class ="com.huling.basic.life.MyObject3" init-method ="myInit" destroy-method ="myDestroy" > <property name ="name" value ="huling" /> </bean >
测试程序如下:
1 2 3 4 5 6 7 8 9 10 11 @Test public void test10 () { ClassPathXmlApplicationContext ctx = new ClassPathXmlApplicationContext ("/applicationContext.xml" ); System.out.println("======测试开始======" ); MyObject3 myObject3 = ctx.getBean("myObject3" , MyObject3.class); System.out.println(myObject3); ctx.close(); }
七、Spring配置文件参数化 烦恼的参数修改
随着我们Spring项目的规模越来越大,项目中的Bean越来越多,我们的配置文件applicationContext.xml也变得越来越大,其中有一些可能需要我们经常修改的字符串信息例如数据库连接的相关信息,例如开发人员使用开发环境的数据库,运维人员部署上线需要修改为生产环境的数据库,此时运维人员便需要到这样一个总的大配置文件中找到数据库连接信息并修改,这是存在一定风险的,可能会误改其他的信息,因此有必要进行热冷分离(自创的词汇,即热点修改数据与基本不变的冷数据分离保存)!
我们可以以数据库连接相关的参数为代表,把Spring配置⽂件中需要经常修改的字符串信息,转移到⼀个更⼩的配置⽂件中如db.properties,更有利于维护、修改。
参数的文件抽离 首先,在resources目录下创建db.properties配置文件:
1
2
3
4
jdbc.driverClassName = com.mysql.cj.jdbc.Driver jdbc.url = jdbc:mysql://localhost:3306/mysql?serverTimezone=UTC&characterEncoding=utf8&useUnicode=true&useSSL=false&allowPublicKeyRetrieval=true jdbc.username = root jdbc.password = root
接着,修改Spring的配置文件applicationContext.xml:
1
2
3
4
5
6
7
8
9
10
11
12
13
14
15
<?xml version="1.0" encoding="UTF-8" ?> <beans xmlns ="http://www.springframework.org/schema/beans" xmlns:xsi ="http://www.w3.org/2001/XMLSchema-instance" xmlns:context ="http://www.springframework.org/schema/context" xsi:schemaLocation ="http://www.springframework.org/schema/beans http://www.springframework.org/schema/beans/spring-beans.xsd http://www.springframework.org/schema/util http://www.springframework.org/schema/util/spring-util.xsd http://www.springframework.org/schema/context http://www.springframework.org/schema/context/spring-context.xsd" > <context:property-placeholder location ="classpath:/db.properties" /> <bean id ="conn" class ="com.huling.basic.factoryBean.ConnectionFactoryBean" > <property name ="driverClassName" value ="${jdbc.driverClassName}" /> <property name ="url" value ="${jdbc.url}" /> <property name ="username" value ="${jdbc.username}" /> <property name ="password" value ="${jdbc.password}" /> </bean > </beans >
八、自定义类型转换器 我们先编写一个Student类引出我们的话题:
1
2
3
4
5
6
7
8
9
10
11
12
13
14
15
16
17
18
19
20
public class Student { private Integer id; private Date birthday; public Integer getId () { return id; } public void setId (Integer id) { this .id = id; } public Date getBirthday () { return birthday; } public void setBirthday (Date birthday) { this .birthday = birthday; } }
上面这个类有两个成员变量:Integer类型的id和Date类型的birthday,以往我们注册bean标签并通过Setter注入的方式完成变量赋值,类似于下面:
1 2 3 4 <bean id ="student" class ="com.huling.basic.converter.Student" > <property name ="id" value ="1" /> <property name ="birthday" value ="2020-03-01" /> </bean >
Spring通过类型转换器会把配置⽂件中字符串类型的数据,转换成了对象中成员变量对应类型的数据,进⽽完成了注⼊。但是很不幸,Spring默认支持的日期字符串解析格式是yyyy/MM/dd,不太符合我们的使用习惯,因此我们需要自己自定义类型转换器并注册到Spring中(如果自定义了日期类型转换器,那么由框架提供的转换器就会失效!):
1
2
3
4
5
6
7
8
9
10
11
12
13
14
15
16
17
18
19
20
21
22
23
24
25
public class MyDateConverter implements Converter <String, Date> { private String pattern; private static SimpleDateFormat sdf = new SimpleDateFormat (); public String getPattern () { return pattern; } public void setPattern (String pattern) { this .pattern = pattern; } @Override public Date convert (String s) { sdf.applyPattern(pattern); Date date = null ; try { date = sdf.parse(s); } catch (ParseException e) { throw new RuntimeException (e); } return date; } }
通过继承并实现Converter<From,To>接口,convert方法完成字符串类型到日期类型的转换,MyDateConverter中把日期格式字符串作为成员变量pattern,有利于灵活调整我们想要的日期格式。
配置文件的内容如下:
1
2
3
4
5
6
7
8
9
10
11
12
13
14
15
16
17
18
19
20
21
22
23
24
<?xml version="1.0" encoding="UTF-8" ?> <beans xmlns ="http://www.springframework.org/schema/beans" xmlns:xsi ="http://www.w3.org/2001/XMLSchema-instance" xsi:schemaLocation ="http://www.springframework.org/schema/beans http://www.springframework.org/schema/beans/spring-beans.xsd http://www.springframework.org/schema/util http://www.springframework.org/schema/util/spring-util.xsd http://www.springframework.org/schema/context http://www.springframework.org/schema/context/spring-context.xsd" > <bean id ="myDateConvert" class ="com.huling.basic.converter.MyDateConverter" > <property name ="pattern" value ="yyyy-MM-dd" /> </bean > <bean id ="conversionService" class ="org.springframework.context.support.ConversionServiceFactoryBean" > <property name ="converters" > <set > <ref bean ="myDateConvert" /> </set > </property > </bean > <bean id ="student" class ="com.huling.basic.converter.Student" > <property name ="id" value ="1" /> <property name ="birthday" value ="2020-03-01" /> </bean > </beans >
ConversionSeviceFactoryBean定义的id属性值必须为conversionService,这是Spring框架的规定,我们需要遵守。
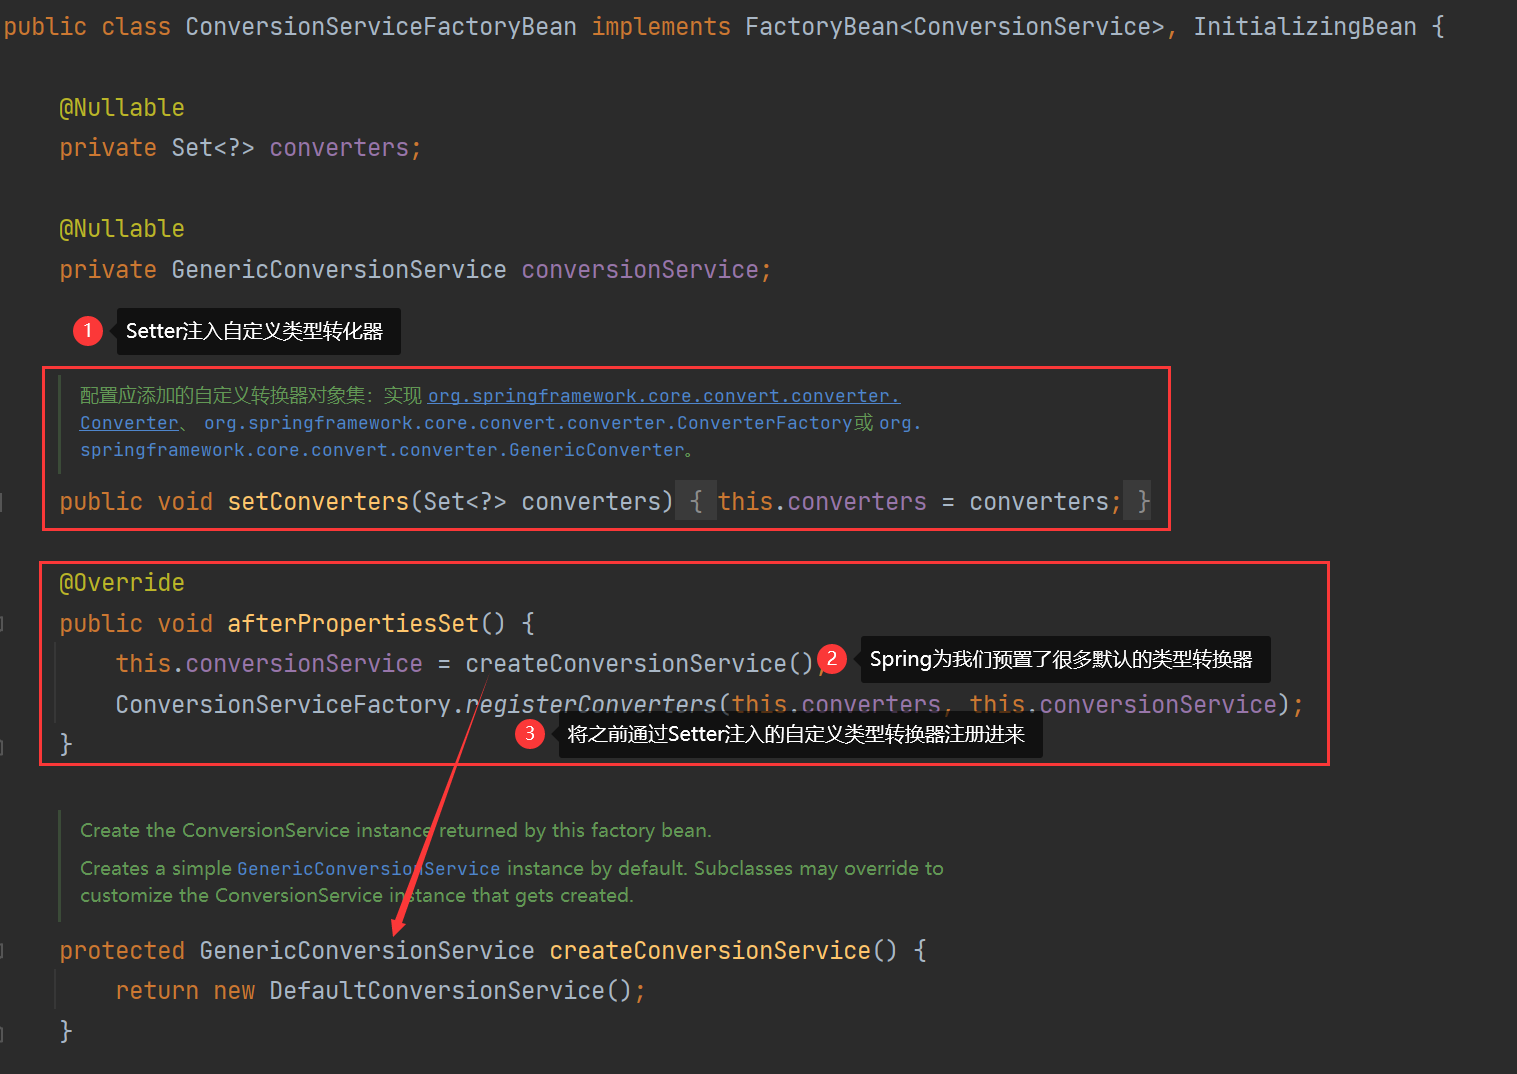
自定义类型转换器的原理也很好理解,看看ConversionSeviceFactoryBean类的源码:
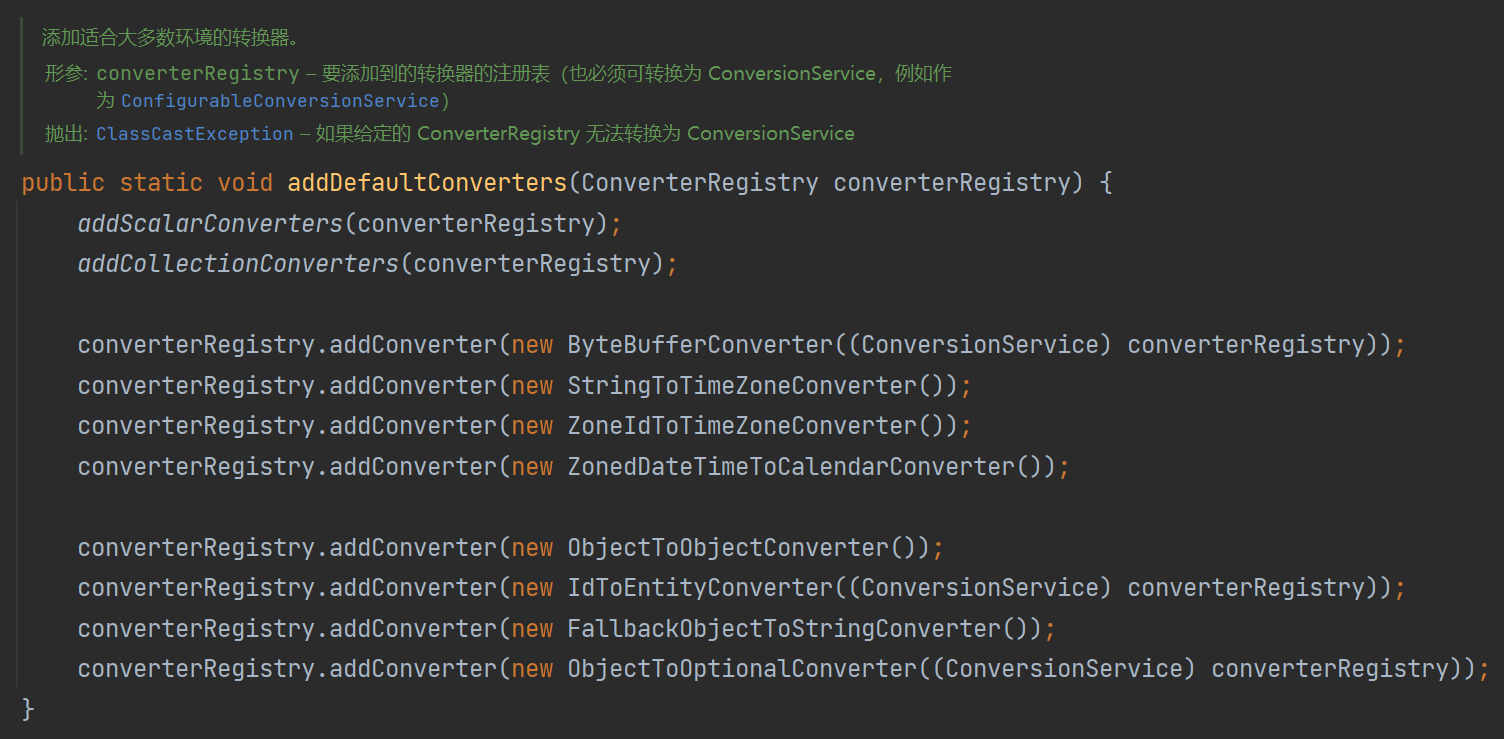
我们可以通过Setter注入的方式(针对converters成员变量)添加自定义类型转换器,并且其实Spring也为我们预置了很多默认的类型转换器,大部分场合下都不需要我们额外自定义:

