Servlet开发的调试 启动Tomcat无非就是设置好classpath并执行Tomcat某个jar包的main()方法,我们完全可以把Tomcat的jar包全部引入进来,然后自己编写一个main()方法,先启动Tomcat,然后让它加载我们的webapp就行。
我们新建一个web-servlet-embedded工程,编写pom.xml如下:
1
2
3
4
5
6
7
8
9
10
11
12
13
14
15
16
17
18
19
20
21
22
23
24
25
26
27
28
29
30
31
32
33
34
35
36
<?xml version="1.0" encoding="UTF-8" ?> <project xmlns ="http://maven.apache.org/POM/4.0.0" xmlns:xsi ="http://www.w3.org/2001/XMLSchema-instance" xsi:schemaLocation ="http://maven.apache.org/POM/4.0.0 http://maven.apache.org/xsd/maven-4.0.0.xsd" > <modelVersion > 4.0.0</modelVersion > <groupId > org.example</groupId > <artifactId > servletEmbedded</artifactId > <version > 1.0</version > <packaging > war</packaging > <properties > <tomcat.version > 10.1.13</tomcat.version > <java.version > 11</java.version > <maven.compiler.source > 11</maven.compiler.source > <maven.compiler.target > 11</maven.compiler.target > <project.reporting.outputEncoding > UTF-8</project.reporting.outputEncoding > <project.build.sourceEncoding > UTF-8</project.build.sourceEncoding > </properties > <dependencies > <dependency > <groupId > org.apache.tomcat.embed</groupId > <artifactId > tomcat-embed-core</artifactId > <version > ${tomcat.version}</version > <scope > provided</scope > </dependency > <dependency > <groupId > org.apache.tomcat.embed</groupId > <artifactId > tomcat-embed-jasper</artifactId > <version > ${tomcat.version}</version > <scope > provided</scope > </dependency > </dependencies > </project >
其中,<packaging>类型仍然为war,引入依赖tomcat-embed-core和tomcat-embed-jasper,引入的Tomcat版本<tomcat.version>为10.1.13。不必引入Servlet API,因为引入Tomcat依赖后自动引入了Servlet API。因此,我们可以正常编写Servlet如下:
1
2
3
4
5
6
7
8
9
10
11
12
13
@WebServlet(urlPatterns = "/") public class HelloServlet extends HttpServlet { protected void doGet (HttpServletRequest req, HttpServletResponse resp) throws ServletException, IOException { resp.setContentType("text/html" ); String name = req.getParameter("name" ); if (name == null ) { name = "world" ; } PrintWriter pw = resp.getWriter(); pw.write("<h1>Hello, " + name + "!</h1>" ); pw.flush(); } }
然后,我们编写一个main()方法,启动Tomcat服务器:
1
2
3
4
5
6
7
8
9
10
11
12
13
14
15
16
public class Main { public static void main (String[] args) throws Exception { Tomcat tomcat = new Tomcat (); tomcat.setPort(Integer.getInteger("port" , 8080 )); tomcat.getConnector(); Context ctx = tomcat.addWebapp("" , new File ("src/main/webapp" ).getAbsolutePath()); WebResourceRoot resources = new StandardRoot (ctx); resources.addPreResources( new DirResourceSet (resources, "/WEB-INF/classes" , new File ("target/classes" ).getAbsolutePath(), "/" )); ctx.setResources(resources); tomcat.start(); tomcat.getServer().await(); } }
这样,我们直接运行main()方法,即可启动嵌入式Tomcat服务器,然后,通过预设的tomcat.addWebapp("", new File("src/main/webapp"),Tomcat会自动加载当前工程作为根webapp。通过main()方法启动Tomcat服务器并加载我们自己的webapp有如下好处:
启动简单,无需下载Tomcat或安装任何IDE插件;
调试方便,可在IDE中使用断点调试;
使用Maven创建war包后,也可以正常部署到独立的Tomcat服务器中。
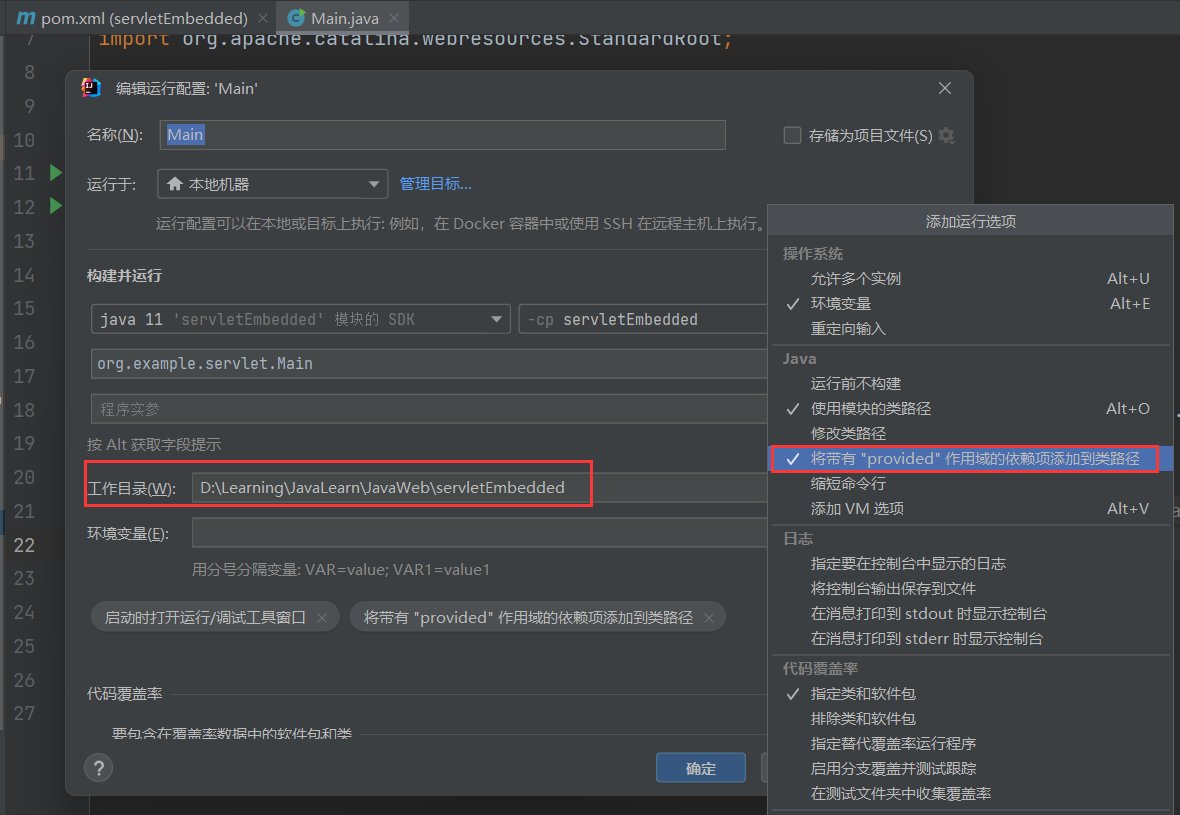
IDEA中实现上述效果需要注意两点,首先工作目录一定选择正确为项目根目录,其次运行选项中勾选”将带有”provided”作用域的依赖项添加到类路径”
